Summer

Berry and Buttermilk Scones // Serious Crust

Berry and Buttermilk Scones

Berry and Buttermilk Scones // Serious Crust

Berry and Buttermilk Scones // Serious Crust

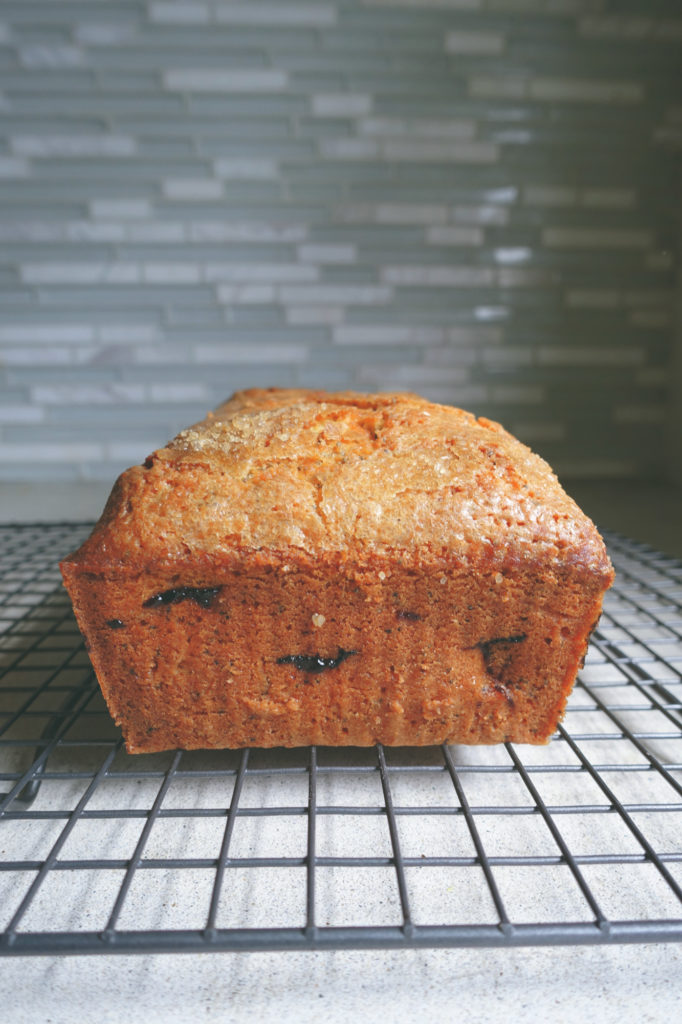
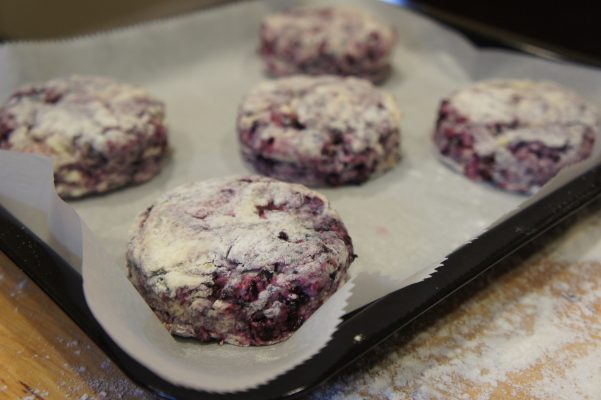
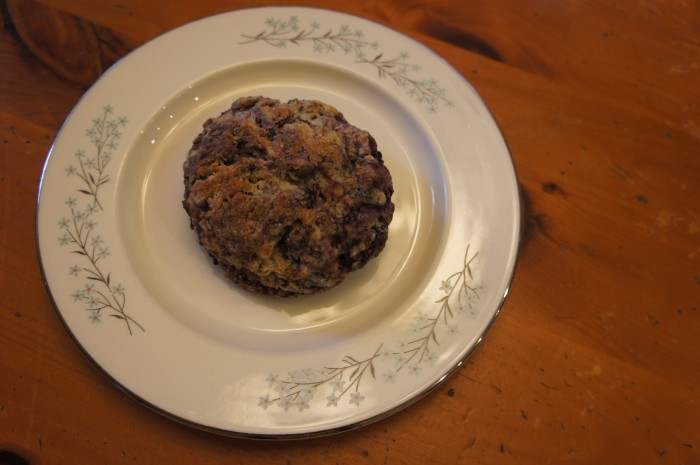
Tis the berry season. I feel like everywhere I go, I’m seeing piles of raspberries, blackberries, even some late season strawberries. I baked these scones about a month ago, but I haven’t quite had time to post it. The time is now! Amongst all the food my mom sent home with us from the beach, were a pint of marionberries and some buttermilk.

The weekend we came home, we had a three hour band practice, and I knew I was going to need some sustenance. And who can resist warm, freshly baked, delicious scones? No one. So I whipped some up in the morning, and brought them to band practice.

I feel like my bandmates are still not used to my bringing baked goods. When I bring them, they’re there to share. Why would I bring a basked of a dozen scones all for myself? I wouldn’t. With a little nudging, I finally got the guys to snack on some. They were still warm, and smelled like sugar and berries. They were really delicious. I only wish I’d had some lemon curd to slather on them.

Berry and Buttermilk Scones

Ingredients

3/4 – 1 cup fresh berries (I used marionberry, but raspberry or blackberry would work well too)
4 3/4 cups flour
1 Tbl baking powder
3/4 tsp baking soda
1/2 cup granulated sugar
1 1/4 tsp salt
1 tsp lemon zest
1 cup plus 1 Tbl cold, unsalted butter, cut into chunks.
1 1/2 cups buttermilk
3 tablespoons melted butter
brown or turbinado sugar for sprinkling

Instructions

Preheat your oven to 400 degrees F. Line a baking sheet with parchment paper. In a large mixing bowl, whisk together the flour, baking powder and baking soda. Mix in the sugar, salt, and lemon zest. Using a pastry knife or a fork, cut the butter into the dry ingredients. You want the butter to be evenly mixed into the dry ingredients, in about pea-sized chunks.

Add the buttermilk and the berries, and mix the dough gently with a wooden spoon until it holds together well. If it seems a little dry, add a little more buttermilk to the dough, a couple tablespoons at a time. Flour a cutting board or countertop, and turn the dough out onto it. Pat the dough into a rectangle about an inch and a half thick. Using a circular cookie cutter (or a water glass, if you don’t have a cutter), cut out as many circles as you can, gather together the scraps, pat them out, and repeat. Place on the lined pan, brush with melted butter, and sprinkle with sugar (brown or turbinado).

Bake scones for 20-35 minutes, until the tops are golden brown at the edges. Transfer to a cooling rack, and allow to cool for a few minutes until they’re nice and warm, but won’t scald your mouth. Serve with butter, lemon curd, jam, or any other toppings you like.

Mariam's Salad Rolls // Serious Crust

Mariam’s Salad Rolls

Mariam's Salad Rolls // Serious Crust

Mariam's Salad Rolls // Serious Crust

It was 100 degrees in Portland yesterday. The sun was not beating down, no. It was a cloudy, muggy day (by Pacific Northwest standards). And so when the time came to cook dinner, the thought of turning on any heating device just felt wrong. So I went to the store and picked up some fresh, crunchy, fruity, flavor packed ingredients to make salad rolls.

I had seen a recipe for salad rolls using lentils, but I didn’t really have time to cook them, so I thought I’d use another flavor of Mariam’s lentil dips (which I’ve written about before here). I went with the curry and green lentil flavor, thinking it would go nicely with the kind of Asian flavor. I’m not sure a few of these rolls would have made enough for dinner without the lentils – they’re packed with protein, and they made the rolls much more filling. They were delicious!

You can fill these rolls with whatever you’d like, really. You can slice up some tofu and put it in raw or cooked. You can grill some shrimp. You can add some vermicelli noodles, bean sprouts, red onions, or even shiitake mushrooms. The possibilities are endless!

Mariam’s Salad Rolls

Note: If Mariam’s lentil dip isn’t available where you are, feel free to substitute with some cooked green lentils, tossed with a little sesame oil, soy sauce, sriracha, salt, etc. Or see above for other recommendations.

Ingredients

½ cucumber, thinly sliced
2 carrots, thinly sliced
1 large ripe mango (or 2 small ripe mangos), thinly sliced
1 ripe avocado, thinly sliced
Cilantro, picked from stems
Mariam’s Curry and Green Lentil Dip
Spring roll wrappers (available in the Asian section of most grocery stores)
Sweet chili sauce for dipping

Instructions

Arrange all of your ingredients in bowls or on plates, so that they are easily accessible. Set out a large bowl of room temperature water, and a damp dishtowel. Follow the instructions on the spring roll wrapper package to prepare, or if they don’t have instructions, prepare like this: soak in room temperature water for 15 seconds, until the wrappers have almost no crinkle left, and spread on a damp dish towel. Arrange a few slices of cucumber, carrot, mango, avocado, a few leaves of cilantro, and a few dollops of Mariam’s Curry and Green Lentil Dip down the center of the wrapper, leaving about an inch on either end. Fold in the short ends over the ingredients, fold the bottom half of the wrapper up over the ingredients, and roll up the rest of the way. Enjoy dipped in sweet chili sauce or other dipping sauces.

This is a sponsored post. All of the opinions below are my own.

Grilled Romaine Hearts (with a 9-minute egg) // Serious Crust

Grilled Romaine Salad (with 9 minute eggs)

Grilled Romaine Hearts (with a 9-minute egg) // Serious Crust

Moms are cute. My mom especially, is very cute. I’ve told you about her, right? Last weekend Jonah and I went out to Cannon Beach with my mom and her boyfriend and my baby sister and my sister’s girlfriend, and we had a lovely weekend, and then my mom proceeded to send us home with two boxes of food. (Because she’s a mom and that’s what moms do, they give you food.) She tried to give us much more. She was going through the kitchen saying things like “Do you want some cream cheese?” (No.) “How about some romaine hearts?” (Yes.)

We got home around 8:30pm on Saturday, and all I wanted was food. And we had food. Lots of it. Thanks, Mom. I’ve had grilled romaine hearts at restaurants, and figured it can’t be that hard to make, can it? You guys, it was so good. Why have I been waiting this long to grill romaine hearts? It was super easy. The grilling softened and warmed the romaine, but retained some of that famous crunch. The eggs were perfectly cooked, if I do say so myself, the dressing was salty and tangy, and the breadcrumbs brought a great crispiness.

Grilled Romaine Salad

Ingredients

Romaine Salad

1 romaine heart per person
1-2 9-minute eggs per person (details below)
toasted bread crumbs to garnish

Dressing

2 tsp soy sauce
1 tsp fish sauce (optional)
1 Tbl balsamic vinegar
1 Tbl sesame oil
1 Tbl olive oil

Instructions

Romaine Salad

Heat your grill. Slice the romaine hearts in half lengthwise. Brush with oil. Grill until slightly charred and wilted, flipping, and repeating on the other side.

To make 9 minute eggs, bring a small pot of water with a sprinkling of baking soda to a boil. Lower in as many eggs as you are making using a spoon, slotted or otherwise. Boil for 9 minutes, drain, and rinse in cold water to cool. (As far as the eggs to, I have come to rely on this article/image from Bon Appetit as a guide for how long I should cook my eggs.)

Dressing

Make the dressing by combining the ingredients in a jar and shaking until thoroughly combined.

To serve, drizzle the dressing over the romaine hearts, top with sliced 9-minute eggs, and a heavy sprinkling of breadcrumbs. Enjoy.

Summer Vegetable Tacos with Mariam Foods Lentil Dip // Serious Crust

Summer Vegetable Tacos

Summer Vegetable Tacos with Mariam Foods Lentil Dip // Serious Crust

I love tacos. I really do. They’re easy to throw together. You can eat one for a snack or three for dinner (or four or five). You can put whatever you want in them, which I think is pretty great. You can make almost a variation from almost any cuisine. When my friend Elaine, who does marketing here in Portland, asked me to do some recipe development for her client Mariam Foods, my first idea was: summer vegetable tacos.

Mariam Foods makes these delicious lentil dips. I know what you’re thinking, because I thought it too. At first mention, lentil dip sounds anything but delicious. I am an adventurous eater, by no means picky, but I do not like lentils. Or didn’t, I suppose. I tend to not really like their texture, and while I know they’re great for protein and budget cooking, I can’t get myself to use them. But Elaine invited me over to taste Mariam’s lentil dips, and I was pleasantly surprised. They are similar to the consistency of refried beans, with maybe the occasional whole lentil. And the flavors she was asking me to use, black lentil with jalapeño and black lentil and curry, were really nicely flavored. I started to get excited about the ways I could play with these flavors. While the dips are Ethiopian inspired, I knew I could sneak these dips into other cuisines.

I decided to start with tacos using the most scrumptious of summer produce: zucchini, tomatoes, and corn. Toss them with some Mexican inspired spices and roast them. While they were in the oven, I decided to whip up a cilantro-sour cream with lime. Then, to assemble the tacos, I started with a spoonful of the lentil dip smeared down the center of my tortilla, topped with warm vegetables, topped with the cilantro-sour cream, and another squeeze of lime for good measure. These tacos were so delicious, and really easy to make, and they made truly awesome leftovers. I ate them at least twice more throughout the week.

A little bird also told me that Mariam Foods has two new flavors coming out early this fall: brown lentil and sesame (with garlic and ginger) and brown lentil and sriracha. I know Jonah will love the sriracha, but I’m really excited about the sesame flavor! Mariam lentil dips were created by the Andemariam family, inspired by Afiza, a lentil salad that their Ethiopian and Eritrean grandmothers used to make. They source their ingredients as locally as possible, which I like. The dips can be found at various New Seasons, Whole Foods, and other markets and co-ops in the greater Portland area.

Summer Vegetable Tacos

Ingredients

Roasted Vegetables

2 ears corn, kernels sliced from the cob
2 small zucchini, diced into ½ inch pieces
1 cup grape tomatoes, sliced in half
½ medium-sized red onion, diced
1 red bell pepper, diced
2-3 tablespoons olive oil
½ teaspoons salt
1 ½ teaspoons ground cumin
2 garlic cloves, minced

Cilantro Cream

1 cup sour cream
¼ – 1/4 cup chopped cilantro
juice of ½ lime

Taco Assembly

Mariam Black Lentil and Jalapeño Dip
Small tortillas (corn or flour)
Optional: grated cheddar cheese, queso fresco, salsa, additional cilantro, lime wedges

Instructions

Roasted Vegetables

Preheat your oven to 400 degrees F. In a large mixing bowl, combine the corn, zucchini, grape tomatoes, red onion, bell pepper, olive oil, salt, cumin, and garlic. Toss until all of the vegetables are evenly coated with the spices and oil. Line a rimmed baking sheet with parchment paper or a silpat. Spread vegetables on the baking sheet, and roast for 20 minutes. Toss, and roast for another 15-20 minutes, until the vegetables are soft and starting to brown.

Cilantro Cream

While the vegetables are in the oven, make the cilantro cream. Combine sour cream, cilantro, and lime juice in a bowl, stir well. Feel free to add more cilantro, lime juice, salt, or pepper to your taste.

Taco Assembly

To assemble the tacos, spread a spoonful of Mariam’s Black Lentil and Jalapeño Dip down the center of a tortilla. Top with roasted vegetables, and a dollop of cilantro cream. Enjoy!

This is a sponsored post. All of the opinions below are my own.

Chocolate Banana Bread // Serious Crust

Chocolate Banana Bread

Chocolate Banana Bread // Serious Crust

Let’s talk about the beauty of roommates. After living with just Jonah in a studio apartment, we have been lucky enough to find the greatest housing situation either of us have ever really had. We live with two other couples, all of whom are friends from college. Six people may seem like a lot, but when it’s three couples, it’s really not that many. Each couple has our own bathroom (score!), and while the kitchen is small, we’ve almost never had everyone trying to cook at once.

The other fantastic thing about roommates is that they eat things. My roommates are wonderful about sharing food. Sure, borrow a banana. Let’s all make brunch, I have potatoes, you have bell peppers, frittata sounds great. One of the things that always used to stress me out about baking for this blog is that I always have all these sweets to pawn off on other people. Living with five other people means that I don’t have to look too far for someone to eat the rest of those cookies, or give me their opinion of this bread. And when I say things like, “I really feel like baking. Should I bake something?” their answer is usually, “Is that even a question that people ask?”

Jonah was away traveling the world, as he is wont to do, and I was home, wanting to bake. There were many contributing factors to my making a very slight variation on this chocolate banana bread from Pastry Affair. First, it had been a little cool out, and I wanted something less summery, a little chocolate, and cozy. Second, there was a can on the back of my pantry shelf, hidden from view, of cocoa nibs that I hadn’t used in a very long time. Third, we had some awfully ripe bananas. So this bread seemed like the perfect choice.

I like that this bread is chocolatey without being too sweet. I like the crunch of the cocoa nibs, almost like adding walnuts (which you could totally do also). I like that the banana isn’t overpowering at all. I like this bread.

Chocolate Banana Bread

Makes 1 loaf

Note: If cocoa nibs are not your thing, or you don’t happen to have them sitting around like I do, feel free to substitute some chopped walnuts or pecans. Alternatively, if you’d like your bread to be a little more dessert-like, feel free to use chocolate chips.

Ingredients

1 cup all-purpose flour
1/2 cup whole wheat flour
1/2 cup cocoa powder
1 tsp baking soda
1 tsp baking powder
1/2 tsp salt
3/4 tsp cinnamon
1/2 cup (1 stick) butter, room temperature
3/4 cup packed brown sugar
2 eggs
1 tsp vanilla extract
3 ripe bananas, mashed
1/2 cup milk
1/2 cup cacao nibs

Instructions

Preheat your oven to 350 degrees and butter a loaf pan. In a medium bowl, sift together the flours, cocoa powder, baking soda and powder, salt, and cinnamon. Stir to combine and set aside.

Using an electric mixer, cream together the butter and sugar. Add the eggs, mixing after each addition, then the vanilla extract and bananas. Mix until thoroughly combined. Add the flour mixture and mix again – no pockets of flour or clumps of cocoa powder here! Add the milk, mix, and the cocoa nibs, and mix again.

Pour the batter into the greased pan. If you’d like to sprinkle a few additional cocoa nibs on top, go for it. Bake for about an hour, give or take 5 minutes, or until your bread successfully passes the toothpick test (or if you’re like me and can never find toothpicks, the sharp knife test). Allow the bread to cool in the pan for about 10 minutes before removing it to a cooling rack to cool the rest of the way. A slice of this bread is best served warm, accompanied by a glass of cold milk.

Soba Noodles with Summer Squash and Mango // Serious Crust

Soba Noodles with Summer Squash and Mango

Soba Noodles with Summer Squash and Mango // Serious Crust

Soba noodles have become a staple in my kitchen. I have always liked them, but as the weather has been slowly getting warmer, and there’s lovely produce all around, they have been appearing more often in my kitchen. I love them with a light sauce made of rice vinegar and lime juice. But the true beauty of soba noodles, to me, is that they are delicious cold. The day after you make them, and they’ve been sitting in whatever sauce you’ve tossed them with, they become ultra flavorful and refreshing. I am a big fan. And I think you should be too.

Jonah came home this week, on Monday actually, and I had a feeling that cooking might not be exactly what he wanted to do the moment he stepped of the plane. So on Sunday night I made a big batch of soba noodles tossed with roasted zucchini, fresh mango, and a light citrus-y sauce. I ate a small bowl, and threw the rest in the fridge, knowing that it would be delicious the next day for dinner with some roasted green beens (also in the fridge).

I love how colorful this dish is, how summery it is, and how packed with flavor. I think it’d make a great cold side dish for a summer party (4th of July, anyone?), and it makes great leftovers to take to the office for lunch. You can add some seared tofu, or maybe even some grilled chicken.

Soba Noodles with Summer Squash and Mango

Ingredients

2 zucchini, julienned
2 summer squash, julienned
olive oil
salt
1 9-oz package buckwheat soba noodles
3/4 cup rice vinegar
1/4 cup sugar
3/4 tsp salt
2-3 cloves garlic, finely chopped
1 jalapeño, finely chopped (and seeded, if you’re not feeling the heat)
juice and zest of 1 lime
1 Tbl sesame oil
1 ripe mango, peeled and julienned
~1/4 cup fresh basil, chopped
~1/4 cup fresh mint, chopped
optional but recommended: chopped peanuts to top (I used about 1/4 cup), lime wedges

Instructions

Preheat your oven to 400 degrees. Toss the julienned zucchini and squash with olive oil and salt. Spread on a parchment lined baking sheet. Roast for 20-30 minutes, until lightly browned, tossing halfway through. Set aside to cool.

Cook the soba noodles as instructed on the package. Usually, this means boil them for about 4 minutes, drain them, rinse them with cold water, drain them, and spread them out on a dish towel to try.

While boiling the water for the noodles, combine the rice vinegar, sugar, and salt in a small pot over medium heat, stirring until the sugar dissolves. Remove from heat and add garlic and jalapeño. Allow to cool, then add the lime juice and zest as well as the sesame oil. Whisk to combine. Put the soba noodles in a bowl, and toss with the dressing. Add the squash, mango, herbs, and nuts to the noodles, tossing to combine. Garnish with a sprinkle more of chopped peanuts and a lime wedge. Enjoy with a light beer on a hot day.

Apricot Foldover Pie // Serious Crust

Apricot Foldover Pie

Apricot Foldover Pie // Serious Crust

I’ve been wanting to make this apricot foldover pie for a few weeks now. I’ve been dreaming about how soft the apricots will get, and how homey and rustic the crust will taste with whole wheat pastry flour. And yesterday was the perfect excuse, as it was Jonah’s last night before he left for 2 weeks in Europe for work. Hard life he leads, that guy.

So he heads to work, I whip up the dough and throw it in the fridge to chill before running to the store to pick up fruit. I found the most tender apricots and the juiciest raspberries to use for this pie. In fact, I couldn’t help myself and ate a couple raspberries on the approximately 2 minute drive back to my house.

I cut up the fruit and mix up the filling. All is going well until I try to start rolling out the dough. I was working up a sweat, I kid you not. It’s so tough, and it’s starting to get huge – way bigger than needed to fill the pie dish with some overhang. But no matter, I drape it into the pie dish, pour in the filling, and then start folding up the edges. As I’m folding it all up, I realize how thick the crust is despite having rolled it out to be far bigger than necessary. I knew something must be wrong. I go back to check the recipe, and there is my glaring mistake. I misread 1/2 cup of whole wheat pastry flour for 1 1/2 cups. So, you know, I basically doubled the flour.

At this point, I have to leave for work in about 40 minutes. What else could I do? I dump the filling back into the mixing bowl, toss the original crust, and start from square 1. Instead of chilling the dough for the prescribed 30 minutes, I stuck mine in the freezer for about 5. Rolled it out, filled it up, and threw it in the oven, asking my roommate Sophie to take it out when the timer beeped.

And it came out beautifully. Rustic, perfectly golden, all that. I can only imagine what a disaster it would’ve been trying to eat that crust if I hadn’t discovered my mistake and started over. But there you have it. It all works out in the end. And everyone makes mistakes.

Apricot Foldover Pie

Note: I like cardamom. A lot. So I used 1/2 tsp of it. However, it is a strong flavor. I suggest smelling it, and seeing if it’s something you would like lots of or a little of, and then add either 1/4 or 1/2 tsp based on your whiff.

Ingredients

Pie Dough

1 1/2 cups AP flour
1/2 cup whole wheat pastry flour
1/2 tsp salt
1 Tbl sugar
12 Tbl (1 1/2 sticks) cold unsalted butter, cut into chunks
1 egg yolk
1/2 tsp white vinegar
1/4 cup ice water, plus a few Tbl if needed

Apricot Filling

7-8 cups apricots, pitted and quartered (a little over 2 lbs)
1-2 cups raspberries (optional, though if you aren’t using raspberries, you’ll want to use more apricots)
1/3-2/3 cup sugar, plus 1 Tbl
3 Tbl AP flour
1/2 tsp cinnamon
1/4-1/2 tsp cardamom
2 Tbl unsalted butter, melted

Instructions

Pie Dough

To make the dough, mix the flours, salt, and sugar in a bowl. Add the chunks of butter, and cut them in with a pastry knife. You can also use an electric mixer with the paddle attachment (that’s what I did) or a food processor. Blend until the butter is roughly the size of uncooked chickpeas. In a separate small bowl, mix the egg yolk, vinegar, and 1/4 cup of ice water. Add the egg mixture to the flour mixture 2 Tbl at a time, until the dough starts to come together. If you need to add extra ice water, do so 1 Tbl at a time. Make the dough into a disc, wrap in plastic wrap, and refrigerate for at least 30 minutes or up to two days.

Apricot Filling

When the dough is fully chilled, start to preheat your oven to 450 degrees F. Taste a slice of your apricots – if they are sweet, use 1/3 cup sugar, if they’re less sweet add a little more. In a large bowl, toss the quartered apricots, raspberries, sugar, flour, and spices together. Set aside.

Roll the chilled dough out into a circle about 1/8 of an inch thick. Transfer it into a 9-inch pie plate, leaving the edges of dough hanging over the plate (you’ll have lots of excess dough, don’t trim it unless you are just aiming for a more even appearance). Pour the fruit into the pie crust, and gently fold the excess dough over the top of the fruit. Brush the dough with the melted butter, pouring any extra into the fruit. Sprinkle the dough with about 1 Tbl of sugar.

Line a rimmed baking sheet with parchment paper, and set the pie plate on the sheet. Bake for 15 minutes at 450, then turn the oven down to 375 degrees F. Bake for about 45 minutes, or until the crust is golden brown at the edges and the fruit is bubbling. Allow to cool before serving with some fresh whipped cream.

Shaved Asparagus Salad // Serious Crust

Shaved Asparagus Salad

Shaved Asparagus Salad // Serious Crust

Sometimes,  you make a meal, thinking one dish will be the star. Especially when you lay down a hefty chunk of change on a cut of meat. But things happen – you run out of time and you don’t season the meat properly or sear it the way you’d like, and then maybe you leave it in the slow cooker a little bit longer than you should have. And when that happens, there are side dishes that sneak up and surprise you. Like this shaved asparagus salad did.

Don’t get me wrong, I knew this salad would be good. I love asparagus, and there are seemingly a million shaved asparagus salad recipes out there (like this one, and this one, and this one). And yeah, they’re all relatively the same. But man, something about the freshness of this salad – crunchy, sour, salty – just got me. It was exactly what I needed after a long day of work. And it certainly was better than an underseasoned, overcooked (only slightly) piece of meat.

Shaved Asparagus Salad

Serves 4

Ingredients

1 bunch of asparagus
juice from half of a lemon
olive oil
salt (course is good, if you’ve got it)
freshly ground pepper
1/4 cup, roughly, of toasted pine nuts, sliced and toasted almonds, or shelled pistachios
parmesan cheese, though crumbled feta would work nicely too

Instructions

Don’t snap the tough ends off your asparagus just yet! Leave them on and use them as a handle. Lay the asparagus on a cutting board, and use a peeler to shave off wide strips, shaving away from you. You’ll have some thick pieces at the end, but do the best you can. Apparently the consensus is that y-shaped peelers are better for this, but I don’t have one of those. Make do with what you’ve got. Discard the woody ends. Put the peeled pieces into a bowl or on a platter or whatever you’re planning on serving on/in. Pour the lemon juice over top of the asparagus, and drizzle with olive oil. I can’t tell you how much olive oil, because I didn’t measure. A good glug should suffice. Sprinkle some salt and pepper over the top, as well as the toasted nuts. Rinse your peeler and use it to shave some thin pieces of parmesan to top the salad (or use a fork and crumble the feta over top). We’re big cheese fans, so we did more cheese instead of less.

Enjoy on a spring or summer day, preferably with a glass of refreshing white or rosé wine. I think this salad would be perfect alongside some grilled fish or chicken for a summer soirée.

Herb and Lemon Shortbread // Serious Crust

Herb and Lemon Shortbread with Straus Family Butter {Sponsored}

Herb and Lemon Shortbread // Serious Crust

I love butter. Let’s be clear here, I don’t like to grab a stick and eat it like a candy bar, the way my mother used to. Certainly not. But there is something to be said for a good piece of sourdough covered in melty butter. Or a roast chicken that’s been slathered in butter and salt and pepper. You know what I mean?

Recently, Jonah and I have become more interested in buying “good” butter. Butter is butter – it’s good. But we were wanting to buy butter made with milk from grass-fed cows. It started a couple months ago when our roommate’s dad, Bruce, came to visit. Bruce is very knowledgeable about diet and nutrition, and while he was here we had many conversations about foods that people think are bad for you (aka butter) but aren’t really if you eat them well. Good fats are good for you, guys! Things like good olive oil, good butter, even chicken livers (fatty, yes, but full of nutrients), are things we can enjoy without feeling guilty about it.

So when I was sent some coupons for Straus Dairy products, I knew immediately I wanted to try their butter. I started with ye old piece of toast. What better way to judge a butter’s character? It was good. It was richer and creamier than your average butter. So I took things to another level. I had bought some chicken livers the day before, so I made some chicken liver paté (Julia Child’s recipe, in case you were interested). And let me tell you, it was some incredibly creamy paté.

Let’s talk for a second about Straus Family Creamery. After spending a fair amount of time on Straus’s website, perhaps one of the things I find the coolest is that they were the first 100% certified organic creamery in the country. For real! Evolving from a family dairy farm, Straus Family Creamery was officially founded in 1994, when Albert Straus saw going organic as a way to differentiate himself and save the state of local family farming. The butter has 85% butterfat content, and is less moist than normal butter. What does this mean for us bakers? It means it’ll brown more evenly and be more flaky. And for the cooks? It doesn’t burn as easily. Now I know, this butter ain’t cheap. But when you’re making butter heavy things like paté or shortbread, I think it’s worth spending the extra few dollars. You don’t skimp on a pork shoulder or buy cheap-o chocolate for your chocolate chip cookies, do you? I thought not.

Enough waxing poetic about butter, Annie. Let’s get on to this recipe for herb and lemon shortbread. On our front steps, we have a little pot of herbs that we carried with us from our last home. Our thyme isn’t looking so hot, but the sage is coming back strong this spring. And every time I walk by that pot, I start thinking of things I could do with those herbs. This week, I had an idea for this herb and lemon shortbread. And lo and behold, I had one stick of this beautiful butter left. It was perfect.

Herb and Lemon Shortbread

Note: I used solely sage for this recipe, but any combination of sage, rosemary, and thyme would be great, I think.

Ingredients

1 cup flour
1/4 tsp salt
2 Tbl plus 1 tsp sugar
1-2 tsp freshly chopped herbs (I used 1 tsp of freshly chopped sage, and wish I had used more)
1/2 tsp lemon zest
1 stick (8 oz) Straus Family butter, unsalted, at room temperature

Instructions

Preheat your oven to 350 degrees.

Sift flour and salt together in a medium bowl, set aside. In a small bowl, combine 2 Tbl sugar plus chopped herbs and lemon zest. Rub these ingredients together with your fingers – this will make sure the sugar absorbs the oils from the herbs and lemon, making it perfectly aromatic. Add the sugar mixture to the flour, and stir until combined. Cut the butter into chunks, and combine it with the flour/sugar mixture with a fork or a pastry knife, blending until you’ve got a beautiful soft dough.

Gently press the dough into a 9×9 baking dish or a 9-inch pie plate. Sprinkle the remaining teaspoon of sugar over the top. Bake until it’s golden brown around the edges. Once you’ve removed it from the oven, carefully cut it into wedges or squares or whatever shape you like while it’s still hot. Allow to cool before separating it. It helps to run the knife along the lines again.

I think this shortbread would make a fantastic base for lemon bars or rhubarb bars or any kind of bar topped with curd. Just saying.

This is a sponsored post. I was given coupons for Straus Dairy products, and all of the opinions below are my own.

Rhubarb Poppy Seed Bread | Serious Crust by Annie Fassler

Rhubarb Poppy Seed Bread

Rhubarb Poppy Seed Bread | Serious Crust by Annie FasslerRhubarb Poppy Seed Bread | Serious Crust by Annie Fassler
Rhubarb Poppy Seed Bread | Serious Crust by Annie Fassler

Update: It is spring (nearly summer, really) 2018, and I thought this recipe could use a little love. It is one of the recipes I most frequently make from this here blog, and I think perhaps that may go for some other folks too. You’ll find one new ingredient and some new instructions that help the rhubarb distribute more evenly throughout the loaf instead of floating to the top the way they used to do, but it’s still perfectly moist.

Hi, my name is Annie. I have a problem. The problem is rhubarb. I seemingly can’t stop thinking about it, can’t stop talking about, can’t stop cooking with it. Between the baked rhubarb at Passover, the rhubarb bourbon soursthe rhubarb themed weekend finds post, and now this poppy seed bread sprinkled with rhubarb, I’m starting to worry myself. But oh well. It tastes too good to stop.

A couple weeks ago, I was wanting to make some poppy seed bread, but I wanted it to be not just your normal old poppy seed bread. I prefer almond poppyseed to lemon poppy seed, so I knew I wanted to lean that way. I also knew I wanted to add fruit. And once I thought of the tartness of the rhubarb combined with the nuttiness of the almond and the poppy seeds, I knew I had to try it.

If you’re interested in a sweeter flavor combination, try subbing strawberries for the rhubarb. But really, you should try it at least once with rhubarb. I swear, it’s really really good.

I first made this recipe for a brunch with my roommates, and between the six of us we finished a whole loaf. In one sitting. It wasn’t even hard. The second loaf quickly disappeared over the next two days. The house smelled incredible, even up on the third floor, and even out on the second floor deck. This bread is a perfect quick bread for the spring (and summer) – it’s unique and dotted with fruit. I recommend bringing it to a friend’s house for brunch: it gets it out of your kitchen (yeah, it’s that dangerous), and they will think you are brilliant.

Poppy Seed Bread with Rhubarb

Makes 2 loaves

Ingredients

1/4 and 1 3/4 cups sugar, divided
2 1/2 cups rhubarb, cut into a half inch dice
1.5 cups AP flour
1.5 cups bread flour
1 1/2 tsp salt
1 1/2 tsp baking powder
3 eggs, lightly beaten
1 1/4 cups olive oil
1 1/2 cups milk, preferably 2% or whole
2 tsp almond extract
2 tsp vanilla extract
2 1/2 Tbl poppy seeds
2-3 Tbsp turbinado sugar (optional)

Instructions

Preheat your oven to 350 degrees. Grease and flour two bread pans. In a bowl, toss the rhubarb with 1/4 cup of sugar to coat. Set aside.

Combine the remaining sugar, flour, bread flour, salt, and baking powder in a mixing bowl, whisking to combine. Set aside.

In the bowl of a stand mixer, combine the eggs and olive oil. Mix on medium speed with the whisk until emulsified, 1-2 minutes. Add in the milk and two extracts and mix again until smooth. With the mixer running, add the poppy seeds to the bowl. When they look to be evenly distributed, stop the mixer and scrape down the sides of the bowl, reaching all the way to the bottom – you wouldn’t want any part of the batter to be missing poppy seeds! In two batches, mix in the dry ingredients, mixing until smooth and uniform.

You’re going to pour the batter into the 2 pans in 3 batches, so start by simply pouring enough to heavily cover the bottom of each pan. Leaving any juices in the bowl, split half of the rhubarb between the two pans (so 1/4 of the rhubarb in each pan). Pour more batter on top of this (but not all!), add more rhubarb, then finish by covering all the rhubarb with the rest of the batter. Scatter the turbinado sugar over the batter.

Bake for 60-75 minutes, or until the bread is golden brown on top, and a knife or skewer inserted comes out clean.

Allow to cool for 20 minutes in the pans, then run a knife around the edge of the pan, and gently turn the loaves out onto a cooling rack. Allow to cool completely, 20-30 more minutes. Slice and enjoy.

Thai Larb // Serious Crust

Thai Larb with Lettuce Wraps

Thai Larb // Serious CrustThai Larb // Serious Crust

A couple of weeks ago, my roommates had a problem. I had gone with them to the climbing gym, and on our way home, we decided to stop at the store to get some food for lunch. We were thinking about what we already had in the house that we could use, and they started talking about how they had too much lettuce. See, they’re more spinach eaters (in salads and scrambles and such) than lettuce eaters, and so had a head of lettuce that they didn’t particularly want to eat or know what to do with. I had an idea: Thai larb.

This Thai larb, a chicken dish with lettuce wraps, immediately popped into my head. I quickly looked up a couple recipes on my phone, and grabbed the ingredients at the store. It was a warm day, and this bright, tart, crunchy dish was perfect. Plus, they were impressed that I made lettuce into something so delectable.

Today it was 85 degrees in Portland, and tomorrow is supposed to be even hotter. In fact, it’s supposed to be beautiful (and hot) until Saturday. My suggestion? Make this Thai larb: it’s so refreshing on a hot day. I’d serve it with maybe a green papaya salad and rice (sticky rice if you can swing it).

Thai Larb with Lettuce Wraps

Serves 4

Ingredients

Dressing

1/3 cup lime juice
1 Tbl fish sauce
2 Tbl light brown sugar
1/2 tsp Sriracha

Chicken

2 lbs skinless boneless chicken breasts, cut into roughly 1-inch pieces
1 large shallot, chopped
1 stalk lemongrass , thinly sliced (see this article for instructions on prepping your lemongrass)
1-2 cloves garlic, thinly sliced
1 red chile, jalapeño, or thai chile, depending on your desired spice level
2 tsp fish sauce
1 tsp kosher salt
3 Tbl vegetable oil
1 head romaine or iceberg lettuce, rinsed
Cilantro for garnish (optional)

Instructions

To make the dressing, stir all of the ingredients in a bowl until well combined. Set aside.

In a food processor, combine the chicken, shallot, lemongrass, garlic, chile pepper, fish sauce, and salt. Add 1 Tbl of oil, and pulse until the chicken is finely chopped, or how you would imagine ground chicken would look. In a large nonstick pan, heat the remaining 2 Tbl of oil over medium-high heat. Once the pan and oil is hot, add the chicken mixture and cook, breaking up into smaller pieces with your wooden spoon, until the chicken starts to turn golden brown and is cooked through.

To eat your larb, spoon some chicken onto a lettuce leaf, and top with the dressing and a little cilantro if you like. Be sure to eat over a plate – I can guarantee there will be dripping.

Kale Stem Pesto // Serious Crust by Annie Fassler

Kale Stem Pesto

Kale Stem Pesto // Serious Crust by Annie FasslerKale Stem Pesto // Serious Crust by Annie Fassler

I often find myself frustrated with how much stuff I put in my compost. I guess I should stop right there and say, at least I have a compost, right? The beautiful city of Portland has roadside pickup every week, making it so wonderfully easy to make more environmentally conscious choices. There aren’t a lot of cities that do that. Anyway, I know I could save some bones and carrot tops and onion tops and parsley stems for stock… But I just don’t do it. I mean, I do sometimes… But not as often as I should. And there’s one thing lately that I have always felt guilty after putting it in the compost: kale stems. Jonah and I eat a fair amount of kale – usually sautéed with butter and garlic or something like that, sometimes in a salad. But I always am frustrated at the toughness of the stems, and wish I could do more with them.

After a little research and looking around, I mostly found that people who do use their kale stems either sauté them with their kale, simply adding the stems first so they cook for longer, or put them in smoothies. I wasn’t really into either of these options, so I made myself a third one. With the all-in pesto in mind, and a container of pine nuts whining from my pantry, I got to work making some kale stem pesto. I wasn’t planning on sharing this pesto here, since the recipe is really improvised, but I got so many comments and questions about what it was when I posted pictures on my Instagram and Facebook, that I thought, why not? This pesto is certainly a product of whatever you’ve got around, which is generally my theory about pesto. Herbs are good, parmesan is good, and other than that, you can kind of go crazy. Nearly any kind of nut will work, any greens, and you can really play until you find some flavors that you like. I didn’t do any measuring here – mostly just throwing in handfuls of this or that – but below is an approximation of what I used.

The beautiful thing about pesto is that it can be a complete reflection of your kitchen: if you just went to the market and have some radish greens, use them. If you don’t have any pine nuts but plenty of pistachios or walnuts, use them. If it’s raining and you want something heartier, add more cheese.

We tossed our kale stem pesto with fresh spaghetti (you can find a recipe here) and topped it with sliced grape tomatoes, which added a really nice juicy brightness. I also like to make a thick piece of toast and slather it with fresh pesto.

Kale Stem Pesto

Ingredients

1 bunch of kale stems, plus probably the equivalent of 1 leaf of kale
1 cup spinach
1/4 cup parsley
~ 3/4 cup pine nuts
Parmesan cheese
Garlic
Olive oil
Salt

Instructions

Fill a small pot halfway with water, salt well, and bring to a boil. Roughly chop kale stems into about 1/2 – 1 inch pieces. Add to boiling water, and cook until stems are easily pierced with a knife. Drain and cool.

In the bowl of a food processor (or blender), combine kale stems, a few small chunks of parmesan, about half the pine nuts, 2 cloves of peeled garlic, and a few glugs of olive oil. Pulse to combine. Add spinach, some parsley, and a hefty sprinkling of salt. The key here is to taste and add. If you want a little more spice, add another clove or two of garlic. If you want it creamier, more nuts, and olive oil. If you want it greener, add more spinach and parsley, or some fresh basil or chard if you’ve got some around.