Sometimes you have a week that is hard, but also totally reviving. The beginning of last week was tough, but things quickly got better: good food was made and fun was had and cocktails were made. And an old friend from college came to visit, which always is exciting and soothing at the same time. Isn’t it nice when people who knew you when (“when” being just a few years ago in this case, but still) can kind of ground you and make everything seem ok? That happened. It was nice.
But before she came to visit, and before there was weekend and all that, there was this cocktail. I had finished the actual rhubarb from the dessert I made for Passover, but I had a bunch of this sour syrup left over. And I had bought a bottle of Bulleit bourbon. So, you know, rhubarb bourbon sour time it is. With a little research and a little improv, Jonah and I whipped up this drink. If you don’t have sour rhubarb syrup laying around, you can make it pretty easily by following a rhubarb simple syrup recipe like this one or this one, but I would cut the sugar so that the tang of the rhubarb can really shine.
Rhubarb Bourbon Sour
Makes 1 cocktail

Ingredients
1 shot (1.5 oz) bourbon

juice from 1/2 lemon

1 tsp powdered sugar (or half a shot of simple syrup) – Note: if you are making rhubarb simple syrup from one of the recipes above, you can nix this sweetener part, or add it to taste.

1/2 shot rhubarb syrup

1 egg white


Instructions
Combine all ingredients in a shaker without ice, shake for about 10 seconds. Add ice, shake thoroughly. Pour into glass. Sip and enjoy. Yeah, it’s that easy.
I like being home. Traveling the world is awesome, don’t get me wrong. I will happily go on adventures like the one to Vietnam any time. But there is something about coming home to your own bed, your own shower, and your own kitchen. I feel like I need to give all my kitchen tools little hugs and tell them I’ve missed them. Which, at this point, I’ve basically done, because I’ve been cooking up a storm this week.
Portland, however, is being slightly less welcoming than my kitchen. Mostly just in its weather-related mood swings. Seriously, this whole week has been days of sporadically alternating sunshine and rain. Sometimes each lasts 5 minutes, sometimes an hour. But it’s making it awfully hard to cook. What I’m going to make is always determined by my mood, which is often influenced by the weather. Between the rain and sun breaks, I can’t decide if I should be making spring recipes or winter recipes.
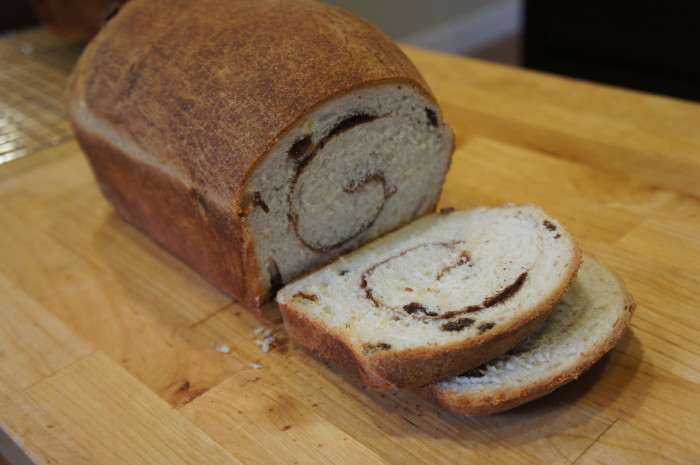
This cinnamon raisin bread is the perfect balance between spring and winter, though I already know I’ll be making it year round. It’s homey and warming thanks to the springy crumb and the way it fills your kitchen with the most comforting smell. But the raisins and cinnamon bring a little fruitiness and fun to the mix, a little surprise if you will. This isn’t just plain ol’ bread, you know. This has a beautiful swirl of cinnamon sugar and beautifully juicy pops of fruit throughout it.
This recipe made two loaves, and I thought for certain I’d freeze one loaf, because my roommates just don’t usually eat that much bread (unless it’s beer bread). But I was wrong. In two days, we are down to half a loaf left. Everyone has been enjoying this bread, toasted, slathered with butter, or raspberry rhubarb jam, or nutella for breakfast and dessert and a snack here and there.
Point is, make this bread and your house will smell like heaven, your friends will love you, and you’ll be perfectly toeing the line between the seasons.
Cinnamon Raisin Bread
Makes 2 loaves

Ingredients
2 1/4 tsps (1 package) dry instant yeast

2 1/4+ cups warm water

3 Tbl and 1/4 cup granulated sugar, divided

1 Tbl salt

3 Tbl butter

6 -7 cups all-purpose flour

1 cup raisins

canola/vegetable oil

1 Tbl cinnamon


Instructions
In the bowl of an electric mixer (or not. If you don’t have one, this can easily be made with the strength of your own two arms.) combine 1/2 cup warm water, the yeast, and 1 Tbl of sugar. Set aside and let sit until it’s foamy. In another bowl, cover the raisins with warm-hot water, at least 2 cups. This step is optional, but it will plump the raisins, making them a bit juicier in the bread. After about 3 minutes, pour 1 3/4 cups of the raisin water off into a measuring cup and discard the rest. Pour the raisin water into the mixing bowl with the yeast, in addition to 2 Tbl sugar, the salt, 2 Tbl melted butter, 3 1/2 cups of flour, and all of the raisins. Mix with the paddle attachment until thoroughly combined, adding up to 3 more cups of flour until the dough is smooth enough to handle, but still moist. Switch from the paddle attachment to the dough hook, and knead for about 7 minutes (10 minutes if you’re kneading by hand). Dump the dough out onto a floured surface, coat the mixing bowl with canola or vegetable oil, and put the dough back into the bowl, turning it to coat, and cover the bowl with a clean dishtowel. Set the bowl in a warm spot (I like to turn on the light over my stove and set it under that) and let it rise for about an hour, or until it’s doubled.
In a small bowl, combine the remaining 1/4 cup sugar and 1 Tbl of cinnamon and mix well. Butter two bread pans. When the dough has doubled, remove it from the bowl onto a floured surface and punch it down, then divide it in half. Roll out one half of the dough into a rectangle that measures roughly 16 by 8 inches. Once rolled out, sprinkle the dough with 1 Tbl of water, and half of the cinnamon sugar mixture. Roll the dough up starting from the short end, and pinch the seam shut. Drop the roll of dough into one of the greased loaf pans. Repeat with the second half of dough. Brush the top of both loaves with the remaining 1 Tbl of melted butter, and cover them again with a clean dishtowel to let them rise for another hour in a warm spot.
About 15 minutes before your bread is done rising, preheat your oven to 425 degrees. Bake the bread for 30 minutes, or until the loaves look beautiful dark brown on top. Remove the loaves from the pans (beware, as cinnamon sugar may have oozed and become rather sticky – aprons are your friend) and set on a cooling rack. I recommend slicing into one of these bad boys when it’s still pretty warm. You can toast it and put a nice layer of cream cheese on top, like I did with my cinnamon raisin bread when I was younger, but a little butter will do nicely as well. Enjoy.
It’s raining in Portland. I know, surprise, surprise. But it wasn’t that long ago that the sun was shining and I even got a sunburn. Seriously! Last weekend, Jonah’s mom and Grandma were in town for the day, and we took them to the PSU Farmer’s Market, which has got to be one of my favorite things about Portland. The sun was shining, I wasn’t even wearing a jacket, and there was beautiful crimson rhubarb everywhere! Rhubarb has got to be one of my favorite ingredients of all time, so I was excited, to say the least.
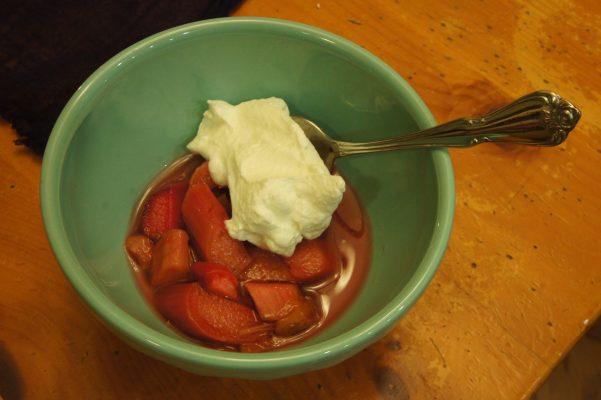
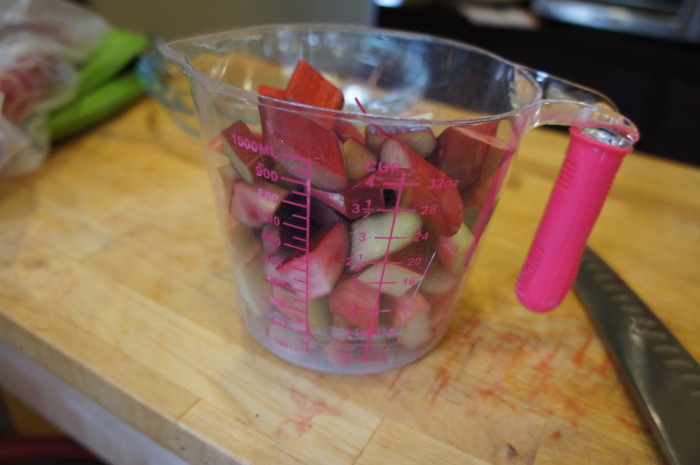
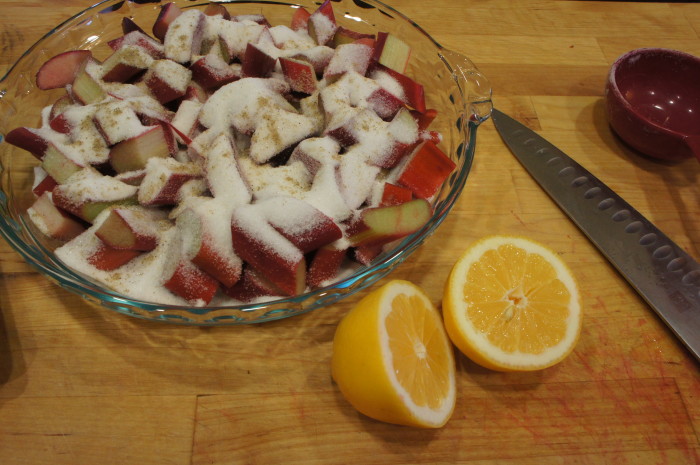
As I was getting ready for Passover dinner on Tuesday, I decided to nix the matzo crunch in favor of something a little more reminiscent of springtime: some baked rhubarb. After doing a little recipe hunting and finding this recipe on Food52 and this recipe on Orangette, I decided to do a little adapting. This recipe is so easy and delicious – I love the slightly sour flavor of the rhubarb and the hint of lemon, cardamom, and earl grey. I balanced the tartness with some fresh whipped cream, but ice cream, fresh ricotta, or yogurt are also great options.
Baked Rhubarb with Lemon and Cardamom

Ingredients
6 cups rhubarb, cut into 1-inch pieces

1 cup granulated sugar

1 meyer lemon, juiced

1/8 tsp cardamom

3/4 cup steeped and cooled earl grey tea
optional: fresh whipped cream, ice cream, fresh ricotta, or yogurt for serving


Instructions
Preheat your oven to 350 degrees. In a baking dish, combine rhubarb, sugar, lemon juice, cardamom, and tea. Stir to combine. Bake for 15 minutes, stir, and bake for another 15 minutes. Remove from oven, and allow to cool. You can serve the rhubarb warm, room temperature, or chilled, all are wonderful. Yes, that’s it. Can you believe how easy this is?
P.S. The leftovers, if there are any, taste delicious stirred into your yogurt and granola the next morning. Or on top of pancakes. Just saying.
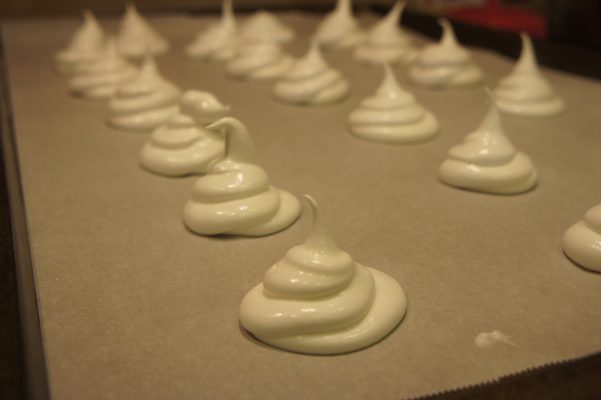
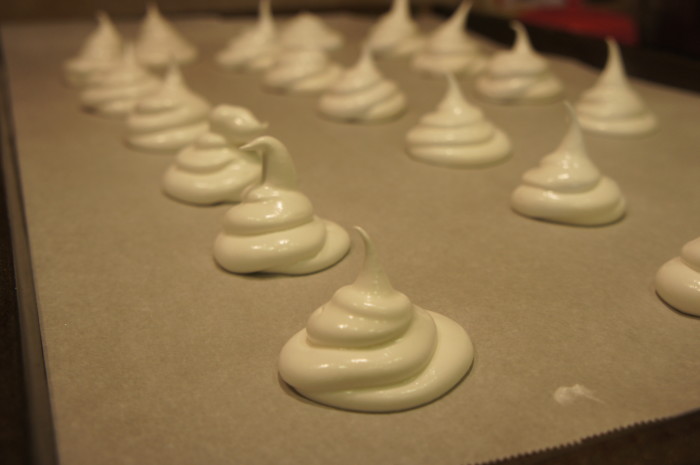
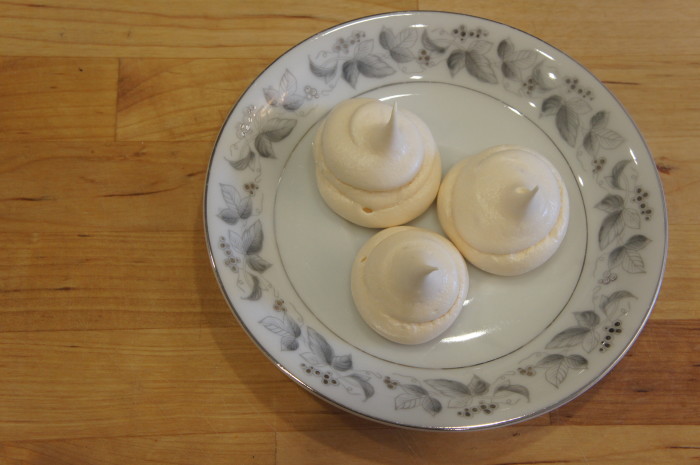
I loved meringues when I was a kid – the incredible sweetness, the way they just melt in your mouth, the way they sound kind of like styrofoam (a weird thing to like, I know), and the delicate poofy shapes they came in. I remembered making them once when I was in middle school, and getting the sticky batter all over my shirt and fingers and face.
While I don’t feel as passionately about meringues as I did when I was younger, I still enjoy them. I still love how as soon as you get a crumb on your tongue, it seems to be gone almost as quickly as it came. I love the intense sweet taste, and how it lingers in your mouth. I love the slight nuttiness that comes from the slow caramelization of the sugar.
After I made the mint matcha ice cream, I had a bunch of leftover egg whites. I thought about making macarons, but I simply wasn’t in the mood for something so potentially intense where so much could go wrong. Plus, all my egg whites were in a jar together, so measuring out 3 or however many was going to be tricky. That’s the tough thing about leftover egg whites or yolks – you so often have to find a recipe that uses the exact amount you have leftover. I had seen an article recently on Food 52 about making meringue without a recipe, so I read it, and went ahead. I wouldn’t normally choose to make this much meringue, but it turns out 6 large egg whites yeilds…a lot.
Simple Meringues
Ingredients
1 part egg whites to 2 parts sugar. For example, 1 cup egg whites, 2 cups sugar. To stabilize, you’ll need 1/2 tsp cream of tartar or 2 tsp white vinegar per 1 cup of egg whites. An easy way to remember this, if you’re using vinegar, is that it’s the same amount as the sugar but in teaspoons. So, what I used: 1 cup egg whites (from 6 large eggs), 2 cups sugar, and 2 tsp white vinegar.
Instructions
Bring your egg whites to room temperature, if not a little warmer. You can do this by simply leaving them out in the kitchen for a while, or putting them in a bowl and putting that bowl in another bowl full of hot water.
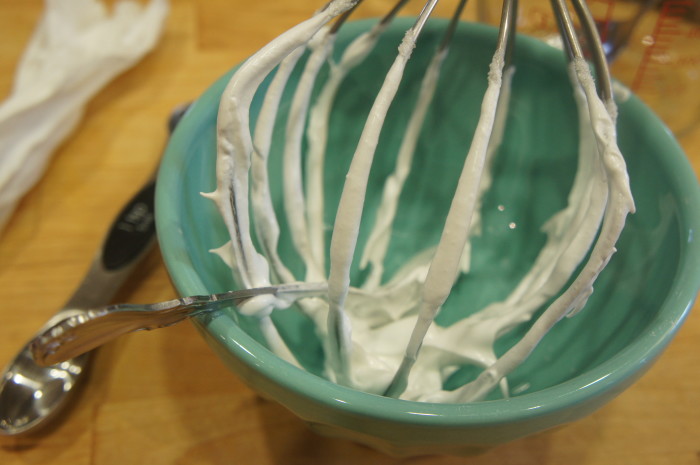
Preheat your oven to 225 degrees. Line two pans with parchment paper. In a bowl, combine egg whites and vinegar or cream of tartar. Whip on medium speed with an electric beater or in the bowl of an electric mixer until there are soft peaks when the beater is lifted from the bowl.
Once soft peaks can form, turn the mixer speed to high, and add the sugar by heaping teaspoons. This will take a few minutes (certainly if you’re making as much meringue as I was). Be patient. Once the sugar is mixed in, either pipe the meringue onto the prepared baking sheets, or drop by spoonful. I used a large ziploc, used a spatula to scoop all of the meringue in, and then cut off the tip of one of the corners, and used that for piping. It worked really well.
Bake the meringues for 1 1/2 hours, rotating front to back and top rack to bottom half way through. When time is up, turn off the oven and allow them to cool in the oven. If you have SO MUCH MERINGUE, like I did, you can turn off the oven and allow them to cool partway, remove from oven, and then preheat the oven for the next batch. I left my meringue on the counter while the first batch baked, and while it was noticeably not as fully whipped, it still worked just fine. I recommend crunching into one when it’s still warm, because how often do you get to try a warm meringue? Store the rest in an airtight container, and enjoy whenever you’re in need of a sweet, light treat.
When I made the anise ice cream that I posted about last week, it made me realize how truly simple it is to make your own ice cream. I mean, if you’ve got the ice cream attachment for the Kitchen Aid like my roommate does, or some other kind of ice cream churner. I found myself asking why I hadn’t been making my own crazily flavored ice cream for years. And you know what? I didn’t have a good answer.
So I thought I might as well start now. I’ve had some matcha sitting in my drawer since I made these madeleines, and I’d been wanting to try some matcha ice cream. But I didn’t want to make JUST matcha ice cream. After thinking about what flavor combinations might work with matcha – chocolate? lemon? – I decided to go with mint. I liked the idea of the herbaceous, refreshing mint with the earthy, almost savory matcha. So, mint matcha ice cream it is!
I also decided to make this ice cream this week because I thought it might be nice to start doing some holiday-oriented recipes. And while the flavors in this recipe have nothing to do with St. Patrick’s Day, it is green. Definitely green. Especially if you make it the day before you’re planning on eating it.
After a little research, this recipe is adapted from and inspired by David Lebovitz, Kinfolk, and many other ice cream recipes all over the internet.
Mint Matcha Ice Cream
Ingredients
1 cup whole milk
2 cups heavy cream, divided
3/4 cup granulated sugar
a pinch of salt
1 cup fresh mint leaves, rinsed
4 tsp matcha green tea
5 egg yolks
Instructions
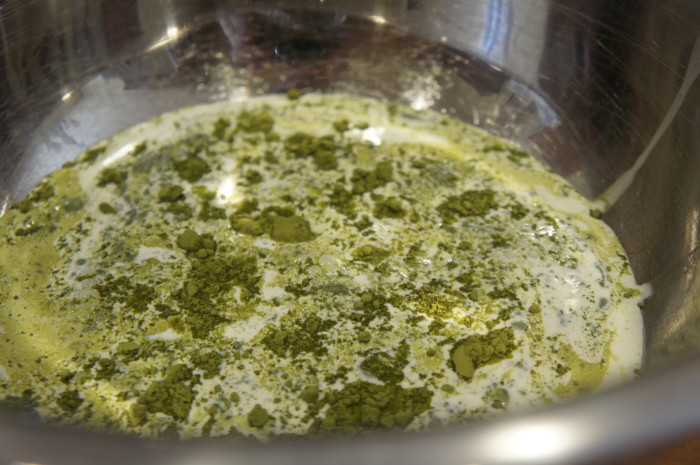
In a saucepan over medium heat, combine milk, 1 cup of cream, sugar, salt, and mint leaves. Stir until sugar is dissolved, and once the mixture is hot and steaming, remove the pan from heat, cover, and let it steep for one hour.
Fifteen minutes before your mint is done steeping, get out two mixing bowls. In one, combine the other 1 cup of cream and the matcha. Whisk together until thoroughly combined and no clumps remain. In the other mixing bowl, whisk together the egg yolks.
Once the mint is done steeping in the milk mixture, strain out the mint leaves, pressing them to extract all of the flavor. Re-warm the milk over low heat – you want it to be warm, not too hot – and slowly pour it into the egg yolks and whisk until combined. Pour the mixture back into the saucepan, and cook over medium heat, stirring constantly with a heat-proof spatula, until the custard thickens enough to coat the back of a spatula. Strain the custard into the bowl with the matcha cream, and whisk again to combine. Stir the mixture over an ice bath to cool. Once cooled thoroughly, churn in your ice cream maker according to your machine’s instructions.
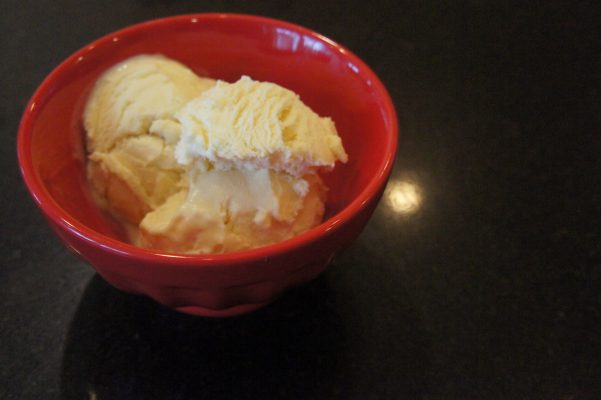
I went to Seattle this past weekend. My aunt was visiting, and I needed to get out of town a bit. It turned out that he was also having this dinner with friends. He has all these friends who cook, and so they’re starting this dinner club kind of thing, like an extremely organized potluck.
It’s really cute – whoever is hosting picks a cuisine or a cookbook, and sends the guests recipes to make. My dad picked the Pok Pok cookbook, and oh my goodness, the meal was incredible. We helped him make the famous chicken wings (which were exactly like the real thing), which was so fun. And for dessert I made this dish I’ve been working on with my baker friend Caitlyn (post coming soon, we still have a bit more testing to do). Wanting something to top it with, I decided to also make some ice cream from David Lebovitz’sThe Perfect Scoop. So what goes with a slightly Asian cake, and an incredibly flavorful dinner? I picked the anise ice cream, and decided to add a touch of cardamom.
This ice cream is beautiful – extremely creamy, herbaceous, and perfectly sweet, I could have gladly eaten just a bowl of the ice cream for dessert (or for a snack, which I did the next day). After making (and eating) this ice cream, I proceeded to take pictures of many recipes in The Perfect Scoop so I can make them at home… because unfortunately, I don’t have the book for myself.
Anise Ice Cream with Cardamom

Ingredients
2 tsp anise seeds

2-3 green cardamom pods

2 cups heavy cream

1 cup whole milk

2/3 cup sugar

1 1/2 Tbl good quality honey

pinch of salt

5 egg yolks


Instructions
Toast the anise seeds and cardamom in a small saucepan over medium heat for about 3 minutes, or until fragrant. To the saucepan add 1 cup of the cream, the milk, sugar, honey, and salt. Keep saucepan over heat until the liquid is warm, then cover, remove from heat, and let steep for an hour.
After an hour, re-warm the milk mixture over low heat. Pour the remaining 1 cup of cream into a medium mixing bowl, with a sieve set over the top. In another bowl, whisk together the egg yolks. When the milk mixture is warm, slowly pour it into the bowl of egg yolks, whisking constantly. Then, pour the milk and egg yolk mixture back into the original saucepan and cook over medium heat. Stir it constantly, preferably with a heatproof spatula, until the mixture has thickened and coats the spatula or spoon. Pour this custard through the strainer into the bowl with the cream, and stir it so the cream is fully incorporated. Set this bowl in an ice bath and stir to cool. Refrigerate until cooled through, and then churn based on your machine’s instructions. Enjoy!
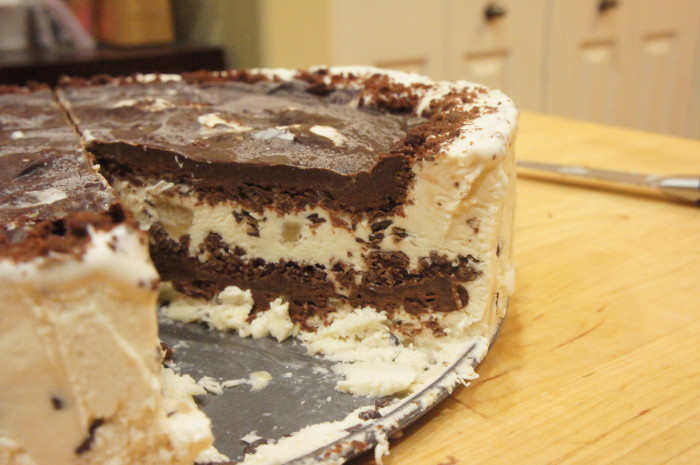
When I asked Carmelle what kind of cake she wanted for her birthday this year, and she replied, “ice cream cake,” I was stumped. I mean, not so stumped. I’ve had ice cream cake before. I understand the concept. But I’ve certainly never made one. In a summer cooking camp I did when I was younger, I made a baked alaska, but I certainly wasn’t going to attempt that. My mom used to make a version of ice cream cake with Ho hos: she would take a big metal bowl, line it with slices of Ho hos, fill the bowl with ice cream, freeze it, and then turn it out, so it looked something like this.
So I suppose it was officially time to learn to make my own ice cream cake. I had a choice to make: do I make the kind with an actual layer of cake in it? Or do I make the kind that just has layers of ice cream and chocolate sauce and magical cookie crumbles?
I decided to go with the latter. If I’d had more time I would’ve made my own ice cream, it turned out it was a crazy weekend (full of Valentine’s Day, a bar mitzvah, work, and an Amos Lee concert), so there wasn’t time for that madness. Still though, ice cream making is on my to-do list.
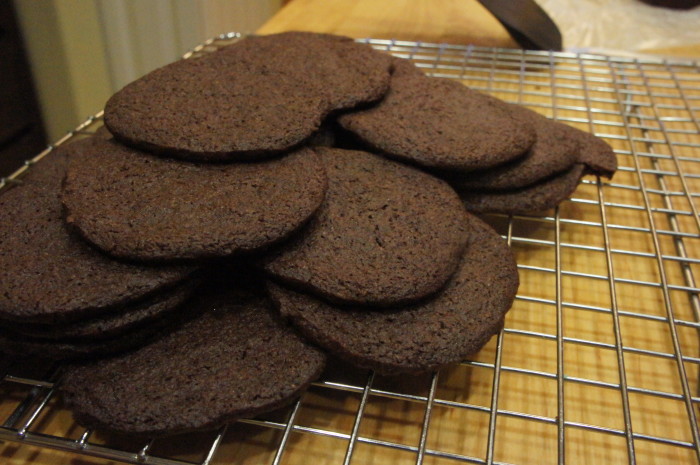
I decided to use a recipe from Not Without Salt (NWS) as a guideline, except I wanted to just buy Oreo crumbs at the store instead of making my own chocolate wafers. At this point, I was thinking more along the lines of cake assembly than actual creation. Don’t judge me. After hitting the grocery store (note to self: NEVER go to Fred Meyer’s on a Sunday again), and not finding Oreo crumbs or any wafers I liked, I decided to make them myself. And because I’ve been eyeing Smitten Kitchen’s chocolate wafers, I decided to go with that recipe. Interestingly, something I noticed after I had already made the wafers was that both Smitten Kitchen and Not Without Salt identify Alice Medrich as the cook behind the recipe for their wafers, though they do differ a bit. What I’m saying is, if you decide to go with NWS’s chocolate wafer recipe, I’m sure it will be just as delicious.
Ice Cream Cake
Note: For your ice cream, I would suggest something smooth like coffee, or with small pieces in it, like mint chocolate chip. Carmelle requested cookie dough ice cream, and while it was certainly delicious to get the chunks of cookie dough, it made it a little trickier to slice and serve.
Ingredients
Chocolate Wafers
1 1/2 cups flour
3/4 cup unsweetened cocoa powder
1 cup + 2 Tbl sugar
1/4 tsp salt
1/4 tsp baking soda
14 Tbl (1 3/4 sticks) butter, softened
3 Tbl milk (higher fat is better, because we’re baking here, people)
1 tsp vanilla extract
Chocolate Fudge Sauce
1 cup heavy cream
1/3 cup corn syrup (I used dark because I liked the slight molasses smell to it, but light or golden syrup will work)
1/3 cup brown sugar
1/4 cup cocoa powder
1 cup (6 oz) bittersweet chocolate (you can use chopped baking chocolate or chips, whatever is convenient for you)
2 Tbl butter
1/4 tsp salt
1 tsp vanilla extract
1 gallon of ice cream of your choice, or 2 quarts of ice creams of your choice
Instructions
Chocolate Wafers
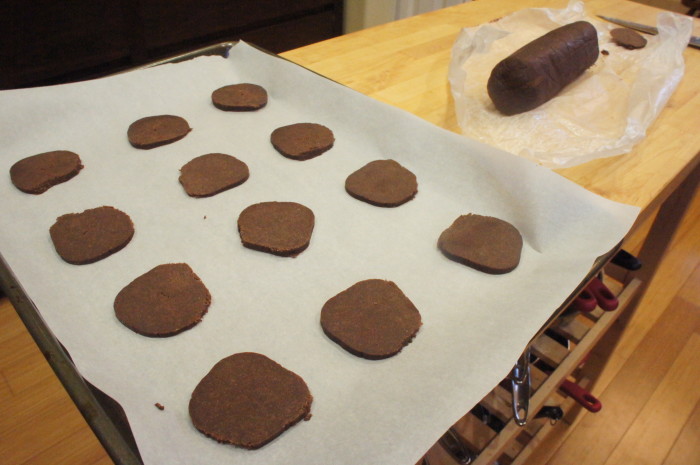
First, let’s make the wafers. In the bowl of your food processor, combine the dry ingredients and pulse to mix. Cut the butter into chunks and add it to the bowl as well, pulsing again until evenly distributed. In a small bowl, combine the milk and vanilla extract, and then add it to the bowl with the food processor running. Transfer the dough to a bowl and knead a few times to bring it together. On a piece of parchment or wax paper, form the dough into a ~14-inch log, wrap it in the parchment or wax paper, and refrigerate for an hour, or freeze for 20-30 minutes, or until firm.
Preheat your oven to 350 degrees, and line baking sheets with parchment paper. Slice the log of dough into ~1/4 inch slices, thinner if you’d like, but keep an eye on baking time. Place them on pans about an inch apart, and bake for 12-15 minutes, rotating halfway through. Allow to cool on the pan for a minute or two, as they’ll break easily. Which, for our purposes isn’t the end of the world, but you will have extras, and maybe you want those to be unbroken.
Chocolate Fudge Sauce
Before making the fudge, I recommend taking your ice cream out of the freezer to soften.
To make the fudge, combine the cream, corn syrup, sugar, and cocoa powder in a pan. Bring this mixture to a boil, then reduce the heat to a steady simmer. Allow it to simmer for 5 minutes, stirring occasionally. After 5 minutes, remove the pan from the heat and stir in the chocolate, butter, salt, and vanilla. Keep stirring so the chocolate and butter melt, and run through a sieve, preferably into a microwave safe bowl, make sure there are no clumps of cocoa powder. My fudge had a little trouble, and decided to separate (super fun!). Jonah had the brilliant idea to just get out the immersion blender, and I would suggest the same should the separation happen to you. But I sincerely hope it doesn’t. Set fudge aside and let it cool down a bit. Because you have to make this cake in layers and freeze between each layer, the microwave safe bowl comes in handy when you need to warm up (and potentially blend) your fudge sauce.
Now let’s assemble the cake. Put about 20-25 of the chocolate wafers in a big ziploc bag, and beat it with a rolling pin, until the cookies are completely crumbled and there are no pieces larger than a pea. In an 8 or 9 inch springform pan, spread 1/2 of your gallon of ice cream, or one of the quarts. Make sure it’s evenly spread, so it’s roughly the same thickness all the way around the pan. Sprinkle half the cookie crumbs on the ice cream, and then drizzle/spread half the hot fudge over the cookie. Put the pan in the freezer for 30-45 minutes to set. After it has firmed up a bit, spread the second half of ice cream over the fudge, then sprinkle over the remaining cookie crumbs and spread over that the remaining fudge. Put the cake in the freezer until you’re ready to serve, at least an hour.
When you’re ready to eat this bad boy, remove from the freezer and run a knife around the edge before un-molding the cake. Serve and enjoy!
Everything is melting. Meeeeelllllting! It’s like I’m the wicked witch of the west. Or rather that Portland is, anyway. Which is seemingly appropriate given the hue of today’s baked goods recipe. (In case you missed it, we are officially on the tail end of a large snow storm, at least by Pacific North West proportions, where it snowed for days and no one could drive anywhere and we all got cabin fever.)
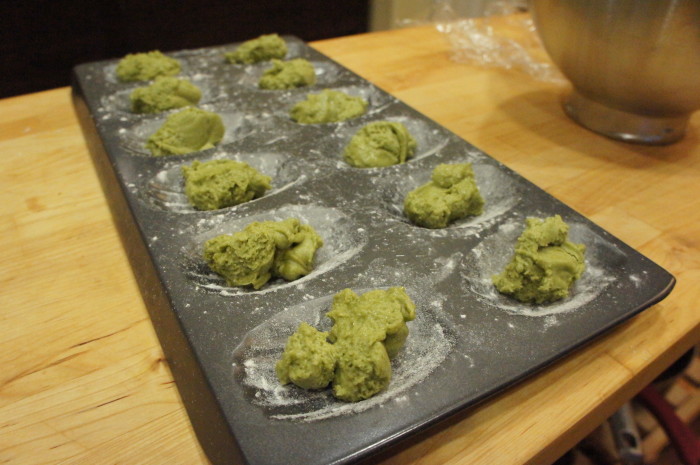
I have long been wanting to try some variation of Matcha green tea madeleines. I’m sure, at this point, I have a bunch of recipes on my Pinterest board, and really I was just waiting for the time to come when I actually remembered to purchase Matcha at Tea Chai Té. You’d think it wouldn’t be hard, since I usually visit one of their shops every other week. But remembering is harder than you think.
You know what else is harder than you think? Weighing all of your ingredients. See, every recipe I found for these madeleines had the amounts in weight, or it didn’t have quite enough of this or that for my taste. OR even worse, it had some of the ingredients measured in weight and some in teaspoons or cups. Which is fine, I have a scale. But when it came down to it, and I was finally making these little gems, I was not in the mood to weigh a million things and add a little bit more, a teaspoon at a time, until the weight was exactly right. So… I guestimated. If I was someone else, I would have made this recipe multiple times, adjusting the amounts of ingredients to make sure I was giving you the absolute best variation. But I’m not someone else. I’m me. And this recipe worked. So this recipe is what I’m giving you. I hope that’s ok. And hey, wouldn’t you rather I be me instead of someone else?
Matcha Green Tea Madeleines

Ingredients
2 Tbl Matcha green tea powder

1/2 cup flour (all-purpose)

1 tsp baking powder

8 Tbl butter (1 stick), melted and cooled

3 eggs

1/2 cup sugar

1/4 tsp salt

1 tsp vanilla extract


Instructions
Butter and lightly dust your madeleine pan with flour. Keep the pan in the freezer while you prepare the dough.
In a bowl, sift together the flour, baking powder, and Matcha powder and set it aside. In a bowl, beat the eggs for 1 minute (I used my electric mixer; a handheld mixer would work too), and then add the sugar and salt. Mix until the sugar/egg mixture is pale and a bit thick, about 5-6 minutes.  Add the vanilla, and mix for another minute. Now add in the flour and Matcha mixture, blending until it’s just combined. You’ll want to be gentle when adding the flour mixture, and may even want to use a spatula and gently fold it together – you don’t want to deflate the eggs. If you’re using an electric mixer, I recommend switching from the whisk to the paddle attachment. Once you’ve mixed in the flour mixture, slowly add the butter and beat until the dough is smooth with the mixer on a low speed, or with your spatula. Cover bowl and refrigerate for at least one hour.
Preheat your oven to 375 degrees, and remove the pan from the freezer. In each little madeleine mold, drop about a teaspoon of batter. Bake for ~8 minutes, or until they have puffed up and are golden brown around the edges. Allow the madeleines to cool in the pan for a minute before removing them. I found it easier to remove them by placing the wire rack upside down over the pan and then flipping it over, then lifting the pan off.  These are best enjoyed the same day, preferably right out of the oven, with a nice cup of tea (and no, it doesn’t have to be green tea).
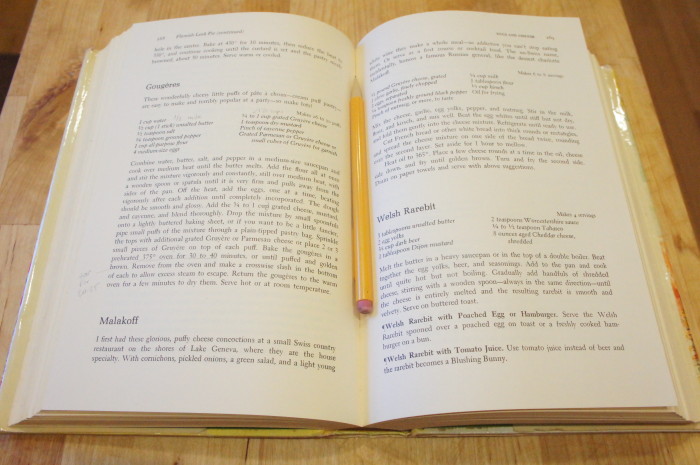
I recently had a serious gougères craving. Which is not a normal craving. Normal people crave… I don’t know what. But my guess is not cheesy little dough puffs. Right?
Also, I’ve discovered I have a lot of cookbooks. I knew this. But when I was looking for a recipe to use for these gougères, I realized I have a few cookbooks that I have never even opened. Mostly these are ones I got for free. For example, I have about 5 old James Beard cookbooks. How many different recipes for one thing can the man really have? I think I need to do a little research and then pick one or two to keep. Because also, my cookbook bookshelf is officially overflowing. Books are starting to get piled on top of books, so you can’t see what they are, and everything falls out when you pull out your selection. Not good.
I also decided that I want to be the kind of person that writes notes in my cookbooks. In pencil. But still. Rather than attempting to remember what I liked about a recipe or what I did differently or what didn’t work, I should just write myself little notes in the margins. Or be like my Aunt Elise, who has layers of post-its all over her favorite recipes.
So, my February resolutions: clear out some cookbooks, or at least USE the ones I haven’t used yet and if I don’t like them, think about getting rid of them; and make notes in the margins. Totally doable, I think.
Gougères

Ingredients
1/2 cup water

1/2 cup milk (I used 2%)

1/2 cup (1 stick) unsalted butter

3/4 tsp salt

1/4 tsp freshly ground pepper

1 cup flour

4 eggs

1 1/2 cups grated Gruyère cheese OR 1 cup grated gruyère and ~1/2 cup grated Parmesan

a pinch of cayenne pepper

1 tsp of dry mustard (optional – I didn’t add this, but wished I had afterwards, as my gougères were missing a bit of bite to them)


Instructions
Preheat your oven to 375 degrees. In a medium saucepan over medium heat, combine water, milk, butter, salt, and pepper; Cook until the butter melts. Add the flour in one batch, and stir with a wooden spoon or spatula. The mixture will become this strange, shiny, kind of gelatinous mixture, and will pull away from the sides of the saucepan. Remove the pan from the heat, and add the eggs one at a time, stirring after each addition. It will seem, for a short while after you add each egg, that it won’t incorporate. I promise it will. There will be a magical moment where all of a sudden, the egg and the flour decide they like each other and want to be the best of friends. After adding all of the eggs, the dough should be nice and glossy. Add 1 cup of the grated Gruyère, dry mustard if you are using, and cayenne, and combine thoroughly.
Butter a baking sheet or line it with parchment or silpat, and drop the batter on by tablespoon. Sprinkle the tops with the remaining grated Gruyère or Parmesan. Bake for 25-35 minutes, until puffed up and golden brown. Allow to cool for a couple of minutes before indulging, as they’re full of steam and can be very hot.
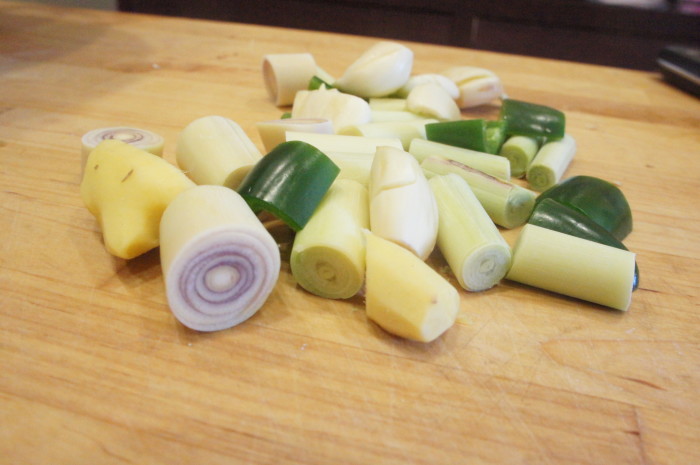
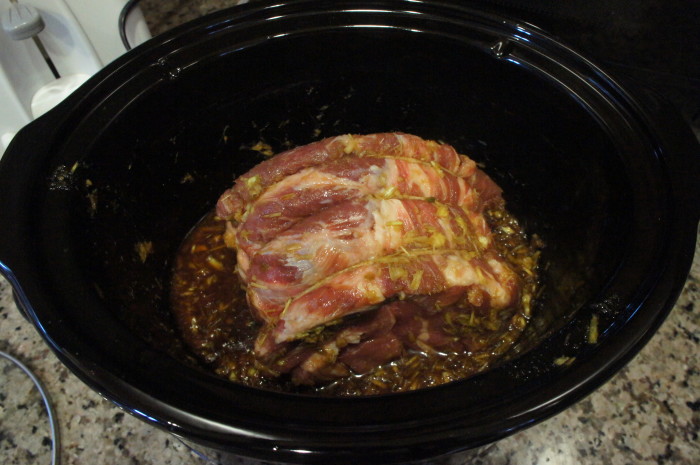
When I was getting ready to make this Asian pulled pork, I knew I wanted to write about it. I didn’t intend to write about it so soon – I knew I had a few posts to be written, the pictures sitting in their appropriate folders on my desktop – but things changed.
As I was putting all of these ingredients together on Monday, the kitchen already started to smell good. The fragrance of the lemongrass and ginger, combined with the rice vinegar and soy sauce, had begun to permeate the kitchen, and when my friend Elsa stopped by while I was making the pickles, she asked, “What smells so good?” as soon as she opened the door. When I left for work a few hours later, the slow cooker was on, the pickles were in the fridge, and mostly I just couldn’t wait to get home and eat the stuff.
After work, I had a message from my mom, asking me to call her. My phone was nearly dead (a morning on the phone with various auto insurance agents will do that to you), so I decided to wait till I could get home and plug my phone in to call. I opened the front door, and I was surrounded by this smell. The Asian flavors swirling around, making my stomach grumble. And then I looked at Jonah, sitting at the kitchen table, and he asked me, “Have you called your mom?” No. “Herby died,” he said.
I immediately called my mom, who was on the other line with my Nana, and said she’d call me back shortly. Herby, or Poppa Herb, is my grandfather. Herby had been sick for a long long time, and I had known for a while that his time was coming to a close. We all knew. And yet, as I said to Jonah moments after he told me, knowing it’s coming doesn’t seem to make it any less sad. Herby suffered for a long time, and so did Nana, really. He was unwell and hard to care for, and he was very ready to go. So after some tears, we couldn’t do much but continue to get dinner ready. The lid came off the slow cooker, and the scrumptious aroma wafted into the air, perfuming our meal. Before we actually sat down to eat, I got to talk to my mom, who let me know that one of the last meals Herb enjoyed was 5 (count them, 5) slices of her french toast. Thank goodness he ate well until the end. And then we ate.
As I started to think about writing this post, I haven’t been able to think about this dish without thinking of Poppa. And while the association could be sad, it really isn’t. It makes me a little more thoughtful, but mostly happy. Happy that I got to have this wonderful extra grandfather, who loved me like I was his own flesh and blood, who believed in me, who used to do little funny dances around the kitchen, who wore all those silly sweatshirts we made for him when we were little, and who made it possible for my family to see each other every year on the Oregon coast. And while I certainly don’t want this recipe to make you sad, I do hope that this post can make you think a little bit more about doing and eating the things we enjoy, and who we enjoy them with.
Slow Cooker Asian Pulled Pork Tacos
Note: You’ll see in my pictures that I minced up the lemongrass with the garlic, ginger, and jalapeño, as recommended in the Garden Betty recipe. I would suggest cutting it into coins or large chunks instead – the stalks were too hard for my food processor, and so I ended up with some sharp/pokey pieces of lemongrass amongst the meat.
Ingredients
Pulled Pork
2 inch piece of ginger
1 jalapeño
5 large cloves of garlic, or 6 smaller cloves
2 stalks of lemongrass
1/2 cup brown sugar
1/2 cup soy sauce
1/4 cup rice vinegar
1 1/2 Tbl fish sauce
2 1/2 lbs pork shoulder roast
4-5 large portobello mushrooms (optional, but recommended)
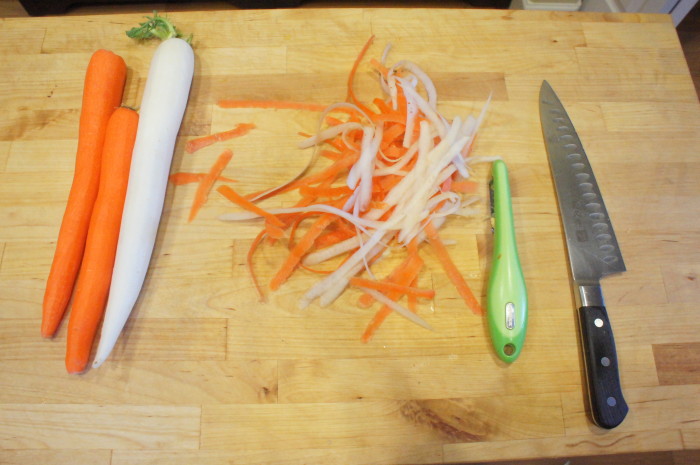
Quick Pickled Daikon and Carrots
2 large carrots
1-2 large daikon
1 tsp salt
2 tsp sugar plus 1/2 cup
3/4 cup rice vinegar
1/2 cup distilled white vinegar
1 cup lukewarm water
Tacos
Small corn tortillas
Lime wedges
Cilantro
Slices of jalapeño (if you like heat)
Sauces: sweet chili sauce, Sriracha, plum sauce…
Instructions
Pulled Pork
To prepare the meat, mince the garlic, ginger, jalapeño, and lemongrass (I did mine in the food processor; see note). Combine those four ingredients, as well as the brown sugar, soy sauce, rice vinegar, and fish sauce in a small pot over low heat. Cook until the brown sugar is dissolved, then pour into your slow cooker. Place the pork shoulder in the sauce, turning to coat, and then cook for 8-14 hours (I did mine for 8… but it definitely could’ve been softer and more fall-apart-tender, so I suggest going for longer). If you are opting to use the portobello mushrooms (which you really should), cut them into large slices and add them to the slow cooker 4 hours before the meat is done.
Quick Pickled Daikon and Carrots
Once the meat is nestled in the slow cooker, ready for the long haul, you can prepare your pickles. Peel and julienne the daikon and carrots, and put them in a bowl. Sprinkle them with the salt and 2 tsp of sugar, and then gently massage/knead them for 3 minutes. When the daikon is very bendy, and a little pool of water has collected at the bottom of the bowl, rinse the vegetables in cold water, and pat or press them dry with paper towels. Put them into a jar (or jars, depending on how big your jars are and how big your carrots and daikon were). Now make the brine by combining the 1/2 cup sugar, rice vinegar, white vinegar, and lukewarm water in a bowl and stirring until the sugar is dissolved. Pour the brine over the vegetables in the jar, and allow to sit for at least 1 hour. In a jar, these will last for about 4 weeks in the fridge.
Tacos
When the meat is cooked, remove the strings, and pull it apart with two forks. Leave the slow cooker on warm while you warm you tortillas, slice your cucumbers and jalapeño, and pick your cilantro. Then, enjoy!
P.S. The meat and sauce and toppings make great leftovers when heaped atop a bowl of fresh rice or soba noodles.
Poppa Herb and I at the Oregon coast, many years ago.
Over Christmas, my sister Emily was raving about this tomato sauce on Smitten Kitchen that I’d seen several times. For some reason, it never really stuck out to me. It’s almost too easy.
But for New Year’s Eve we were having some friends over, and I decided to make fresh pasta with homemade sauce. Knowing full well that I wouldn’t be able to find incredible fresh tomatoes, I decided to give the recipe a shot. And you know what? It was awesome.
I did a few things differently. Firstly, I doubled the recipe. I probably could have still only used one onion, but I used two. Instead of just mashing the tomatoes against the side of the pan, after removing the onion I used an immersion blender to slightly puree the sauce. I’m not a huge fan of chunks in my tomato sauce, so it was a personal taste thing. I also added some chili flakes for a bit of heat.
Easy Year-Round Tomato Sauce

Ingredients
1 28-oz can of whole, peeled tomatoes, preferably San Marzano (yes, you can taste the difference)

5 Tbl unsalted butter

1 medium yellow onion, peeled and halved

Red chili flakes

Salt


Instructions
In a heavy bottomed saucepan, combine butter, tomatoes, onion, and a pinch of red chili flakes. Choose a pan bigger than you might think. The onions can be a little unwieldy while stirring as they’re in such big chunks. Over medium heat, bring the sauce to a simmer, then reduce heat to maintain that simmer. Cook for 45 minutes, stirring every once in a while, and smashing the tomatoes against the sides of the pot (be careful not to squirt all over yourself here). Remove onions from sauce, turn off heat, and, if you’d like, use an immersion blender to lightly purée the sauce. If not, that’s ok too. Season to taste. Use sauce to dress your favorite pasta (homemade or otherwise), or in a lasagna or on pizza.
First, let me apologize for disappearing for a little while. I was laid up in bed with a really terrible cold for most of this week. There was lots of tea, cough drops, movies, tom kha soup, and knitting. But now that I’m back from the land of the ill, let’s talk about granola a little bit.
For a while now, I’ve been making the recipe from Orangette or another friend’s secret granola recipe. And every time I’ve tried to go rogue (aka not exactly following a recipe), my granola ends up too dry, or not sweet enough, or not as crispy as I like it. And I’m not the kind to make the same recipe a thousand times trying to add a teaspoon more of this or up the temperature 13 degrees. It’s not going to happen.
So when I happened upon a granola equation, on Buzzfeed of all places, I immediately wrote it down on a little notepad I’ve started carrying with me wherever I go (can’t recommend that enough). And I’ve used it many times. I’ve made a couple adjustments, and I have a couple of suggestions in terms of which way to lean on some of their more vague instructions, and I want to share it with you.
The Perfect Granola Equation

Ingredients
Dry Ingredients
3 1/2 cups grain This is where most people use oats. I use oats. I guess if you want to use barley or whatever, you can.
1 – 1 1/2 cups nuts I’ve been using mostly a mix of whatever I have around. I like half pecans, half sliced almonds, but I’ve also used walnuts.
1 tsp salt
1 – 2 cups seeds I would suggest leaning towards one cup instead of two. Otherwise it can quickly start to feel like you’re eating birdseed. I’ve been mostly using pumpkin seeds and sunflower seeds (old habits and all that), but I’m itching to try sesame seeds too.
1 cup coconut If you really dislike coconut, you can go without, but it adds a lovely nutty toasty flavor to the granola that I adore.
Spices You can really add as many as you like, but don’t get too crazy. A teaspoon of cinnamon is always a good place to start, and after that, maybe add a quarter teaspoon of one or two other things. I always use a quarter teaspoon of cardamom, and because it’s the holiday season and I associate nutmeg with the holidays, I’ve been adding a quarter teaspoon of that as well.
1 cup dried fruit I’m personally not a fan of dried fruit in my granola – I’d rather cut in a banana or peach or some berries – but if you are, you can add it after baking. If you’re adding something big like dried apricot or figs (as opposed to something small like dried cranberries or cherries), cut it into a rough dice before tossing it in with the granola.
Wet Ingredients
1/2 – 3/4 cup sweetener I like to do mostly maple syrup, though it can get a little pricy. Sometimes I’ll do half syrup and half honey. Agave is another good option.
1/4 – 1/2 cup oil I used to use solely olive oil – I liked the kind of savory-ness it brought to the granola – but I’ve started doing half olive oil and half coconut oil, and I am a big big fan.
1 tsp vanilla


Instructions
Preheat your oven to 300 degrees. Mix dry ingredients in a large mixing bowl. Add wet ingredients, stir until thoroughly combined and coated. Line a rimmed baking sheet with parchment paper, and spread the granola on the parchment. Bake for 45 minutes, stirring every 15 minutes (unless you like clumpier granola, in which case stir once halfway through). Remove from oven, allow to cool, and enjoy.