Tag: Portland

Miso Sticky Toffee Pudding

Miso Sticky Toffee Pudding // Serious Crust
Miso Sticky Toffee Pudding // Serious CrustMiso Sticky Toffee Pudding // Serious Crust

Almost a year ago, there was a piece in the New York Times. I’m not sure where I found it – most likely someone posted it on Facebook – but it struck a chord. It’s called “When a Food Writer Can’t Taste,” by Marlena Spieler, a James Beard Award winning food writer. In the article, she writes about how a car accident, in which she broke both arms and sustained a concussion, completely demolished her ability to taste and smell.

Now, that sounds horrible no matter who you are. But when a food writer loses the senses that bring her the most joy and allow her to work, it’s devastating. Her descriptions of tasting what had once been some of her favorite foods are heartbreaking: “Cinnamon drops, a childhood favorite, were bitter, horrible.” “Bananas tasted like parsnips and smelled like nail polish remover.” “Gently sautéed mushrooms seemed like scorched bits of sponge.” Luckily, the nerves were only damaged, not severed, meaning that she would, in time, recover. She created her own rehabilitation plan, eating and tasting a huge range of foods, forcing herself to taste things like chocolate over and over again, starting with milk chocolate and slowly upping the cocoa content. Things she hadn’t particularly loved before – fish, especially – became a daily craving.

In the end, she recovered most of the way, and though her senses still occasionally go haywire, she can enjoy food to an incredible extent. But I’d like to focus on a specific part of this story: about halfway through the article, she tells us how, though she used to “lack a sweet tooth,” her sweet tooth now couldn’t be ignored. She lists a few things she baked, and they all sound delicious, but one jumped out at me: miso sticky toffee pudding.

When I studied abroad in London, I became a fan of sticky toffee pudding. It’s not pudding like we think of in the states. It’s a cake that is sweet but not too sweet, drenched in a warm toffee sauce that seeps into the cake, resulting in a moist, warm, absolutely fantastic dessert. Now I have looked for a recipe for Spieler’s mystical dish, and I am not the only one. The day after the article was published, someone tweeted at Spieler asking for the recipe. There’s a Chowhound thread asking if the recipe can be found anywhere (yes, I commented). But I couldn’t find it, and it seems, neither could anyone else. There are recipes for miso toffee, and for sticky toffee pudding with miso ice cream, but not this exact dessert. So, after talking with my baker friend Caitlyn, we decided to make one ourselves.

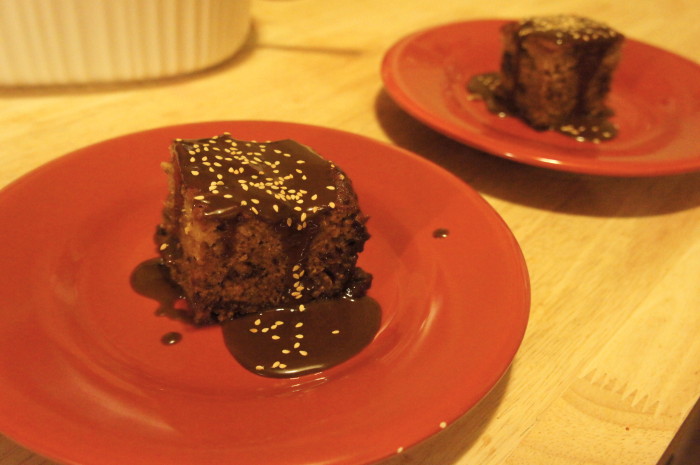
We decided to adapt David Lebovitz’s sticky toffee pudding recipe, and really, there were only a couple simple changes to be made. (In retrospect, I should’ve used Spieler’s sticky toffee pudding recipe, but I never happened upon it until I was sitting down to write this.) The resulting dessert is sweet, salty, caramelized, strong, and unique. Its flavors are perhaps a bit confusing at first, but I think the way they swirl around your tongue, combining to create a balance of sweet and savory is a fun adventure.

Miso Sticky Toffee Pudding

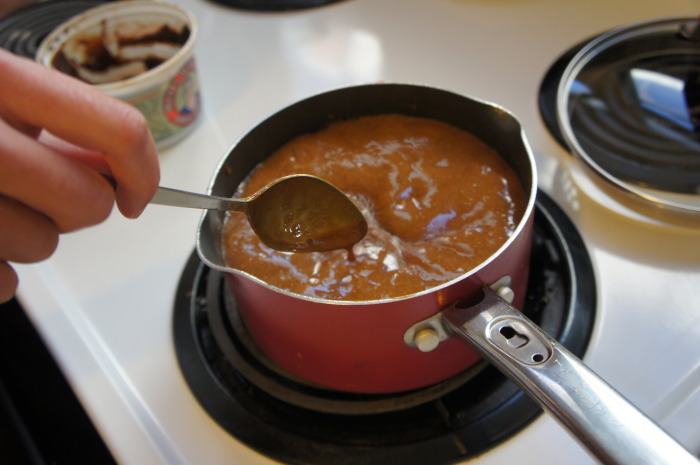
Note: I have made this recipe now with both red and white miso paste. While I personally liked the white miso better, Caitlyn, Jonah, and Caitlyn’s boyfriend Dylan liked the red. On one hand, I think the deeper, more caramelized flavor of the red miso was nice, and on the other, the white provided a little more brightness, while bringing the same level of saltiness. Both are good, so it’s up to you which you use.

Ingredients

Toffee Sauce

2 cups heavy cream
1/2 cup muscovado sugar (if you don’t have that, demerera or dark brown sugar will do)
2 1/2 Tbl molasses (we used Blackstrap)
2-3 tsp miso paste (start with two teaspoons, and add up to another teaspoon to taste)
1-2 Tbl toasted sesame seeds

Pudding

6 ounces pitted dates, snipped into small pieces
1 cup water
1 tsp baking soda
1/3 cup candied ginger, chopped
1 1/4 cups flour
1 tsp baking powder
1/2 tsp salt, preferably fine
4 Tbl unsalted butter, softened to room temperature
3/4 cup granulated sugar
2 large eggs, at room temperature
1 tsp vanilla extract
toasted sesame seeds, to serve

Instructions

Toffee Sauce

Preheat your oven to 350 degrees F, and butter an 8 1/2 inch porcelain soufflé dish, or something of a similar size.

In a medium sized saucepan, bring the cream, muscovado sugar (or other dark brown sugar), molasses, and miso to a boil, stirring often to melt the sugar, and keeping a close eye to make sure it doesn’t burn. Lower the heat and let simmer for about five minutes, stirring constantly, until the sauce has thickened and coats the spoon. Try your best to break up any chunks of miso. Pour roughly half the sauce into your buttered baking dish, sprinkle the toasted sesame seeds over the toffee sauce, and place the dish in the freezer. Set the pan with the rest of the sauce aside for serving.

Pudding

In another medium saucepan, bring the dates and water to a boil over medium heat. Once boiling, remove from the heat and stir in the baking soda and ginger. Set aside, but keep slightly warm – leaving it on low heat isn’t a terrible idea.

In a small bowl, sift together the flour, baking powder, and salt. In a large mixing bowl (you can use an electric mixer), cream together the butter and granulated sugar. Add the eggs one at a time, and then the vanilla, stirring to combine. Add half of the flour mixture, then the date mixture, and then add the rest of the flour mixture, stirring between each addition. Be careful not to over-mix the batter.

Remove the baking dish from the freezer and pour the batter in over the toffee and sesame seeds. Bake for 50 minutes, or until it passes the toothpick test. Allow it to cool slightly before serving. To serve, warm the toffee sauce, spoon portions of the pudding onto plates or bowls, and top with the warm toffee sauce and a sprinkling of toasted sesame seeds. Whipped cream or vanilla ice cream will make a nice topping. I’ve also topped mine with some homemade anise-cardamom ice cream (based on the anise ice cream from David Lebovitz’s The Perfect Scoop).

According to Lebovitz, if you’re making the pudding in advance of serving, bake it without the toffee in the bottom of the dish. Close to serving time, poke the cake about 15 times with a chopstick or skewer, and distribute half the toffee sauce over the top. Cover with foil, warm in a 300 degree oven for about 30 minutes, and then follow the serving instructions above.

Banana Bread with Miso and Ginger

Banana Bread with Miso and Ginger // Serious CrustBanana Bread with Miso and Ginger // Serious Crust

I heard people were getting worried. In the week before I posted the recap of Feast last week, at least two people said to me, “I was looking at your blog, and noticed you haven’t posted in a month! Is everything ok?” Which at least means they hopefully like coming over to this little corner of the internet. Mostly though, it has just been a wildly busy month. But hopefully things are calming down a little bit, and as we settle into fall, I can get back to more cooking and writing.

A few weeks ago we cleaned out our freezer to make room for a giant tub of Salt & Straw ice cream, and discovered that we had so many frozen bananas. You know, every time a banana or two gets overripe, you throw it in the freezer, thinking “Oh, I’ll use it soon.” But you always forget. Anyway, I saw this pile of bananas and thought to myself, ok, the time has come. But of course I didn’t want to make just a traditional banana bread. So I took a standard banana bread recipe from Food52 and added a couple things: miso and crystallized ginger.

If you’ve never baked with crystallized ginger before, I highly recommend it. My family likes to put it in apple pie at Thanksgiving. It lends a nice bit of spiciness, and makes you feel a little bit healthy about whatever baked good you’re eating. What is it about ginger that makes everything it’s in seem healthy? How misleading. In this bread, you’ll find little zings of it as you munch on this moist quick bread, a perfect combination of sweet and savory (thanks to the miso).

Banana Bread with Miso and Ginger

Makes 1 loaf

Ingredients

3 large or 4 small ripe bananas
1 egg, lightly beaten
3/4 cups granulated sugar
3 Tbl butter, melted and cooled
4 tsp white miso (optional)
2 cups flour
1 tsp baking soda
1 tsp baking powder
1/3 cup crystallized ginger, chopped

Instructions

Preheat your oven to 350 degrees. Butter a loaf pan (5×9 inches).

In a large mixing bowl, mash the bananas. Add the egg and sugar, stir to combine, then add the butter and miso. Mix until thoroughly combined.

In a small bowl, sift together the flour, baking powder, and baking soda. In two additions, fold the dry ingredients into the wet, being careful not to overmix. Gently fold in the crystallized ginger. Pour into loaf pan.

Bake for 45-60 minutes, until a toothpick (or wooden skewer, which is what I had on hand) inserted into the center of the loaf comes out clean. Cool for ~5 minutes in the pan, then remove onto a cooling rack. This bread is best served warm and fresh. If you’ve got some leftover, store in the fridge for best second-day results.

Feast 2014 Oregon Bounty Grand Tasting

Feast 2014 Oregon Grand Bounty Tasting // Serious Crust

Please tell me you’ve heard of Feast. The three-year-old food festival that now takes over Portland for a weekend in late September? The one with so many incredibly opportunities to eat, drink, and be merry? The one where you can easily spot your 5 favorite foodie celebrities in a single day?

This was my first year attending Feast, and I was (unfortunately) only able to hit up one event due to some scheduling conflicts with the band. But the event I did get to go to, the Oregon Bounty Grand Tasting, was 5 hours of tastebud extravaganza, meeting lots of people, and watching cooking demos. My dad and Darla came down for the weekend (they drove out to our gig with us over the weekend), and the three of us went to Pioneer Square to enjoy all that Oregon has to offer.

We made it to the tents in time to grab a couple wine pours and food samples before sitting down to watch Chef Naomi Pomeroy whip up a pork loin with romesco sauce (which, after sampling, inspired me to finally make some romesco sauce of my own). Afterwards, as we moved from some pâté panna cotta with Oregon berries and a parmesan tuile from Uptown Billiards Club, to Eliot’s Adult Nut Butters, to kale salad with smoked salmon (from I’m not every sure who), to crazy delicious bites from Three Little Figs, to some awesome bloody mary shooters from Face Rock Creamery, to tomatoes sprinkled with varied salts from Jacobsen Salt, to of course incredible ice cream from Salt & Straw (served by the one and only Jon Wash), and possibly my favorite dessert: Salt & Straw Olive Oil ice cream topped with Cacao drinking chocolate and candied cocoa nibs. I realized something. I am so unvelievably lucky to live in a city that not only has food like this at every turn, but to live in a city that creates a festival like this, that brings all these artisans and chefs and wineries and breweries together, and has this community around food. I think it’s pretty cool, don’t you?

Feast 2014 Oregon Grand Bounty Tasting // Serious Crust

Let it be known that we also enjoyed some beautiful wines poured by some beautiful people. The wineries that were pouring were some of the best in Oregon, and they were pouring wines that range from $20-70 a bottle. It was a chance for me to try some wines that, let’s face it, I would otherwise not have been able to. Some favorite wineries included Elk CoveAdelsheim VineyardsChehalem, and Penner-Ash Wine Cellars.

Overall, it was a beautiful day spent eating and drinking with some of my favorite people. I met some new friends (like Ian and Mike from Pfriem Brewery), bumped into some old ones (Erin from Bakery Bingo, Rachel from Love, Rachel, and, from afar, Bee from The Spicy Bee), and truly enjoyed discovering all the wonderful food and drink coming from the wonderful Pacific Northwest. Lucky girl, indeed.

Easy Energy Bites

Easy Energy Bites // Serious Crust

So these energy bite things have been popping up in my life for a while now. I’ve seen them everywhere: favorite foodie websites, blogs, Pinterest (duh, everything is on Pinterest), and on my sister’s Facebook. I tried a batch inspired by Sprouted Kitchen that was peanut butter heavy, but they weren’t really my jam (but maybe peanut butter is your jam, or jelly, as it were). After talking to my sister, she inspired me to try her version. And they were great. They were fruity, jammy, chewy, and a little nutty, similar to Larabars.

The beauty of these is that they could not be easier to make. Also, people have found them really impressive, even though they took a mere pressing of buttons to make. The other beauty of these is that you can make them using whatever you’re in the mood for. On this particular day, dried apricots and cherries were calling my name. But I also wanted a little decadence, so I threw in some semi-sweet chocolate chips. The possibilities are endless. And I like that.

Easy Energy Bites

Note: you will need a food processor to make these. You could try them in a blender, but I’m not making any promises about what might happen.

Ingredients

1 cup nuts (I used almond) – toasting optional
1 cup pitted dates
1 cup dried fruit (I went for half apricots, half sour cherries)
Optional: 1/2 cup semi-sweet or dark chocolate, or cocoa nibs

Instructions

Get out a large piece of wax or parchment paper.

Combine the nuts, dates, whatever dried fruit, and chocolate (if you’re using it) in a food processor. Pulse a few times to break up the ingredients, stopping to separate the dates if they clump together. Now, turn the food processor on for 30 seconds or so. Everything should break down every more to crumbly pieces. Scrape down the edges of the bowl. Process again for 1-2 minutes until a paste starts to form and the ingredients clump together into a ball. Dump the paste/dough onto the piece of parchment or wax paper, and press it with your hands until it forms a square, roughly 8×8. Wrap up the dough, and let cool in the fridge for at least an hour, or up to overnight.

Once the dough is chilled, unwrap it, slice it into bars of whatever size. You can individually wrap the bars if you’d like, but I stacked mine in a tupperware and stored them in the fridge. Note that they don’t necessarily need to be kept in the fridge, but doing so will help them maintain their shape and firmness. Room temperature bars will be softer and pastier.