Summer

This meal is brought to you by Alice Waters

This meal is brought to you by Alice Waters

This meal is brought to you by Alice Waters

This meal is brought to you by Alice Waters

This past weekend my dad and his girlfriend came down to Portland to visit me and Jonah. They had given Jonah a cookbook, “The Art of Simple Food” by Alice Waters, for his birthday, and so we decided to make them a full meal straight out of the book as a little thank you. If you don’t know who Alice Waters is, she’s a chef at a restaurant called Chez Panisse in Berkeley, CA. The restaurant is known for organic, local ingredients and simple cooking. She has written about a million cookbooks. Anyway, for dinner we made: salad, Baked Wild Salmon with Herb Butter, Chard with Butter and Parmesan, and Roasted Butternut Squash for dinner. It was quite a meal. I’ll do one recipe at a time here so they aren’t all intertwined. Make things a little easier.

The meal was really delicious, fresh tasting, and best of all, SIMPLE. I guess the title of the cookbook doesn’t lie. These vegetable dishes were really filling and would make a great vegetarian meal. Enjoy!
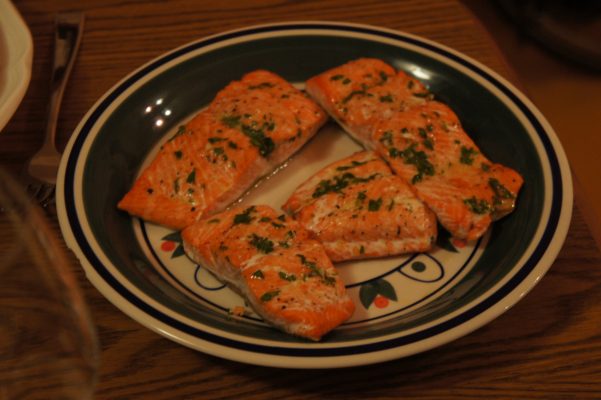
Herb-Butter Salmon, Roasted Butternut Squash, and Chard with Parmesan

Ingredients

Herb-Butter Salmon

1 stick of butter at room temperature
1/2 cup chopped herbs (we used parsley, chives, and tarragon)
1 finely chopped garlic clove
a squeeze of lemon juice
salt
pepper
cayenne
1-1 1/2 pounds wild salmon fillet

Roasted Butternut Squash

2 small butternut squash
1 medium shallot, coursely chopped
4 cippolini onions, peeled and quartered
about 1 Tbl of roughly chopped (or torn) sage leaves
olive oil
salt

Chard with Parmesan

one bunch of Chard
2-3 Tbl butter (depending on how buttery you want your chard)
1/2 – 1 cup of grated parmesan cheese

Instructions

Herb-Butter Salmon

Preheat the oven to 425 degrees. Stir the ingredients for the herb butter in a small bowl. Add lemon, cayenne, salt, and pepper to taste.

Season the salmon with salt and pepper. Oil a baking dish/sheet and put the salmon on skin side down. Drizzle the fish with oil. Bake 7-10 minutes, until the flesh is “just set and still pink in the center.” After taking the salmon out of the oven, spoon some of the soft herb butter over each piece of fish, and put the rest in a small bowl on the table.

Roasted Butternut Squash

Preheat your oven to 350 degrees. Peel the squash, cut in half, and remove the seeds. Cut the squash into 1/2 inch pieces. Throw them into a baking dish with the chopped shallot, cippolini onions, and sage. Drizzle with olive oil and sprinkle with salt. Pop the dish into the oven for about an hour and a half, stirring about halfway through. Test the doneness of the squash before taking it out of the oven to make sure it’s cooked through.

Chard with Parmesan

Remove the leaves from the ribs of the chard, wash the leaves, and cook them in salted boiling water. When the leaves are tender, about four minutes, drain them in a colander and allow to cool, then squeeze out the excess water.

In the same pot you used to cook the chard, melt the butter over medium heat. While the butter is melting, roughly chop the chard. Add the chard to the butter and heat through. Stir in the parmesan, remove from heat, and serve! Sometimes I’m a little skeptical of cooked leafy greens (the texture can be a little slimy for me) but I really enjoyed this. I was careful not to overcook the chard, and the butter and cheese certainly added to the flavor. Because really, what doesn’t taste good with butter and cheese on top?

Red Velvet Cupcakes

Red Velvet Cupcakes

Red Velvet Cupcakes

Red Velvet Cupcakes
Red Velvet Cupcakes

The other day I was hanging out with my dear friend Erica. She was craving some red velvet cupcakes, and so, like a good friend, I told her I’d make her some. That’s right. That’s what friends do for each other. We make cupcakes.

I had never made red velvet cupcakes before, or really thought about what’s in a red velvet cupcake, so I was a little surprised when I started doing research. Cocoa powder, LOTS of red food coloring, buttermilk and white distilled vinegar? Uh… ok. I found a wonderful recipe on a great blog called Ming Makes Cupcakes. I’d made cupcakes from this site before and the pictures are so pretty. I really can’t wait to try more. I ended up doubling the recipe (I wanted to make more than 12 cupcakes!) except the food coloring, which I didn’t double because I didn’t have anymore and one little bottle seemed like enough. However I didn’t double the frosting because it seemed like it’d be enough, and it was!

Anyway, I packed them up and took them to rehearsal (for the show I’m in with that friend, Erica) and they were a huge hit! Nice and moist, good frosting to cupcake ratio, and perfectly red. They were a little bit oily for me, so I think next time I might try bringing down the amount of oil. Also, I wouldn’t have minded if they had been a teensy bit chocolatier. Oh well, some things to play with for next time. They were still incredibly delicious. Enjoy!

Red Velvet Cupcakes

Ingredients

Cupcakes

2 1/2 cups flour
1 1/2 cups sugar
1 tsp baking soda
1 tsp salt
2 Tbl cocoa powder
1 1/2 cups vegetable oil
1 cup buttermilk
2 eggs
1 Tbl red food coloring
1 tsp white vinegar
2 tsp vanilla

Frosting

1 stick butter, room temperature
2 1/2 cups confectioner’s sugar
1/4 cup milk
1/2 tsp vanilla

Instructions

Cupcakes

Preheat your oven to 350 degrees. In a bowl, combine the flour, sugar, baking soda, salt, and cocoa powder. In an electric mixer, combine the dry ingredients: oil, buttermilk, eggs, food coloring, vinegar, and vanilla. Now, slowly add the dry mixture to the wet mixture. I did it in batches, just to make sure it was getting thoroughly blended with no clumps!

Put cupcake liners in your cupcake pan and fill them up with batter. I found that you could actually fill them pretty full. These cupcakes don’t rise a ton, so I filled them up probably 3/4 of the way. Now bake them for 25 minutes, or until a toothpick inserted comes out clean.

Frosting

While the cupcakes are cooling, clean out your mixer bowl, put it back together, and beat the butter until it’s light and fluffy. Add the sugar, milk, and vanilla, and beat until the consistency looks like frosting. If it’s too dry, add a little more milk. If it’s too wet, add a little more sugar.

Time to frost them. I started out not using too much frosting because I wanted to make sure there was enough for all of them, but there was plenty to go around. I love icing cupcakes, making the tops look like they would at a little bakery… So fun.

Spaghetti and Meatballs with Molly!

Spaghetti and Meatballs

Spaghetti and Meatballs

Spaghetti and Meatballs

Spaghetti and Meatballs

Last weekend, my baby sister came down to Portland to visit me and Jonah (as well as some of her college friends who live here). On Saturday night she came over for dinner, and we whipped up a quick and delicious spaghetti and meatballs. The sauce recipe came from my Cook’s Illustrated Cookbook and the meatball recipe came from Martha Stewart.

This pasta was actually way better than I anticipated it being for how easy it was. The sauce was really light and simple, which was a good balance for the meatballs which were a little creamier (because of the parmesan and milk and bread). It was filling and delicious and made for good leftovers. Enjoy!

Spaghetti and Meatballs

Ingredients

Tomato Sauce and Pasta

3 Tbl olive oil
2 cloves of garlic, minced
1 (28-ounce) can of diced tomato
2 Tbl (or more) of course chopped fresh basil
1/2 tsp salt
1/4 tsp sugar
1 lb spaghetti

Meatballs

8 ounces ground beef
8 ounces ground pork
1 garlic clove, minced
1/2 cup finely grated Parmesan cheese
3 tablespoons parsley, finely chopped
2 large eggs, lightly beaten
Coarse salt and freshly ground pepper
1 1/2 slices white bread (Martha says to just tear the bread up into small pieces, which we did, but I think it would have been better if we’d thrown it into the food processor because then it would’ve been in smaller pieces)
1/4 cup milk

Instructions

Tomato Sauce and Pasta

First, make the sauce. Heat 2 Tbl of oil and the garlic in a saucepan over medium heat. Cook the garlic until it’s golden, but not too brown, a few minutes. Add the tomatoes (including their juice, of course) and bring to a simmer. Cook until the mixture is slightly thickened, about 10 minutes. Remove from heat, then add the basil, sugar and salt. We didn’t want our sauce too chunky, so before adding the basil, we blended it a little bit with a hand blender. While we were making the sauce, we also cooked the pasta alongside.

Meatballs

In a bowl, combine the beef and pork (using your hands). Add the garlic, cheese, parsley (we didn’t have any so we skipped that part), and eggs. Season with 1 1/4 tsp salt and some pepper. While you’re adding all these things, soak the bread in the milk for a few minutes, then stir into the meat.

Now roll the meat into 1 1/2 inch balls. The recipe also said to refrigerate them for 1 hour, which probably would have helped them hold their shape, but whatever. We were hungry. So we just heated a couple tablespoons of olive oil in a pan over medium-high heat. Cook the meatballs until browned on all sides (6-ish minutes) and then transfer them to the simmering sauce. This is where they’ll actually cook through. Be sure to check and make sure they’re done by just cutting a meatball open.

Drain your pasta a teensy bit before it’s fully cooked (if you haven’t already at this point) and put it back in the pot. Add the pasta sauce and meatballs to the pasta and cook a little bit longer in the sauce. According to Molly, this is what Anthony Bourdain says to do. I trust that guy. And serve!

Serve it up and garnish with some fresh basil and parmesan cheese!

Dad’s Cheesecake

Dad's Cheesecake

Dad's Cheesecake

This past Friday was Jonah’s birthday. A while back he told me that he really likes cheesecake, and I immediately thought of my dad’s insanely delicious cheesecake recipe. He has made this cheesecake for some big events over the years (I seem to remember him making like 7 for my older sister’s bat mitzvah). I swear it is the creamiest cheesecake I’ve ever had. I had never made it myself before, so I was a little nervous. I just wanted to do everything right!

Also, you should know that in our family, this recipe is pretty top secret. When I told my dad I was putting it on the blog, he may have been a little hesitant. He said “No! We have to make people beg for it! Pine after it!” So the fact that I’m just giving it to you for free is a sign of how much I love you. And that it’s so good that I want to share it with the world. It’s so good that if everyone ate it, it may bring us world peace.

Cheesecake

Ingredients

Graham Cracker Crust

1 7/8 cups graham cracker crumbs
5 Tbl sugar
1/2 cup butter, melted

Cheesecake Filling and Assembly

2 ½ pounds cream cheese
1 ½ cups sugar
2 Tbl flour
1/8 tsp salt
5 whole eggs + 2 extra egg yolks
½ cup heavy cream
1 tsp vanilla extract

Instructions

Graham Cracker Crust

Ok, let’s start with the crust. I just picked up a box of graham cracker crumbs and got the recipe off the side of the box. In my family we like a bit of a thicker crust, so I multiplied the recipe by 1.5. Preheat the oven to 350 degrees. Combine sugar and crumbs in a bowl, add the melted butter. Mix in the butter thoroughly. Pack the mixture into a spring form pan, pressing firmly into the bottom and up the sides. Bake for 8 minutes, and allow to cool before filling.

Cheesecake Filling and Assembly

Once the crust is out of the oven, turn up the heat to 475 degrees. Have the cheese at room temperature. Beat it in an electric mixer until soft and creamy. Now add in the sugar, flour, salt, and the 5 eggs, one at a time. Beat in the egg yolks, cream, and vanilla until very smooth.

Pour the cheese mixture into the spring form pan slowly. Bake in a preheated 475 oven for 10 minutes. Reduce heat to 225 and bake 1 hour longer. Turn off the heat, crack open the oven door and let cake settle in oven for 15 minutes (or longer… I did probably about 30 minutes just because I was running around doing other stuff). When you crack the oven open, run a knife around the edge of the cheesecake, between the crust and pan, so that when you remove the sides of the spring form it’s easier.

Remove from the oven and cool for at least 4 hours before removing sides of spring form. It’s best to put it in the fridge so it can really settle. If you’re going to leave it overnight (like I did), be sure to cover it so it doesn’t get dried out or anything like that. The crust crumbled a lot when serving, but it’s all good because this stuff is so delicious that no one will care. It’s moist and creamy and very rich. Bon appetit!

Revisiting Pie Dough

Pie Dough
Pie Dough
Pie Dough
Pie Dough
Pie Dough
Pie Dough

I know I’ve already posted my pie dough recipe, but I recently made another batch and took more pictures. I thought this might be helpful for first-timers so they have a better idea of what each stage looks like. Hopefully this is helpful!

Pie Dough

Ingredients

2 cups flour
1 tsp salt
1/2 cup shortening (I like to use vegetable, Crisco)
1/2 cup (1 stick) butter
3-5 Tbl ice water

Instructions

In a food processor, combine flour and salt. Then add shortening all at once, but in pieces, pulse. Do the same with the butter (cut it into pieces, add, and pulse). After pulsing in the butter and shortening, your mixture should have the appearance of rough sand. Drizzle the ice water, 2 tablespoons at a time, over the mixture and pulse. Stop adding water when your dough comes together in the processor and looks something like this. Dump the dough out onto a floured surface.

Dump the dough onto a lightly floured surface and form it into a large ball. Cut it in half. The less you handle the dough in these next couple steps, the better. Less handling means more flakiness. Gently form each chunk of dough into a disc, about 1 inch thick (roughly, it doesn’t really matter). Wrap the discs in saran wrap (or wax paper) and refrigerate for at least 30 minutes.

After the dough has been refrigerated, you can remove it and roll it out. Like I said before, I like to roll it out on the saran wrap it was wrapped in so that I can use that to help flip it into the pie dish. As you can see, this recipe makes enough dough for one covered pie or two uncovered pies. Enjoy!

Seared Sea Scallops with Carrot-Marjoram Sauce

Seared Sea Scallops with Carrot-Marjoram Sauce

Seared Sea Scallops with Carrot-Marjoram Sauce

Seared Sea Scallops with Carrot-Marjoram Sauce

When Jonah’s parents were in town, we had them over for dinner. My dad had sent me a recipe for these scallops with reduced carrot sauce that he made a couple times when I was younger. This is the recipe that made me discover scallops. I used to think scallops were gross, the texture was a little too slimy for me, so I never ever ate them. But this sauce was so good that I tried one of the scallops that was drenched in it, and now scallops are one of my favorite seafoods.

This recipe is from The Herbfarm Cookbook, which is a book my dad uses all the time. The Herbfarm is a restaurant in Woodinville, Washington (near where I grew up). I’ve never eaten there, partially because $$$$$$ and partially because you have to make reservations hella in advance. Anyway, if you’re in the market for a beautiful cookbook with lots of good recipes, here’s one to check out.

Seared Sea Scallops with Carrot-Marjoram Sauce

Serves 4 people

Ingredients

2 cups fresh carrot juice (one of those personal Odwalla bottles is usually 2 cups)
1/2 cup dry white wine or dry vermouth
3 Tbl freshly squeezed lemon juice
1 medium shallot, finely chopped (about 1/3 cup)
1/4 tsp salt
4 Tbl unsalted butter, room temperature, cut into 8 pieces
8 3-inch sprigs fresh marjoram, tied together with kitchen twine (if you can’t find marjoram, you can substitute fresh tarragon or fresh lemon thyme)
1 1/2 pounds large sea scallops (~12), untreated (dry-pack)
salt and pepper
2 Tbl vegetable or olive oil

Instructions

A warning before we start. This recipe is long. But it’s not really that hard, it just seems hard because there are a lot of steps. However, it is totally worth it because these scallops and this sauce are so delectable. I promise. Just try it. I’m going to type it out in the same steps as in the cookbook because it breaks it down into little pieces. Quite nice if you ask me.

Combine the carrot juice, 1/4 cup of the wine, the lemon juice, shallot, and salt in a medium saucepan. Bring to a boil over high heat, then reduce the heat just enough to maintain a steady boil. Cook the mixture until reduced to about 1/2 cup of liquid. The sauce should be thicker, about “the same consistency as pulpy orange juice.” This should take about 20-30 minutes. You can do this step ahead of time and stick the mixture in the fridge overnight.

Reduce the heat so the sauce is gently simmering and add the butter, one piece at a time. Whisk the butter in, and wait until each piece is melted and incorporated before adding another. Return the sauce to a simmer, whisking constantly. Add the bundle of marjoram, submerging it completely in the sauce, and remove the pan from heat. Set aside till you’re done cooking the scallops!

It’s time to sear the scallops. I’ll let you know that Jonah and I struggled a little bit with this step, mostly because we decided to try to use our cast iron skillet (the recipe says to use a heavy bottomed saute pan). We’ve had some trouble, despite reading about how to cook in a cast iron and clean and care for it, with things sticking to the pan, and can’t really figure out what we’re doing wrong. Anyway. The recipe also says to heat your oven to 175 and then turn it off and you can put the scallops in there to warm them, but our oven was otherwise occupied, so we just put them on a rack on a pan.

Pat the scallops dry and season them lightly with salt and pepper. Heat the oil in whatever pan you choose to use until it is very hot and smoking. Using tongs, carefully put the scallops flat side down in the pan. Let them cook without touching them for 2-3 minutes or until the side touching the pan is a deep golden brown. Then turn them and cook them another 1-2 minutes on the other side. When you turn them, you want to preferable put them in a different part of the pan, where there has not just been a scallop. When they’re done cooking, remove them from the pan and put them in the oven or on a rack or whatever you choose to do.

Reduce the heat to medium and add the other 1/4 cup of wine. Scrape up the little browned bits in the pan and add the liquid from the pan to the carrot juice.

Remove the marjoram bundle from the carrot sauce, squeeze it dry, and get rid of it. Reheat the sauce over medium heat, whisking in the oil/wine mixture from the scallop pan. Season to taste with salt and pepper if needed. If you want the sauce to be super smooth, you can put it through a fine sieve. I like the little scallop bits and shallots, so we skipped the straining. Now put the scallops on plates, dress them with the sauce, and enjoy!

Seared Sea Scallops with Carrot-Marjoram Sauce

Roasted Carrots

Roasted Carrots
Roasted Carrots

I love roasting vegetables. It makes them a wonderful texture, a little crispy on the edges, condenses the flavors, often makes them a little sweeter. Oh man, it’s just so good. One of my favorite veggies to roast is carrots. I love to toss them with a little olive oil, honey, and salt. It brings out the sweetness and makes them caramelize a little more.

Roasted Carrots

Ingredients

Carrots
Honey
Oil (preferably olive, but vegetable oil is fine)
Salt

Instructions

Preheat your oven to 375 degrees (or 400, depending on how quickly you want them to cook). Peel and cut your carrots into bite size pieces (see picture below to see about how big I cut mine). Toss them in oil, honey, and sprinkle with salt. Measurements of each kind of depend on how you want them to taste. You want them to be evenly covered in oil. If you think you might want them sweeter, do quite a bit of honey, or not if you don’t. I know it’s kind of vague, but I promise you’ll just be able to tell depending on how many carrots you’re cooking and what you want them to taste like.

How long you cook them for is another guessing game. Firstly, it depends on how crispy/burnt you want them. I like mine to be fairly dark at the edges, so I roast them for about an hour at 375. But sometimes more and sometimes less. Second, it depends on how many carrots you’re roasting. You don’t want them too crowded on the pan otherwise they’ll do more of a steaming kind of thing. Also, you want to toss them about halfway through your cook time.

So this posting was really more of a “carrots tossed in this stuff and roasted are good” than an exact recipe, but it’s worth it just for anyone to discover the joys of this dish. Experiment a little and find the right amounts, temperature, and cook time for you! I promise, it’s worth it.

Sea Salt and Thyme Chocolate Chunk Cookies

Sea Salt and Thyme Chocolate Chunk Cookies

Sea Salt and Thyme Chocolate Chunk Cookies

Sea Salt and Thyme Chocolate Chunk Cookies

Sea Salt and Thyme Chocolate Chunk Cookies

Last weekend when I was in Seattle for my dad’s birthday, he informed me that he had been wanting some cookies or something sweet around the house. My sister and I were a bit dumbfounded because my dad always hated having sweets around the house when we were younger. Of course I told him I’d take care of it. So I pulled up a recipe I had saved on my pinterest for sea salt and thyme chocolate chunk cookies. This recipe is adapted from Desserts for Breakfast, a blog I discovered about 2 weeks ago, and it looks so lovely, so I couldn’t wait to try something from it.

These cookies were so delicious. After baking, the thyme becomes really aromatic. I was a little worried you wouldn’t taste it, but you definitely do. It’s not too strong though, so don’t worry. And the salt and chocolate is a perfect combination. These are just a really lovely grown-up version of a chocolate chip cookie. Enjoy!

Sea Salt and Thyme Chocolate Chunk Cookies

Ingredients

1 1/2 cups unbleached bread flour
1 2/3 cups all purpose flour
3/4 tsp baking soda
1 tsp coarse salt
2 Tbl fresh thyme leaves
2 sticks butter, room temperature
1 cup dark brown sugar
2/3 cup white sugar
1 Tbl molasses
2 eggs
1 cup semisweet chocolate chunks, more or less if you like
1 cup dark chocolate chunks, more or less if you like
sea salt

Instructions

Preheat your oven to 350 degrees. Grease your cookie sheets. In a large bowl, combine the dry ingredients: bread flour, all purpose flour, baking soda, salt, and thyme. Set aside. In your mixer, cream the butter, then add brown sugar, white sugar, and molasses. Beat until the mixture is light and fluffy. Add the eggs, mixing well after each addition. Then, slowly add the dry ingredients (think a few batches). Combine well! Now fold in the chocolate chunks.

Now, form the cookies using about 2 Tbl of dough, rolling it into a ball, putting it on the pan, and pressing down slightly. These guys spread a bit, so make sure they aren’t too close together. Now sprinkle a little bit of sea salt on each cookie.

Pop them in the oven for 12 minutes or until the edges are just turning brown, rotating the pan halfway through. When you remove the pan from the oven, let the cookies cool on the pan for 2 minutes and then move them to a plate or cooling rack to cool completely.

Plantains with Cinnamon

Plantains
Plantains

Let me tell you about Jonah’s and my living situation. We live in a family’s basement. Sounds awesome right? Let me tell you more. They refurnished half of their basement into this adorable studio apartment, which is actually pretty big for a studio. And instead of paying rent we work for the family: childcare (nannying 3 children is no easy task, I now feel for the nannies I had when I was younger), cooking, and cleaning. Thus far, it has actually been a really wonderful learning experience for us.

The family is gluten-free and Kosher, as well as having a few other dietary restrictions, so cooking for them can be a little complicated, but also has opened new doors for me. Early on in our time with them, one day the father of the family pulled out a tupperware of plantains he had quickly cooked in just oil and told me, “These are going to go bad soon. See if you can get the kids to eat them?” I told him I’d do my best.

Now, I’d never really encountered plantains before, at least not that I remembered, except for one time this past summer when a friend cooked them for us. I know from Jonah’s time in the Dominican Republic that they’re often fried and kind of bland, and I didn’t want that. So I sauteed them in a little butter and cinnamon, got them all caramelized and warm, and the kids ate them up like they were tootsie pops. They tasted so good! They have plantains at the New Seasons by our house, so sometimes I buy them and do the same thing I did for the kids. Delicious.

Plantains with Cinnamon

Ingredients

A plantain
Some butter
Some cinnamon

Instructions

Sounds difficult, right? Slice up the plantain. Melt some butter in a pan. Sprinkle cinnamon over the butter. Put in the plantains. Sprinkle the other side with cinnamon. Cook on both sides until browned and caramelized.

These are so incredibly easy to make, they taste delicious, and are pretty healthy! And I even got picky children to eat them. So you know they’re good.

A Loaf of Bread

bread
bread

bread

Remember a little while back (in the cheddar and sage biscuits post) when I said I had bought some yeast and wanted to use it to make some bread? So I finally did that. I was more than a little bit frightened, and while all did not go perfectly smoothly, it worked! Very cool!

I hunted online for a while for some beginner bread recipes. While I was tempted to jump in and start with crusty french loaves and sourdoughs and breads with all kinds of stuff in it (think garlic cloves, spices, onions, anything else you can dream of), I thought it best to start simply and try to figure this thing out. I found this recipe for just a basic white loaf which didn’t require me to go to the store and buy anything, so already I was a big fan.

I used my kitchenaid mixer because it makes life easier. But a lot of the recipes I read are like “it’s so easy you don’t even need a mixer!” Whatever.

Sandwich Bread

Makes 1 loaf

Ingredients

1 package of active dry yeast
1 1/2 tablespoons butter, melted
1/4 cup milk
5 teaspoons sugar
1 teaspoon salt
2 – 3 1/2 cups flour
cooking spray or other oil

Instructions

First, warm the bowl by filling it with hot water, then dumping it out. Then dissolve your yeast according to the directions on the packet. Stir until yeast is completely dissolved, with no lumps. I think this is where things started to get wonky for me. I think the recipe assumes your yeast packet will call for 1 cup of warm water, but mine only called for 1/4 cup.

Now add the butter, milk, sugar, and salt to the yeast and stir until it well blended (it will look like a slightly yellow-ish tan liquid). Now add 2 CUPS of flour. No more! Not yet! Mix this very well. If the mixture is still wet, add more flour 1/4 cup at a time, mixing well before adding anymore. Now the recipe I used called for at least 2 1/2 cups of flour, so I mixed in the 2 cups of flour, then pretty quickly added another 1/4 cup thinking it wouldn’t be a big deal. But a big deal it was, my friends. My dough immediately became too dry, crumbling into a million little pieces and it WOULD NOT come together. I was so frustrated! A couple other recipes I had read in my research had said “If your dough is too wet, add more flour. If it is too dry, add more milk/water.” So that’s what I did. I ended up adding probably almost another cup of milk/water. I think the important lesson here is that if you follow the instructions and it’s not perfect, it’s not the end of the world (which I thought it was). Just add a little of this, a little of that, it will all be ok.

Once the dough has come together, you can either let your machine knead it for ten minutes or, if you’re feeling adventurous dump the dough out onto a floured surface and knead it yourself. I did the latter because sometimes it feels better to know you’ve actually put in some physical effort. You know what I mean? There are many different kneading techniques. Some say you should punch the dough down, fold it up, then punch again. Some say you can squish it in your fingers and pull and twist it. I use the good old fashioned push away from you with the base of your palm and fold. Push and fold, push and fold.

I then rinsed out my mixing bowl, coated it in a little oil, put my ball of dough in it, covered it with a dishtowel, and let it rise for an hour in a warm place. Don’t clean up your floured surface, because you’ll need it again. The recipe says that after rising for an hour, your dough should double in size, but not to stress if it’s bigger or smaller than double. This was good news, because mine had not doubled. But it did rise, so we were still on the right track here. Now punch the dough down, and spread it out into a rectangular shape: one side the length of your bread pan, the other side 1 1/2 times the length of your bread pan.  Now roll that bad boy up, tucking the ends of the roll underneath (the bottom being where the seam is). Now drop it into the oiled bread pan.

Now you let it rise again, covered with a dishtowel. The recipe says an hour, but mine hadn’t really done much in that amount of time. Here’s where I thought things were going south again. After an hour of rising in the bread pan and not being where it needed to be, Jonah and I had to leave the house to go record his old a cappella group. I know, right? And then we went out to eat. So the dough sat in the pan rising away for a total of 5 1/2 or 6 hours. So I got home and I expected the bread to have exploded and that there’d be yeasty dough all over the apartment (why I suspected that, I have no idea). But no! It had risen the perfect amount!

At this point I’m starting to think that maybe I haven’t completely ruined this loaf of bread. I heated the oven to 400 degrees and baked that sucker for 30 minutes. Once you take it out of the oven, immediately remove the bread from the pan so it doesn’t continue cooking. The recipe says to let it cool all the way before eating. And check it out!

After it cooled and Jonah and I each ate a slice, I was so dang proud of myself. After thinking I had ruined it twice, it worked! And not only that, but our apartment smelled so incredibly delicious. Oh my goodness. This bread makes amazing toast, and tastes wonderful with just a little butter spread on it. And now that I’ve done it once, I feel ready to tackle the world of bread. Keep an eye out for more bread recipes coming soon!

French Toast (with a secret ingredient)

French Toast

French Toast
French Toast

This past weekend my mom came to town to hang out, and we had her, her boyfriend, and his son over for breakfast on Sunday morning. I thought it would be nice to make the french toast that she used to make for me growing up. Hopefully my mother doesn’t kill me for posting her secret ingredient online for all the world to see.

French Toast

Ingredients

Bread of some kind – we used a baguette cut into thing pieces at a diagonal so they were bigger. If the store had challah, we would’ve used that, but they didn’t.
VANILLA ICE CREAM
Eggs
Cinnamon and whatever other spices you want – we used a pinch of nutmeg.

Instructions

Melt 1 1/2 – 2 scoops of ice cream in a wide, shallow bowl (like the one Jonah is using in the pictures above and below). Wait until the ice cream soup has cooled from melting, and add 2-3 eggs. Whisk together. Add 1/2 tsp cinnamon and a pinch of nutmeg. Soak your bread in egg mixture: we press it down to make sure it gets nice and wet. Melt butter in a pan over medium heat, and add bread. Cook until lightly browned on both sides.

The key, in my opinion, is having the toast perfectly done on the outside but still making sure that all the eggy stuff is cooked on the inside. Sometimes it helps to pop them in the oven on a low temperature: 1) it keeps the toast warm while you’re finishing up the cooking and 2) it helps cook the inside.

We served the french toast with syrup, greek yogurt, and fruit. It was quite delicious, and I think everyone enjoyed it thoroughly. I can also see replacing the ice cream with eggnog for the holiday season (because what isn’t good with eggnog?)!

Pizza Pizza

Pizza

Pizza
Pizza

Sometimes we don’t have time to make elaborate, fancy meals. I assume it’s the same for everyone out there. There are days when you want to eat something really delicious, but you just don’t have the time or energy. Enter: Pizza. A lot of grocery stores have pre-made pizza dough. And not the kind that are already in discs in plastic bags, the kind that is still in a gooey ball. Sometimes you can ask for it at the deli counter (like at Market of Choice) or sometimes it’s in the refrigerated section (like at New Seasons). Anyway, whoever decided to sell pre-made pizza dough at the store is a genius. Extremely quick, easy, and delicious, this meal is easily tailored to who will be eating with you and what you’re in the mood for!

If you are not feeling lazy and instead are feeling ambitious, you could make your own dough. This is something I am planning on doing soon, I swear. This recipe looks good:

http://www.101cookbooks.com/archives/001199.html

This one also gives step by step pictures, which is really helpful!:

http://www.annamariavolpi.com/pizza_recipe.html

Cook on my friends!