Spring

Panko Chicken Tenders with Aioli

Panko Chicken TendersPanko Chicken Tenders

Pinterest is kind of a dangerous place. It’s great because there are tons of recipes, DIYs, fashion tips, art, etc. It’s less great because it’s hard to tell which ones, among hundreds of recipes, are good. There are like 500 recipes for muffins… how do I know which one will taste good? So it can be a little bit of a crap shoot when you decide to actually make a recipe you found on Pinterest.

But that’s what I did. I actually found the blog Love and Olive Oil because of a Meyer Lemon and Olive Oil chiffon cake that was going around Pinterest like wildfire. So I clicked. But I found a whole bunch of other lovely looking recipes, including one for Baked Panko Chicken Tenders with Aioli. Sounds delicious to me, and even more so when you actually read the ingredients. We replaced the garlic powder for fresh garlic.

This dinner was wonderfully simple and tasted so good. Both the chicken and aioli had a nice bite to them (but not too spicy, mind you) because of the cayenne, paprika, and garlic. Enjoy!

Panko Chicken Tenders with Aioli

Ingredients

Panko Chicken Tenders

1 1/2 lbs boneless skinless chicken breasts
1 1/2 cups panko breadcrumbs
2 teaspoons dried basil
2 teaspoons garlic, minced
1 teaspoon smoked paprika
1/2 teaspoon cayenne
1/2 teaspoon salt
1/2 teaspoon pepper
2 eggs
1/2 cup flour
oil

Aioli

1/2 cup mayonnaise
2 teaspoons red wine vinegar
1 teaspoon garlic, minced
1/2 teaspoon dried basil
a squeeze of lemon juice
salt and pepper, to taste

Instructions

Panko Chicken Tenders

Preheat your oven to 350 degrees. Oil a baking sheet and set aside. In a shallow bowl, combine the flour with a little pinch of salt and pepper. In another shallow bowl, beat the eggs. In a third shallow bowl, mix the panko with the basil, garlic, paprika, cayenne, salt and pepper.

Now for the thinning of the chicken. Put your chicken between 2 layers of plastic wrap or just put it on a cutting board and cover it in the paper it came in from the grocery store. Pound it with either a meat pounder (is that what those things are actually called?) or a rolling pin. You want them to be about 1/2 an inch thick. Slice it into strips.

Now, coat each chicken strip, one at a time, in the flour mixture (shaking off any excess flour), then dip in the egg, and then the panko mixture. Arrange the chicken strips on the oiled baking sheet, and put them in the oven for 12-15 minutes, flipping halfway through. You want the breadcrumb coating to be nicely golden brown.

Aioli

Combine all the ingredients in a bowl and stir, and then season to taste with salt and pepper. Not so hard, right?

The Best Grilled Cheese

Grilled Cheese

Caramelized Onions for Grilled Cheese
Grilled Cheese assembly

When I was little, I called grilled cheese sandwiches “girl cheese” sandwiches. Makes sense, right? Boys had cooties and therefore shouldn’t be allowed to eat something as crispy and buttery with perfectly melted cheese. I thought it made perfect sense.

Last summer, my friend Corey worked at a food cart here in Portland called the Grilled Cheese Grill. If you haven’t heard of it, they have these really wonderful, creative, goofy grilled cheese sandwiches. My personal favorite is the jalapeno popper: roasted jalapenos, colby jack, cream cheese, and tortilla chips on sourdough.

Sometimes, when lunchtime rolls around in our apartment, I go hunting through our cabinets and fridge shelves and I am just so uninspired. But the other day, that was not the case. We had a fresh loaf of sourdough bread from New Seasons (usually we get whole wheat, but when I have my way, sourdough it is), and all I wanted was a grilled cheese. But I wanted to make it interesting, and the other thing I had been craving? Caramelized onions.

When I told Jonah of this amazing sandwich, he got jealous and made himself one for lunch the next day. The fever is catching…

Grilled Cheese with Caramelized Onions

Makes one sandwich

Ingredients

Two slices of bread (preferably sourdough)
Cheddar cheese, sliced into thin pieces (we buy Tillamook sharp cheddar)
Parmesan cheese, sliced into thin pieces
1 small onion, thinly sliced
1/4-1/2 tsp brown sugar
Salt

Instructions

The first step is to caramelize the onions. Throw your onion slices in a pan over medium-low heat. Cover and let them soften for a few minutes, then sprinkle the brown sugar and a pinch of salt over them and stir to coat evenly. Cover and cook, stirring occasionally, allowing the onions to brown and soften all the way. After the onions are softened turn the heat up to medium-high and let them cook for another couple minutes, stirring. This will give them a nice sear on the edges.

While your onions are softening, butter the outsides of your sandwich bread (the side that will hit the pan). Thinly slice the cheddar cheese and put it on BOTH sides of the bread. This is key. Nothing is worse than making a grilled cheese with stuff other than cheese on it and then having the bread slide around because there’s no cheese sticking it in place. I’m serious. I put slices of parmesan on just one side so there wasn’t too much of it: parm is a strong cheese and you don’t want it to overpower anything.

When your onions are ready, lay them on the bed of cheese you have created for them. Put the two sides of the sandwich together, and throw it in the pan over medium heat. Cover it while it cooks (this makes the cheese melt quicker so that you don’t have to burn the bread while you’re waiting for the melting to occur). When the bread is golden brown, flip, and cook until the other side is golden brown too. Put on a plate, cut down the middle, and serve, warm and gooey and cheesy. Enjoy!

Polenta Torta with Eggplant Sauce

Polenta Torta with Eggplant Sauce

Polenta Torta with Eggplant Sauce

Polenta Torta with Eggplant Sauce

Polenta Torta with Eggplant Sauce
Jonah, Sophie, Johnny, and Mo at the table and ready to eat!

Last weekend, our friends (and newlyweds) Sophie and Johnny were in town. Sophie and Jonah were housemates senior year of college, along with the lovely Maureen (Mo). So we invited the three of them (Mo, Sophie, and Johnny) over for dinner for a little reunion. Mo is a vegetarian, so I immediately went to “Plenty,” that vegetarian cookbook that we are quickly falling in love with. I found a recipe for some eggplant sauce, to be served on top of sweet corn polenta. Alas, it is not corn season, so I decided to use the eggplant sauce to make a polenta torta (recipe found in Alice Waters’ “The Art of Simple Food”). It was a really simple dish, and while we didn’t execute it to the best of our abilities (our dish was too big which made the layering hard) it was still very good. The mozzarella brought a nice pop to the dish, and was really stringy which I love. The eggplant sauce, as I said above, was nice and creamy. It was kind of like a layered pizza, except no crust, just polenta.

Polenta Torta with Eggplant Sauce

Ingredients

Eggplant Sauce

2/3 cup vegetable oil
1 medium eggplant, cut into 3/4 inch pieces
2 tsp tomato paste
1/4 cup white wine
1 cup chopped peeled tomatoes (we used canned, and I ended up using the whole can just to yield a little more sauce)
6 1/2 Tbl water
1/4 tsp salt
1/4 tsp sugar
1 Tbl chopped oregano

Polenta

4 cups water
1 cup corn grits (polenta)
1 tsp salt
3 Tbl olive oil
1/2 cup parmesan cheese (freshly grated)

Polenta Torta

4 cups polenta (hopefully the above recipe yields 4 cups… we didn’t end up measuring)
2 cups tomato sauce (or in this case, Eggplant sauce)
1 cup parmesan cheese (freshly grated)
1/2 pound (2 medium balls) fresh mozzarella

Instructions

Eggplant Sauce

Heat the oil in a large saucepan, add the eggplant. Cook the eggplant on medium heat for ~15 minutes, or until it’s soft and nicely brown. When the eggplant is cooked, drain as much oil from the pan and discard it. Now add the tomato paste and stir it into the eggplant. Cook for about 2 minutes, then add the wine and cook for another minute or so. Now add everything else (tomatoes, water, salt, sugar, and oregano) and cook for another 5-10 minutes to let the flavors deepen. You probably want to keep the pot covered so the sauce doesn’t cook down too much. On the other hand, if it’s looking a little too liquid for your liking, cook it uncovered so it can cook down a little bit. At this point, you can set this aside until you are ready to use the sauce. I made this sauce the morning of the meal, and actually left it on the stove, covered, for many hours.

The great thing about this sauce is the creaminess that the eggplant brings to it. When eggplant has been cooked this long, it kind of falls apart, and I love it when that happens.

Polenta

Now, I’ll be honest with you: I didn’t cook the polenta. Jonah did while I was getting in my workout at the bouldering gym. So I’ll relay what he did to you, but I don’t have any insider tips because I wasn’t there. But here’s what he did: Boil the 4 cups of water in a saucepan. When it’s boiling, whisk in the corn grits and the salt. Now, turn down the heat and whisk until the polenta is suspended in the water and no longer sitting on the bottom of the pan. Cook for 30 minutes – 1 hour (the longer the better, according to Alice Waters), stirring occasionally. Don’t let the polenta get above a low simmer. If at any point the polenta seems to be getting too dry, add a little water. Once the polenta is all cooked, add the olive oil and parmesan cheese.

Polenta Torta

Preheat your oven to 350 degrees. Oil a baking dish (like I said, ours was too big, so keep this in mind when picking what dish to use), and spread 1 1/3 cups of polenta out over the bottom of the dish. Over the polenta, spread half of the eggplant tomato sauce, then half the mozzarella cheese, and sprinkle half the parmesan cheese. Repeat: spread 1 1/3 cups polenta, the other half of the sauce, mozzarella, and parmesan cheese over the dish. End with a layer of the polenta. Because our dish was too big, we only did one layer, which was ok, but it didn’t look as nice as it could/would have if we’d done it right.

Once it’s all layered up, you can put it in the oven for 30 minutes, or until it’s hot and bubbling. Allow to cool for a bit before serving and eating. Enjoy!

Green Pancakes with Lime Butter

Green Pancakes with Lime Butter

Green Pancakes with Lime Butter

Green Pancakes with Lime Butter

Green Pancakes with Lime Butter

In trying to spend less money cooking, Jonah and I have been doing more vegetarian meals. This is why it’s wonderful that Jonah got this cookbook “Plenty” by Yotam Ottolenghi for his birthday. All vegetarian food, very unique ingredients and recipes. These green pancakes are the second thing we’ve made from it (the first was eggplant with buttermilk sauce, which hopefully Jonah will put up on the blog someday…), and they were delicious. Different from anything I’ve tasted and filled with green goodness. We didn’t have everything required for the recipe, so I’ll let you know what we included and what we skipped.

Green Pancakes with Lime Butter

Note: Ottolenghi’s recipe for self rising flour is: 1 cup flour, 1 1/4 tsp baking powder, and a pinch of salt. it’s a little aggravating because you make over a cup of it and then only use 3/4 a cup in the recipe… but I was too lazy to do the math.

Ingredients

Lime Butter

1 stick of butter at room temperature
zest of 1 lime
1 1/2 Tbl lime juice
1/4 tsp salt
1/2 tsp pepper
1 Tbl cilantro (we left this out)
1/2 garlic clove, finely chopped
1/4 tsp chile flakes

Green Pancakes

1/2 lb spinach, washed
3/4 cup self-rising flour (see note above)
1 Tbl baking powder
1 egg
4 Tbl butter, melted
1/2 tsp salt
1 tsp ground cumin
2/3 cup milk
6 green onions, finely sliced
2 fresh green chiles, thinly sliced
1 egg white
olive oil for frying

Instructions

Lime Butter

Beat the butter in a bowl until it’s creamy. Add the rest of the ingredients. Wasn’t that hard? The recipe says to put it in plastic wrap, roll it into a sausage shape, and chill until firm. But we just covered it and threw it in the fridge until the pancakes were ready.

Green Pancakes

While your sous-chef (Jonah) makes the butter, you can get started on the veggie prep. Wilt the spinach in a pan, then drain it in a sieve or colander, and when it’s cool, squeeze out as much excess liquid as possible. Chop roughly, and set aside. At this point, you can also chop your green onions and peppers so they’re ready to go when you need them.

Now, in a mixing bowl (if you have an electric mixer, you can use it, but you’ll want it later to whip your egg white, so be aware that you’ll be swapping bowls and washing it to use it for something else), combine flour, baking powder, the whole egg, melted butter, salt, cumin, and milk. Mix until thoroughly combined and smooth. Now add all those green things you chopped up earlier. In your electric mixer, whisk the egg white “to soft peaks,” meaning you want it to hold a peak, but not be too stiff. Make sense? Now you can gently fold the whipped egg white into the pancake batter.

Heat some oil (think 1/2 Tbl) in a frying pan over medium-high heat. Ladle the batter into the pan, using about 2 Tbl of batter per pancake. You want them to be fairly thin, so press the batter down gently. Cook them for 2 minutes a side, or until they’re nicely golden-brown (or golden-green, as the case may be).

Transfer the pancakes to a paper towel and keep warm. When you’re done with all the batter, enjoy with a slab of lime butter on top! We ate these for dinner, but I can see them being a wonderful breakfast, and also a great way to get kids to eat some spinach! Enjoy!

Thomas Keller’s Chocolate Chip Cookies

Thomas Keller's Chocolate Chip Cookies

Thomas Keller's Chocolate Chip Cookies

Thomas Keller's Chocolate Chip Cookies

You know how everyone is always on the hunt for the best chocolate chip cookie? When I was younger, our family friend Anita was known for making the best chocolate chip cookies around. Whenever we went over to her house we (my sisters and I) were excited because we knew we would get those delicious cookies. Despite staying close to her family, I do not have her cookie recipe… Odd.

Anyway, the other day I felt like baking (strange, huh?) and Jonah requested classic chocolate chip. I wanted to do a variation, like those thyme and sea salt chocolate chunk cookies I made a while back. But after having no luck finding anything before heading to the store, I remembered Thomas Keller having a recipe for chocolate chip cookies in the Ad Hoc cookbook. I figured, “Hey, that guy kind of knows what he’s doing,” so I pulled out the recipe and went to the store.

I will tell you now that these are possibly the best chocolate chip cookies I’ve ever had (besides Anita’s). You know the great debate: Crunchy or chewy? These are perfectly both. They are crispy on the edges (thanks to our old friend, butter) and chewy and soft in the middle. Oh my goodness. And they spread out when they bake, so they’re pretty big, which makes you feel like you’re really getting a good portion of cookie when you eat one. And if one seems large enough to be satisfying, you would think it’d be easier to not eat like 10 of them. But it’s not. You just get more full.

Side note: Jonah bought me these wonderful baking sheets for Christmas. The brand is Chicago Metallic; they came in a package with two pans and a cooling rack. These pans need no liner or greasing. Nothing EVER sticks to them (knock on wood). They are heavy duty with a wire around the edge so they don’t warp, and industrial-kitchen sized. I love them. I highly recommend them if you’re looking for new pans.

Thomas Keller’s Chocolate Chip Cookies

Ingredients

2 1/3 cups plus 1 Tbl all-purpose flour
3/4 tsp baking soda
1 tsp kosher salt
5 oz. semi-sweet chocolate (think 55%), cut into chip sized pieces (about 1 1/4 cups)
5 oz. dark chocolate (think 70-72%), cut into chip sized pieces (about 1 1/4 cups)
2 sticks cold unsalted butter
1 cup brown sugar (preferably dark)
3/4 cup granulated sugar
2 eggs

Instructions

Preheat your oven to 350 degrees. Line 2 baking sheets with parchment paper (or just grease them a little bit).

Ok, sorry. Now, sift the flour and baking soda into a medium bowl, and stir in the salt. Usually if a recipe says to sift flour, I ignore it, but I had a lot of time on my hands, and hey, I’m not gonna ignore Thomas Keller. I would say that it made a difference. Put the chips of chocolate you’ve cut in a fine mesh basket strainer to get out all the “chocolate dust.”

Using an electric mixer with the paddle attachment, beat half of the butter (1 stick that has been cut up into small pieces) until it’s smooth and creamy. Now add the sugars and the rest of the butter (also cut into small pieces) and beat until well combined and creamy. Add the eggs, one at a time, mixing well between them. Be sure during all of this to be scraping down the sides of the bowl to get everything well-incorporated. Now add the dry ingredients and mix them in.

Thoroughly fold in the chocolate chips. It’s a little tricky because the dough is really thick, but stick with it, it’s worth it. You wouldn’t want those cookies from the bottom of the bowl to not have any chocolate in them, would you? No. No you would not. At this point you can wrap the dough up and refrigerate it for up to 5 days or freeze it for 2 weeks. But I just don’t understand, you’ve gotten this far, why would you not just make the damn cookies at this point?

If you’re continuing on, take about 2 tablespoons of dough, roll into a ball, and place it on the cookie sheet. You only want to put about 8 on a sheet because these suckers need their space. They spread out for real. Leave 2 inches between each ball of dough. Bake for 12 minutes, turning the cookie sheet halfway through baking. Let the cookies cool on the pan for a couple minutes before removing them to a cooling rack to cool the rest of the way (if you can wait that long). Enjoy with a glass of cold milk.

French Onion Soup

French Onion Soup

French Onion Soup
French Onion Soup

French Onion Soup

Yesterday, I was craving French Onion Soup. I found a recipe on Smitten Kitchen (duh) and luckily, we had most of the ingredients except wine, broth, and swiss cheese. After work, I swung by the grocery store, picked up what I needed, and I was ready to go. I halved the recipe, but I’ll give you the original in case you’re cooking for more than just two people (but half was the perfect amount for me and Jonah).

French Onion Soup

Ingredients

1 1/2 pounds (5 cups) thinly sliced yellow onions
3 tablespoons unsalted butter
1 tablespoon olive oil
1 teaspoon table salt (or less)
1/4 teaspoon granulated sugar
3 tablespoons all-purpose flour
2 quarts beef stock (mushroom stock is a good vegetarian substitute)
1/2 cup dry white wine
Freshly ground black pepper
1 to 2 cups (to taste) grated Swiss or Gruyere cheese
Butter
Crusty bread, sliced into 1 inch thick pieces toasted until hard

Instructions

Melt the butter and oil together in a large saucepan over medium-low heat. Add the onions, tossing to coat them in the butter/oil, and spread them so they cover the bottom of the pot. Reduce the heat and let the onions cook, covered, for 15 minutes. You don’t need to stir them during this step.

After 15 minutes, turn up the heat a little bit and stir in the salt and sugar. Cook them for 30-40 minutes until they have become a lovely golden brown, stirring frequently so they don’t burn. Yes, 30 minutes seems like a long time to stir onions, but allowing them to caramelize well will make for really nice flavor later on and will make the soup taste much more complex and, well, just better.

Once the onions are browned, add the flour, stirring it in well, and cook for another 3 minutes. Now add the wine (all at once) and the stock, a bit at a time, stirring between additions. Add a little salt and pepper. Be sure not to over-salt! The stock is plenty salty and the cheese on the gratinée is plenty salty, so don’t overdo it now. Once the stock is all in, bring the pot to a simmer and let is cook, partially covered, for another 30-40 minutes. And stir in the cognac if you’re using it.

Now for the gratinée. Jonah and I didn’t follow instructions, but rather chose to just try out our own process and see if it worked. It did. Turn on your broiler (we put ours on high). Pour the soup into oven safe bowls, and stir in about 1 Tbl of the cheese. Toast whatever bread your using (we used the bread I made in the previous post) until it’s hard. Butter the toast, and set it afloat on the soup. Now put on as much cheese as your little heart desires. We probably did 1/3 of a cup per bowl of soup. Put the bowls on a foil-lined baking sheet, and pop it in the oven. I watched the soups in the oven, and when the cheese was bubbling and starting to turn golden brown, I pulled them out of the oven. Be careful as the bowls will be HOT. Put them on plates and warn whoever is eating them not to touch the bowl, only the plate. Serve and enjoy!

Country Bread

Country Bread

Country Bread
Country Bread

Country Bread

The reason I started making bread is because I’ve always wanted to make one of those crusty light loaves that you find at Grand Central Bakery or Macrina Bakery or Lovejoy Bakers. I’m getting closer, starting with simple white loaves and now moving on to this Country Bread. One day I know I’ll get to one of those crispy on the outside, light and soft on the inside, perfectly sour sourdoughs.

Anyway, my aunt Judy sent me a cookbook (as well as a book about how to write recipes) when I started this blog. It’s called “Flour” by Joanne Chang, who is the chef at a bakery in Boston (where my aunt lives). I’ll admit, many of the recipes in this cookbook look a little daunting, but when I saw the recipe for this bread I knew I had to try it.

WARNING: This is not a quick bread recipe. You have to make the sponge, let it sit overnight, then make the bread, which also has to sit and rest for many hours. It is relatively easy, but there’s lots of waiting around.

Country Bread

Makes two loaves

Ingredients

Sponge

3/4 cup water
1 1/4 cups unbleached all purpose flour
1/4 teaspoon active dry yeast

Bread

1 1/2 cups water, body temperature
2 cups unbleached all purpose flour, plus some for working and sprinkling
2 cups bread flour
12 oz bread sponge
pinch of active dry yeast
2 tsp kosher salt
1 tsp sugar
a handful of medium-coarse yellow cornmeal for the baking sheet

Instructions

Sponge

Alright, let’s start with the sponge, hm? In a bowl, stir together the water, 1 cup of the flour, and the yeast until well combine. Place in a covered container (I just covered the bowl with a dishtowel) and leave at room temperature for at least 4 hours and up to 8 hours. After 4 hours (or however many), you can stir in the remaining 1/4 cup of flour. The sponge will stiffen up with the addition of the flour into a very loose dough. Re-cover it (this is when I transfered it to a tupperware) and leave it in the fridge overnight.

Bread

*The next morning*

Get out your electric mixer (or a bowl and a wooden spoon) and stir together the water, 2 cups of all purpose flour, and the 2 cups of bread flour for about a minute, or until you have a “shaggy, stiff dough.” I love her writing. Cover the bowl with plastic wrap and let sit for 10 minutes.

After 10 minutes, remove the plastic wrap and add the sponge, yeast, salt, and sugar. Mix for 3-4 minutes or until they are incorporated. Now, according to Chef Chang, the dough should be a little bit sticky but still smooth  and feel “like an earlobe when you grasp a bit between your fingers.” Oh… ok.

If the dough is stiffer than earlobe status, add some water 1 Tbl at a time. If it’s not stiff enough, add all-purpose flour 1 Tbl at a time. I ended up needing to add about 3 Tbl of flour to my dough. Also, I had to stop the mixer a number of times to scrape the dough off the dough hook.

Now, lightly oil a large bowl, and transfer the dough to it. Lightly cover the bowl with an oiled piece of plastic wrap and let it sit in a warm place for 2-3 hours. The dough will rise a little bit and will be loose and relaxed and a little sticky.

After that wait, turn the dough out onto a floured work surface. Divide the dough in half with a knife and shape each half into a ball. The easiest way to do this is to tuck the edges of the dough underneath itself, continuing to tuck until it naturally gathers into a ball with a nice taut surface. Sprinkle the cornmeal on a baking sheet and place the loaves on it, at least 3 inches apart. Cover them lightly and completely in more plastic wrap and let them sit for another 2-3 hours.

Phew. We’re almost done. While the dough is resting (towards the end of the rest), preheat your oven to 500 degrees, with a rack in the center and a rack below that one. When the loaves are done resting, sprinkle the tops with about a teaspoon of flour each, and slash the loaves with a knife. The best way to do this is to use a sharp paring knife that has been dipped in water (to keep it from dragging). You’ll want to use the tip of the knife and use quick, sure movements. You can do whatever design you’d like (I did a square and a line down the middle with lines coming off of it). If you don’t slash the bread, it’ll burst on it’s own, which might also look cool.

Anyway, after you’ve slashed it, put the pan in the oven. On the rack below the bread, put a rimmed baking sheet filled with 2 cups of water (the steam creates a “nice moist atmosphere for your bread to grow”). Bake for 35-40 minutes, or until the loaves are a dark golden brown on top (and make a hollow sound when you thump them on the bottom, but who wants to pick up a 500 degree loaf of bread and knock on it?).

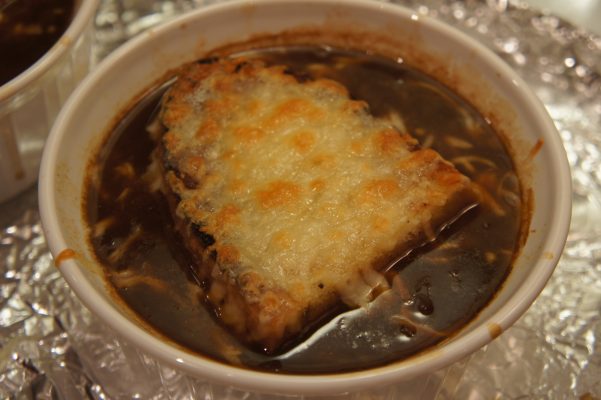
Transfer the loaves to a wire rack and let them cool for at least 1 hour. These store really well just in a plastic or paper bag on the counter. They don’t go stale as quickly as some crusty loaves, which was nice because it’s hard to burn through 2 loaves of bread with just 2 of us in the apartment. The bread was really good. A little sweet and a little tangy, and quite dense. At first, I was actually bummed about how dense it was (I wanted something light with lots of holes but I realized that with all the extra flour I added, that probably wasn’t gonna happen), but after eating a slice with butter, I was really digging it. We also used this bread to make the gratinées for the French Onion Soup we had for dinner last night (which I’ll be posting very soon).

Pasta with Fresh Pesto

Pasta with Fresh Pesto

Pasta with Fresh Pesto

So last week I was in tech and then the run of a show. I had to make really quick dinners because by the time I got done nannying or doing whatever I was doing, I usually had only an hour to cook and eat before heading out to the theater. I pulled out the Alice Waters cookbook and looked for something incredibly quick and delicious. I came across a recipe for fresh pesto (which takes like no time at all to make), and immediately got very excited. Many years ago, a friend of mine named Sierra studied abroad in Italy. When she returned she came over to our house and made us fresh pesto, and man, there is nothing like pasta with fresh pesto. So, with that delicious meal in mind, I set out on my own pesto expedition.

Pasta with Fresh Pesto

Ingredients

1 lb dry pasta
1 garlic clove
salt
1/4 cup lightly toasted pine nuts
1/4 cup (or more) freshly grated parmesan cheese
1 cup lightly packed basil
1/2 cup olive oil

Instructions

First, you’ll want to boil a big old pot of water that has been abundantly salted. While that’s boiling, you can get started on the pesto. Now the cookbook said to use a mortar and pestle but a) who has those anymore and b) why use those when you have a food processor? If you don’t have a food processor, then I suggest you return to the mortar/pestle technique.

In your food processor, combine garlic and salt, pulse. Then add the pine nuts, pulse again until finely minced. Now add in the cheese, pulse again. Ready for the green? Coursely chop your basil, and add it to the food processor, and… you guessed it… pulse! Now add your olive oil and pulse again.

While you’ve been doing all this pesto stuff, hopefully you’ve not forgotten about cooking your pasta. The recipe in the book said to reserve 1 cup of pasta water and add it along with the pesto, but I did not do this… Mostly because I didn’t read the recipe (STUPID ANNIE. You should always ALWAYS read through a recipe completely before you make it). I think I just figured pasta + pesto = delicious, what else could you possibly need to do? Anyway, it all still worked out just fine. As I was saying, cook your pasta, strain it (reserving pasta water if you’d like), and put it back in the pot with the pesto. Mix it up and serve with a light dusting of parmesan cheese.

Pao Bread! (Brazilian Cheese Bread)

Pao Bread! (Brazilian Cheese Bread)

Pao Bread! (Brazilian Cheese Bread)

Pao Bread! (Brazilian Cheese Bread)

Last summer, a friend of ours (Courtney, seen in the Bread Pudding post) worked selling pao bread at various farmer’s markets around Portland. I had never heard of pao bread before, but oh my goodness it’s delicious. Little puffy buns of cheesy (gluten free) goodness. I’m always a little wary of gluten free food, but trust me, these are great. Anyway, I was hunting around on pinterest this other day and happened on a recipe for homemade pao bread. I had a free couple hours, so I went to the store and bought some tapioca flour and got cooking!

Pao Bread

Ingredients

1/2 cup olive oil
1/3 cup water
1/3 cup milk
1 tsp salt
2 cups tapioca flour
2 tsp minced garlic
2/3 cup freshly grated parmesan cheese
2 eggs (beaten)

Ingredients

Preheat your oven to 375 degrees. In a large saucepan, combine olive oil, water, milk, and salt (no need to whisk).

Put the saucepan over high heat; when the mixture comes to a boil, remove from the heat immediately and stir in the tapioca flour and and garlic. It’s a bit of a pain to mix (I assume due to the way the tapioca flour absorbs the moisture), but it comes together eventually. Let this mixture sit for 10-15 minutes.

After resting, stir the cheese and eggs into the tapioca mixture until well combined. The recipe said the texture will be chunky like cottage cheese. It also said to now drop rounded, 1/4 cup sized balls of the mixture onto an ungreased baking sheet. I had a few issues with these steps. First of all, cottage cheese…ew. Second of all, how are you supposed to “round” something that is the texture of cottage cheese? That sounds hard to do. Third, 1/4 cup was too big. So here are my instructions, drop 1/8 cup dollops onto an ungreased baking sheet.

Now pop them in your preheated oven for 15-20 minutes. The tops of mine didn’t brown (like the recipe said they would), but I gauged doneness by the brownness of the bottoms. You don’t want them too brown, then they’ll be overcooked. But the edges should be perfectly golden. When they’re done, let them cool on a cooling rack before enjoying.

Blueberry muffins!

Blueberry muffins!

Blueberry muffins!

Before we get to the cooking, let me apologize for having been so long since my last post. I’ve been stage managing a show and we open tonight (!), so the past week and a half have been a bit crazy. I’ve been doing plenty of cooking (baking, mostly), but haven’t had time to actually write on here.

Now onto the food. A few weeks ago, Jonah said to me, “Sometime we should make muffins for breakfast.” He was right. We often eat cereal and yogurt or eggs and toast for breakfast, but we don’t do a lot of pastry/baked goods. So the other day before I headed off for a day of climbing and rehearsal, I jumped on the chance to make us some classic blueberry muffins. After looking in some of our cookbooks and at my favorite blogs, I settled on a recipe from Smitten Kitchen. I wanted muffins that were perfectly moist and had a good blueberry-to-batter ratio, and these were the perfect match.  I always like muffin recipes (and coffeecake recipes) that call for yogurt or sour cream; I love the creaminess and moisture it brings to the food. The original recipe calls for lemon zest too, but we didn’t have a lemon, so I just left it out. This recipe made us a perfect 12 muffins.

Blueberry Muffins

Makes 12 muffins

Ingredients

5 tablespoons unsalted butter , softened
1/2 cup sugar
1 large egg
3/4 cup sour cream or plain yogurt
1 1/2 cups all-purpose flour
1 1/2 teaspoon baking powder
1/4 teaspoon baking soda
1/4 teaspoon salt
3/4 cup blueberries, fresh or frozen (if frozen, don’t bother defrosting)

Instructions

Preheat your oven to 375 degrees. In a mixer (or by hand if that floats your boat) beat the butter and sugar until it’s light and fluffy. Add the egg and comine well, then add the yogurt. In a separate bowl, combine the flour, baking powder, baking soda, and salt, mixing well. Now that you’ve got all your wet ingredients in there, you can start adding the dry ingredients. Add the dry to the wet in 2 batches, mixing well between them. Don’t overmix it though. As always, the less you handle dough/batter, the better.

Now the batter will be pretty dang thick, more like the consistency of cookie dough than muffin batter. Don’t worry your pretty little head though! Ours was particularly thick because we used a Greek-style yogurt. This is how it should be. Now carefully fold in your blueberries (or, as the little girl we nanny calls them, blueblerries).

Line your muffin tin with liners or spray them with cooking spray and fill them up to about 3/4 full. Put them in the oven for 25-30 minutes. The tops should be golden and a knife or toothpick should come out clean. Let them cool a bit on a cooling rack and then enjoy! Preferably while still mostly warm with a glass of milk.

This meal is brought to you by Alice Waters

This meal is brought to you by Alice Waters

This meal is brought to you by Alice Waters

This meal is brought to you by Alice Waters

This past weekend my dad and his girlfriend came down to Portland to visit me and Jonah. They had given Jonah a cookbook, “The Art of Simple Food” by Alice Waters, for his birthday, and so we decided to make them a full meal straight out of the book as a little thank you. If you don’t know who Alice Waters is, she’s a chef at a restaurant called Chez Panisse in Berkeley, CA. The restaurant is known for organic, local ingredients and simple cooking. She has written about a million cookbooks. Anyway, for dinner we made: salad, Baked Wild Salmon with Herb Butter, Chard with Butter and Parmesan, and Roasted Butternut Squash for dinner. It was quite a meal. I’ll do one recipe at a time here so they aren’t all intertwined. Make things a little easier.

The meal was really delicious, fresh tasting, and best of all, SIMPLE. I guess the title of the cookbook doesn’t lie. These vegetable dishes were really filling and would make a great vegetarian meal. Enjoy!

Herb-Butter Salmon, Roasted Butternut Squash, and Chard with Parmesan

Ingredients

Herb-Butter Salmon

1 stick of butter at room temperature
1/2 cup chopped herbs (we used parsley, chives, and tarragon)
1 finely chopped garlic clove
a squeeze of lemon juice
salt
pepper
cayenne
1-1 1/2 pounds wild salmon fillet

Roasted Butternut Squash

2 small butternut squash
1 medium shallot, coursely chopped
4 cippolini onions, peeled and quartered
about 1 Tbl of roughly chopped (or torn) sage leaves
olive oil
salt

Chard with Parmesan

one bunch of Chard
2-3 Tbl butter (depending on how buttery you want your chard)
1/2 – 1 cup of grated parmesan cheese

Instructions

Herb-Butter Salmon

Preheat the oven to 425 degrees. Stir the ingredients for the herb butter in a small bowl. Add lemon, cayenne, salt, and pepper to taste.

Season the salmon with salt and pepper. Oil a baking dish/sheet and put the salmon on skin side down. Drizzle the fish with oil. Bake 7-10 minutes, until the flesh is “just set and still pink in the center.” After taking the salmon out of the oven, spoon some of the soft herb butter over each piece of fish, and put the rest in a small bowl on the table.

Roasted Butternut Squash

Preheat your oven to 350 degrees. Peel the squash, cut in half, and remove the seeds. Cut the squash into 1/2 inch pieces. Throw them into a baking dish with the chopped shallot, cippolini onions, and sage. Drizzle with olive oil and sprinkle with salt. Pop the dish into the oven for about an hour and a half, stirring about halfway through. Test the doneness of the squash before taking it out of the oven to make sure it’s cooked through.

Chard with Parmesan

Remove the leaves from the ribs of the chard, wash the leaves, and cook them in salted boiling water. When the leaves are tender, about four minutes, drain them in a colander and allow to cool, then squeeze out the excess water.

In the same pot you used to cook the chard, melt the butter over medium heat. While the butter is melting, roughly chop the chard. Add the chard to the butter and heat through. Stir in the parmesan, remove from heat, and serve! Sometimes I’m a little skeptical of cooked leafy greens (the texture can be a little slimy for me) but I really enjoyed this. I was careful not to overcook the chard, and the butter and cheese certainly added to the flavor. Because really, what doesn’t taste good with butter and cheese on top?

Red Velvet Cupcakes

Red Velvet Cupcakes

Red Velvet Cupcakes

Red Velvet Cupcakes
Red Velvet Cupcakes

The other day I was hanging out with my dear friend Erica. She was craving some red velvet cupcakes, and so, like a good friend, I told her I’d make her some. That’s right. That’s what friends do for each other. We make cupcakes.

I had never made red velvet cupcakes before, or really thought about what’s in a red velvet cupcake, so I was a little surprised when I started doing research. Cocoa powder, LOTS of red food coloring, buttermilk and white distilled vinegar? Uh… ok. I found a wonderful recipe on a great blog called Ming Makes Cupcakes. I’d made cupcakes from this site before and the pictures are so pretty. I really can’t wait to try more. I ended up doubling the recipe (I wanted to make more than 12 cupcakes!) except the food coloring, which I didn’t double because I didn’t have anymore and one little bottle seemed like enough. However I didn’t double the frosting because it seemed like it’d be enough, and it was!

Anyway, I packed them up and took them to rehearsal (for the show I’m in with that friend, Erica) and they were a huge hit! Nice and moist, good frosting to cupcake ratio, and perfectly red. They were a little bit oily for me, so I think next time I might try bringing down the amount of oil. Also, I wouldn’t have minded if they had been a teensy bit chocolatier. Oh well, some things to play with for next time. They were still incredibly delicious. Enjoy!

Red Velvet Cupcakes

Ingredients

Cupcakes

2 1/2 cups flour
1 1/2 cups sugar
1 tsp baking soda
1 tsp salt
2 Tbl cocoa powder
1 1/2 cups vegetable oil
1 cup buttermilk
2 eggs
1 Tbl red food coloring
1 tsp white vinegar
2 tsp vanilla

Frosting

1 stick butter, room temperature
2 1/2 cups confectioner’s sugar
1/4 cup milk
1/2 tsp vanilla

Instructions

Cupcakes

Preheat your oven to 350 degrees. In a bowl, combine the flour, sugar, baking soda, salt, and cocoa powder. In an electric mixer, combine the dry ingredients: oil, buttermilk, eggs, food coloring, vinegar, and vanilla. Now, slowly add the dry mixture to the wet mixture. I did it in batches, just to make sure it was getting thoroughly blended with no clumps!

Put cupcake liners in your cupcake pan and fill them up with batter. I found that you could actually fill them pretty full. These cupcakes don’t rise a ton, so I filled them up probably 3/4 of the way. Now bake them for 25 minutes, or until a toothpick inserted comes out clean.

Frosting

While the cupcakes are cooling, clean out your mixer bowl, put it back together, and beat the butter until it’s light and fluffy. Add the sugar, milk, and vanilla, and beat until the consistency looks like frosting. If it’s too dry, add a little more milk. If it’s too wet, add a little more sugar.

Time to frost them. I started out not using too much frosting because I wanted to make sure there was enough for all of them, but there was plenty to go around. I love icing cupcakes, making the tops look like they would at a little bakery… So fun.