Recipes

Corn Salad // Serious Crust by Annie Fassler

Corn Salad

Corn Salad // Serious Crust by Annie FasslerCorn Salad // Serious Crust by Annie Fassler

Guys, it’s September, and I have a few summer recipes, like this corn salad, to get to you before the season slips from our fingers. At this point, it feels like summer might never end in Portland – it cooled off a bit last week, and this week hit a high of about 98 degrees (get it? like the band? ok. I’ll stop.). But this weekend, it’s supposed to rain, and the temperature is supposed to drop, and I am feeling strangely ready for that to happen.

I usually mourn the end of summer, but lately I have been craving heartier dishes and squash, specifically butternut and acorn. I’ll take peaches and tomatoes, but the hankering for those fall dishes is starting to nag at me.

But while it’s hot and there are still things like corn and nectarines, you should eat things like this corn salad. Inspired by a few different recipes, this is one of those dishes that uses corn as a base, but you can really toss in whatever you have around. Quickly cube and cook up some zucchini and throw it in, or add in some chopped tomatoes (seed them first), or chop up some basil. Here’s what I used.

Corn Salad

Serves 4

Ingredients

3 ears corn, lightly cooked (boiled), and kernels cut from the cob
2 nectarines, cubed
1 bell pepper, cubed
1 jalapeño, seeded, chopped
1-2 limes, juiced (start with one, see how you like it)
1/2 cup crumbled feta cheese
Salt and pepper

Instructions

Combine ingredients in a bowl, stir it up, add more of anything you like, and eat with friends as the hot day starts to cool off, preferably accompanied by grilled chicken or fish or something like that, as well as some cold beers.

The Rattlesnake // Serious Crust by Annie Fassler

The Rattlesnake: a cocktail

The Rattlesnake // Serious Crust by Annie Fassler

Sometimes, when you’re spending all day cooking, it’s important to spoil yourself with a cocktail break. And sometimes you are given an all access pass to someone’s liquor cabinet, and you have lots of cocktail blogs to choose from (There Will Be BourbonSpirited Alchemy5 o’clock cocktails…), and you finally pick one called the Rattlesnake, and whip up a batch for all the chefs in the kitchen. Just sometimes.

This cocktail is creamy and light, tasting kind of like a grown up lemon curd/lemon meringue drink. Adapted from There Will Be Bourbon, the recipe below makes enough for 6 drinks. When I’m making that amount, I like to use a trusty tupperware with a good seal instead of a shaker… it means you have to do less work by making all the drinks in one batch.

The Rattlesnake

Makes 6 cocktails

Ingredients

9 oz. bourbon
5 Tbl freshly squeezed lemon juice
1 Tbl sambuca (the recipe called for absinthe, but you can use any anise-liqueur)
2 Tbl powdered sugar (or simple syrup, if you’ve got some around)
3 egg whites

Instructions

Combine all of the ingredients in a tupperware (or cocktail shaker, if you’re only making 1 or 2) with ice. Shake it up! Until the egg whites get nice and frothy. If you want more froth, you can add more egg whites. I wasn’t initially going to add any but when I tasted it without them, it was VERY bourbon-y. So I added half as many as the original recipe called for (which is 1 per drink). I never really realized what egg white did to a drink other than create that frothy foam, but it really mellowed out the flavors. Add bits of whatever you like until it tastes how you want. Strain into glasses filled with ice. If you’re feeling fancy, you can garnish with a lemon peel, or a sprig of mint or rosemary.

Peach Shortbread // Serious Crust by Annie Fassler

Peach Shortbread and changes

Peach Shortbread // Serious Crust by Annie FasslerPeach Shortbread // Serious Crust by Annie Fassler

It has been a week since I last posted, and oh what a week it has been. The past month has been a time of change for me. We moved into a new house in NE Portland, which has been really great. While at first I was not happy to be leaving SE, our new location has surprised me.

Also, I have changed jobs. They company where I worked is undergoing some big changes, and while I am still going to be doing some contracting work creating Prezis for them, I am an account manager no more! At first, this was scary, and I wasn’t sure what to do next. I applied to some administrative and management jobs, but what I kept coming back to was food. I knew I was not easily going to get a job in a restaurant, as I have no experience whatsoever. But I sure as hell was gonna try. Within about a week and a half, I had a new job, hostessing at a restaurant in NE Portland. I won’t tell you which one yet, as I’m still kind of in my training period, but so far, I am really enjoying it. The people are great, the food is awesome, and it’s a completely different kind of job. I needed that change in my life.

Peach Shortbread // Serious Crust by Annie Fassler

Anyway, in the midst of all this, I went to what will probably be one of my last commune dinners for a while. Sadly, my new schedule has me working on Monday nights. I’m hoping to make it to dinner whenever I can, because I’ll miss all that craziness, all that good food, and all that company.

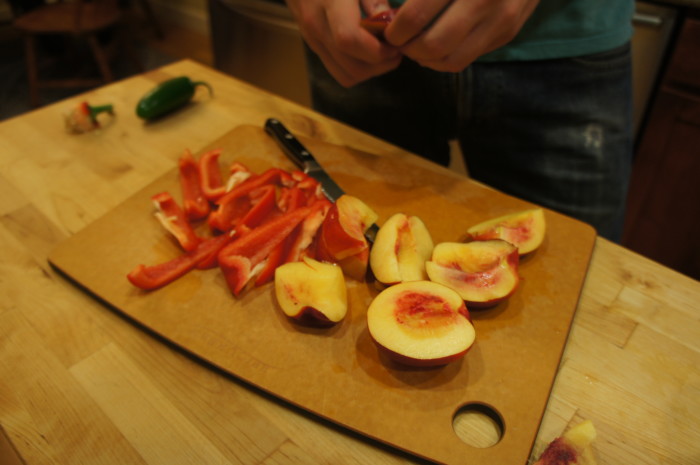
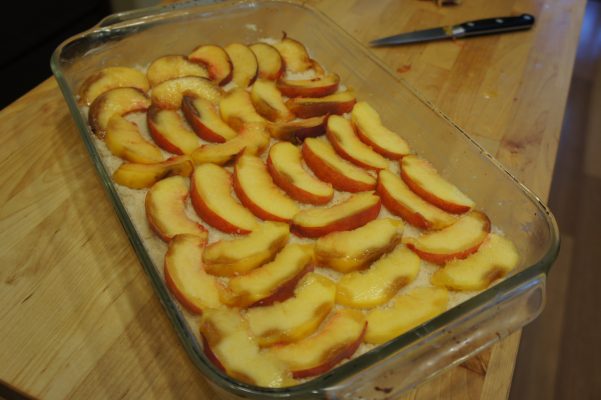
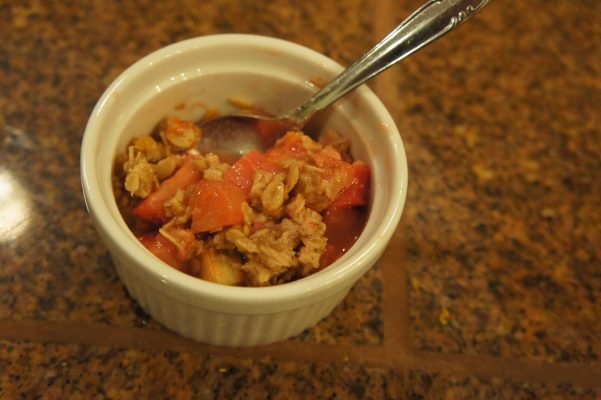
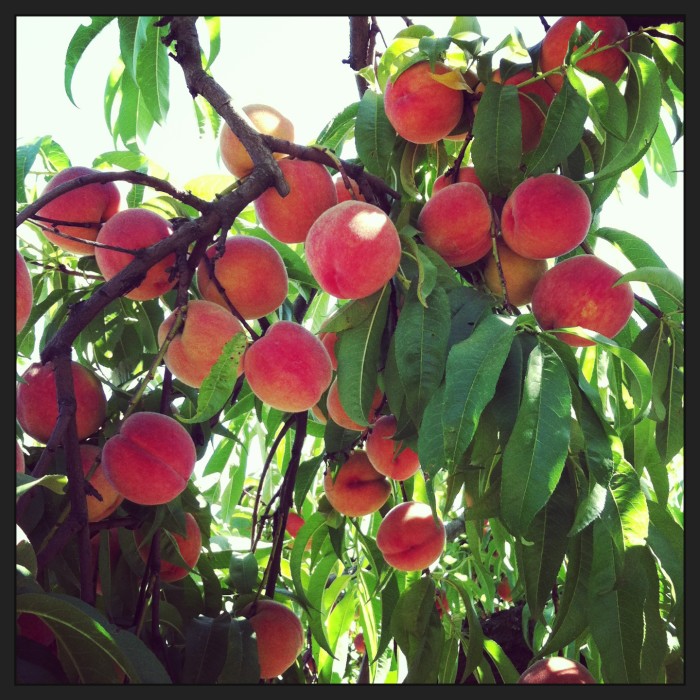
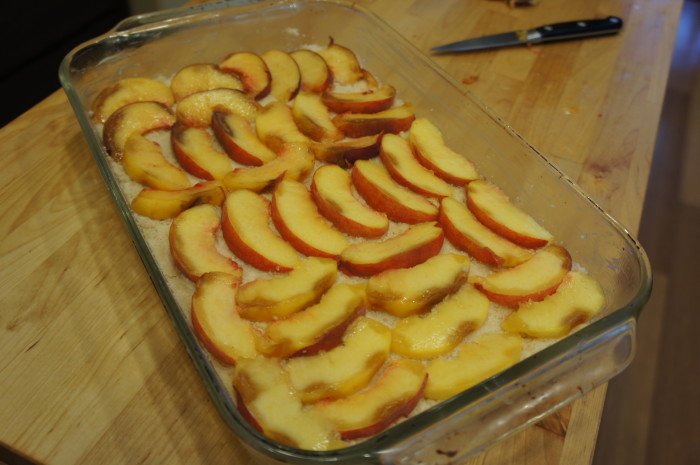
For my last dinner, I was asked to make something with the peaches I had recently picked. North of Portland, there’s a small island in the middle of the river called Sauvie Island. To make sure the island doesn’t get all developed and covered with mansions, in order to live there, a certain amount of your income has to come from the land you own. This means lots of farms, cattle, sheep, etc. One of Portland’s most popular summer activities is going to pick berries, peaches, veggies, and flowers on the island. While our friend Emilie was in town, Jonah, Carmelle, and I took her to Sauvie Island Farms to go picking! We picked 6 ears of corn, 2 tubs of blueberries, a tub of raspberries, and 14 or so peaches, and got them all for $30. It was so fun! Anyway, I had posted photos of our fruit picking adventures, so a fruity dessert was requested. I found this recipe for peach shortbread on Smitten Kitchen, and did a little adjusting (mostly, we didn’t have nutmeg, so I used cloves and did half the amount). It was a big hit, and they were so dang easy to make.

Peach Shortbread

Ingredients

1 cup sugar
1 tsp baking powder
3 cups flour
1/4 teaspoon cinnamon
a generous pinch of ground clove
1/4 teaspoon salt
1 cup (2 sticks) cold unsalted butter
1 egg
2 peaches, pitted and thinly sliced

Instructions

Preheat your oven to 375 degrees. Butter (or somehow otherwise grease) a 9×13 pan or baking dish. In an electric mixer, or a good sized bowl, mix the sugar, baking powder, flour, cinnamon, clove, and salt. Using the paddle attachment, a pastry knife, a fork, or those finger things at the ends of your hands, cut and blend the butter and egg into the dry ingredients. It’s going to be dry and very crumbly, but that’s ok! Take 3/4 of the dough and pour them into the baking dish, pressing down so they’re firmly and evenly packing into the dish. Now, lay the peach slices on top. You want them to be evenly distributed, so make sure every edge and corner is covered. spread the remaining dough crumbs over the top of the peaches and bake for 30 minutes. The top should be slightly browned, and the edges should be golden. Remove from the oven and allow to cool before slicing up and serving. Enjoy!

Risotto with Fava Beans and Corn // Serious Crust by Annie Fassler

Risotto with Fava Beans and Corn

Fresh corn and fava beans ready to go into the risotto // Serious Crust by Annie FasslerRisotto with Fava Beans and Corn // Serious Crust by Annie Fassler

Wowee! What a whirlwind it has been lately. A few weeks ago, Jonah and I were in Chicago for the 4th of July holiday, and it seems like from there, things got crazy. The night we left for Chicago, we applied to rent a house, and the night we got back we found out we got it! We are now living in NE Portland, within walking distance to Porque No?, Tasty n’ Sons, and countless other places. Mississippi and Alberta neighborhoods are a stone’s throw away, and I’m discovering a part of the city of which I had only scratched the surface. It’s pretty sweet. Be on the lookout for reviews of some spots in our new hood.

It has been a while since I gave you guys a recipe. This is one I made a while back, but it is just as perfect for right now. This past weekend, we went out to Sauvie Island to go berry picking – we have blueberries coming out of our ears! As well as raspberries, peaches, and a few ears of corn. The corn reminded me that I STILL hadn’t posted this risotto recipe! I’ve discovered that risotto is such an easy meal to make and you can really throw in anything you have around. Saffron? Sure. Squash? Yup. Mushrooms? Why not. But this was a great spring & summer risotto with fava beans and fresh corn.

Risotto with Fava Beans and Corn

Ingredients

1 1/2 lbs of fava beans, shelled and shelled again (to learn more about shelling favas, go here)
2-3 ears of sweet corn, the kernels cut from the cob
~4 cups of chicken broth (can easily be replaced with vegetable broth to be made a vegetarian dish)
1/2 cup white wine (Alice Waters told me (in her book) that if you don’t have any white wine, you can also use a light beer – I didn’t have any wine or nice beer around, so I used PBR… it worked just fine)
2 Tbl olive oil
1 small white onion, diced
3 cloves garlic, diced
1/2 tsp salt
1 cup arborio rice
1/2 cup shredded parmesan cheese
salt and pepper

Instructions

In a saucepan over medium-high heat, bring the broth to a simmer. Reduce heat to medium-low.

In a separate saucepan over medium-high heat, heat the olive oil, then add the onion, garlic, and salt. Cook them until the onions are soft but not browned, about three minutes. Add the arborio rice and stir to coat it in olive oil. Add the wine (or in my case, beer, because I’m classy like that) and cook until the liquid has been absorbed and evaporated, stirring constantly.

Now add the broth, one cup at a time (or one ladle full at a time). Stir the rice frequently after each addition, and only add more broth when the previous broth has been absorbed. When you have added half the broth (after about 15 minutes), add the fava beans and corn. Continue adding broth and letting the rice cook and absorb, until the rice is tender but still has some bite to it. You may not need all of the broth. When the texture seems good to you, add about 1/4 cup of broth, remove the pot from the heat, and stir in the parmesan, and salt and pepper to taste. Enjoy!

Honeyed Broiled Apricots // Serious Crust by Annie Fassler

Honeyed Broiled Apricots

Honeyed Broiled Apricots // Serious Crust by Annie Fassler

Dear friends, I would like to share with you perhaps my favorite recipe of the summer season (thus far, anyways). I don’t know about you, but I am a big fan of apricots.

I love them in pies, tarts, crisps, and fresh as a perfect afternoon snack. I love how little and manageable they are, I love the color, and I love the tangy flavor. Most other summer fruits are incredibly juicy (peaches, nectarines, melons, berries), but I kind of like that, even at their ripest, apricots have a funny little dryness to them.

Anyway, I had this bag of apricots in the fridge a few weeks ago, and decided, after a little searching here and there for a quick apricot dessert, to make one of the world’s easiest and most delicious desserts. I kid you not.

You could eat them with a fork, but I recommend getting your fingers a little sticky and just picking them up. These are a few bites of heavenly goodness. The warm fruit with the cold creamy yogurt is a dream, sweetened by the broiled honey. Enjoy!

Honeyed Broiled Apricots

Ingredients

Apricots (think 1 per person)
Honey
Greek yogurt (sour cream, whipped cream, or regular plain yogurt will also work, but I like greek yogurt the best)
Pistachios (shelled and chopped)

Instructions

Heat your broiler. Cut each apricot in half along the seam, and remove the pit. Put the apricots, cut side up, in a baking dish (a brownie pan or a pie dish will work well), and fill each cavity with honey. You don’t want the honey to overflow, but you want the cavity to be full. Put the apricots under the broiler for about 5 minutes, rotating halfway through. You want the honey to be bubbling and the apricots to show some good color.

Allow the apricots to cool a bit (not all the way), then move them to little plates or saucers. Top with a dollop of yogurt and a sprinkle of pistachios.

Stale Bread Soup // Serious Crust by Annie Fassler

Stale Bread Soup (Ribollita)

Stale Bread Soup // Serious Crust by Annie FasslerStale Bread Soup // Serious Crust by Annie Fassler

I realize that at this point you might be sick and tired of hearing us harp about how great Tamar Adler’s An Everlasting Meal is. But hear me out one more time. Everyone has stale bread. Or at least everyone who has bread at some point and does not eat it all eventually has stale bread lying around. And most of the time it gets thrown away, or responsibly composted. If you are culinarily educated, dear reader, you may already have known of stale bread soup; but as I read Tamar’s book, I was astounded to find out that not only does such a thing exist, but there is a long and ancient tradition of creating soup from leftover bread (Ribollita in Italian).

There are a few things that should be said about stale bread soup. First, it is not a soup in the same way that chicken noodle is a soup; stale bread soup is usually much thicker and feels more like a hearty chili. Second, stale bread soup is more of a general idea and a starting point than a recipe. It is meant to be made with whatever is around, provided you have some stale bread (otherwise, you will be making whatever-is-around soup – which could turn out to be vegetables-in-water “soup” if you don’t have any broth lying around).

The recipe below is adapted slightly from Tamar’s recipe for Ribollita in An Everlasting Meal. In usual Tamar fashion, you will use A LOT of olive oil in this recipe. We have made stale bread soup twice now, so I’ve noted the different things we used.

Stale Bread Soup (Ribollita)

Ingredients

Olive oil
1 onion, diced
2 cloves garlic
Celery, if you have it (I did not)
salt
1/2 cup chopped fresh herbs like parsley or rosemary or thyme (if you don’t have fresh, maybe do 1/4 cup dried?)
1/2 teaspoon chile flakes
Tomatoes in some form, if you want (3 peeled fresh tomatoes, or I used 1 can diced. Made it once without tomatoes as well)
1 bunch leafy greens (I used kale once and cauliflower greens once; other ideas are swiss chard, collard greens, radish greens, etc)
1/4 cup water
2 cups cooked beans (I used a can of black beans both times, Tamar suggests chickpeas or cannellini beans)
2 cups broth from beans or chicken/veggie stock or cans of tomatoes (I used a combo of all three, and you can make up any shortfall with water)
1 piece of Parmesan rind (Do this if you can, because it makes the soup soooo tasty and rich. Also, what else are you going to do with your Parmesan rind?)
2 cups stale bread, crusts removed, torn/cut into 1/2-inch pieces

Instructions

Heat 1/4 inch olive oil (this is just the beginning) in a big-ish soup pot. Cook the onion and garlic (and celery if you have it) until they soften. Add the herbs and chile flakes and a little bit of salt. Add the tomatoes and cook for a few minutes over medium heat.

Chop the greens (and remove from the stems) then add to the pot, and add the water. Cover and cook over low heat until the greens are wilted. Put in all your broths/waters/juices and the beans, plus the Parmesan rind.

(If you have a bunch of Parmesan left, make sure to cut the rind from the rest of the Parmesan. Otherwise, just save the Parmesan rind for when you will next make bread soup. Make sure your Parmesan is big enough that you can keep track of it, because you’re going to take it out later.)

Bring to a simmer, then add the bread and more olive oil (Tamar says to add 1/2 cup, but I was not brave enough and probably added about a 1/4 cup at this point). Cover and cook for 1/2 hour on low, stirring occasionally to make sure the bottom doesn’t burn. The bread will soak up the soup and then liquify into it.  Taste it, add more broth or salt or whatever you want, and then take it off the heat.

Add in another 1/2 cup olive oil (Tamar, are you crazy!?!? I probably added 3 tablespoons here) and take out the Parmesan rind. You can grate Parmesan on top and add some pepper to serve.

This soup is perfect for a windy, rainy, cold, or dark winter/fall night.

Fresh Pasta with Breadcrumbs, Leeks, and Pancetta // Serious Crust by Annie Fassler

Fresh Pasta with Pancetta, Leeks, & Breadcrumbs with Porcini Powder

Fresh Pasta with Breadcrumbs, Leeks, and Pancetta // Serious Crust by Annie Fassler

Fresh Pasta with Breadcrumbs, Leeks, and Pancetta // Serious Crust by Annie Fassler

Fresh Pasta with Breadcrumbs, Leeks, and Pancetta // Serious Crust by Annie Fassler

Porcini powder. Porcini powder? Yes. From the farmers market. I was told it was wonderful, and was given a little bag as a gift. But what to do with the stuff, that’s the question. I’m not sure I made the right choice… This pasta dish had so much going on in it that the porcini flavor was hiding. It was hiding behind the sourdough breadcrumbs and butter it had been sprinkled into, and under the pancetta it had been tossed with, and between the fresh pasta noodles it had been swirled around with.

All that being said, this dish was dang good, if I do say so myself. There were a few elements, and it took a few pans to get it all prepped. So no, this is not one of those magical one pot meals. Certainly not.

My dear friend Elsa was staying with us, and my friend Dylan came over for dinner, as well as Elsa’s friend Sarah, so we had help in manning all the pans. Tamar Adler said in The Everlasting Meal that there is value in, when a guest asks “is there anything I can do to help?” being able to say, “yes.” I have found that to be very true.

Think of this recipe as a guideline. Or a lightly painted upon canvas. You can remove, add, flavor, sprinkle, drizzle anything you like. I must say, though, that I used a different pasta recipe this time, and I liked it much better than the one I had been using. There’s something to be said for trying something new.

Fresh Pasta with Pancetta, Leeks, & Breadcrumbs with Porcini Powder

Ingredients

Fresh Pasta

2 cups all-purpose flour
3 eggs

Toppings

Olive oil
1 large or 2 small leek(s), sliced and rinsed
1 small white onion, chopped
2-3 cloves garlic, minced
Pancetta – the amount is up to you. I like the pancetta that is thin, almost like prosciutto, though that isn’t what we used here. I think if we’d used the thinner kind, it would’ve clung to the noodles better.
Fresh breadcrumbs
Butter
Porcini powder
Salt and pepper

Instructions

Fresh Pasta

To make the pasta, pulse the flour alone in a food processor a few times. In a bowl, beat the eggs and then add them to flour, and process until the dough forms a ball. If your dough is dry and looks like little pea sized pieces of dough, you can add water 1/2 tsp at a time. If it sticks to the bowl of the processor, add flour 1 Tbl at a time. When the dough has formed a ball, turn it out onto a floured work surface and knead for 1-2 minutes. Wrap the dough in saran wrap and set it aside for up to 2 hours to relax (at least 15 minutes). Then roll out the pasta as you usually do and cut it as you normally would.

Toppings

In a pan over medium (or medium low), cook your pancetta, then set aside on a plate with a paper towel on it. Once the pancetta is removed, you can use that same pan to sautée the leeks, onion, and garlic, seasoning lightly with salt and pepper. You may want to add a drizzle of olive oil to the pan to help keep things from sticking. But then again, maybe you won’t.

In another pan, melt some butter, then add the breadcrumbs and as much porcini powder as you feel like adding. Toast the breadcrumbs on low heat, stirring frequently to prevent burning.

As things are moving along, get out a big pot, fill it with water and a healthy serving of salt, and bring to a boil. Add the pasta (I like to cook fresh pasta in batches, as it makes it less likely to stick together). If you’re cooking fresh pasta, it really only needs to cook for a few minutes. I like to remove it when all the noodles are floating. Do you have a better method? I’d like to know it. If you’re cooking your pasta in batches, you can remove it with tongs into a colander to keep the water boiling on your stovetop.

Strain the pasta, put it in a bowl, and toss with all the various bits and pieces. Enjoy with a glass of buttery, nutty white wine and friends, around a table, on a sunny evening.

Saffron Risotto with Mushrooms // Serious Crust by Annie Fassler

Saffron Risotto with Mushrooms

Saffron Risotto with Mushrooms // Serious Crust by Annie Fassler

I mentioned a couple of weeks ago that Jonah and I recently purchased The Family Meal by Ferran Adria. As soon as we got it in the mail, Jonah proceeded to look at the whole book, page by page, cover to cover. Which was really adorable. He was pretty excited. Anyway, a couple days later, I finally got it out and flipped through it, and I too got really excited. There are so many awesome recipes in this book, and the layout is great. It tells you the timeline of your meal (2 hours before, you can start doing task #1, 1 hour before, you can start doing tasks #2 and 3, 40 minutes before… you get the idea), it tells you how much of each ingredient you will need to make the meal for 2 people, 6 people, 20 people, and 75 people. So we can perfectly cook for just the two of us, or we can cook for us and a bunch of friends. Lastly, the recipe itself is in photograph form, so you know exactly what each step looks like, which is such a big thing for a lot of people. And it has super specific instructions, i.e. instead of saying “cook until lightly browned” it says “cook for 16 minutes.” Which is so nice.

Anyway, while flipping through it for the first time, we marked a bunch of the recipes we wanted to try first, and then went to the store to pick up ingredients for a couple meals this week. The coolest thing was that because we had bought a chicken at the farmers market a couple weeks ago, cut it into pieces, frozen the pieces, and made broth out of the carcass, we had almost all of the ingredients we needed for these meals. First up was saffron risotto with mushrooms. I have never made risotto before, and was a bit nervous about it, because it’s one of those things that seems like it might be easy to mess up – overcook, undercook, underseason, overseason… etc. But because the instructions for these recipes are so specific, I had no fear!

Saffron Risotto with Mushrooms

Serves 2

Ingredients

2 1/2 cups chicken stock (can be replaced with vegetable stock)
1 pinch saffron strands
1 1/2 Tbl olive oil
1/4 white onion, finely chopped
2 Tbl white wine
1 cup risotto rice, also called arborio rice
2-6 white mushrooms (it all depends on how big your mushrooms are and how many you want on your risotto)
1 tsp butter
1/4 cup grated parmesan cheese
1 tsp (maybe more) fresh lemon juice

Instructions

Put all of the stock into a sauce pan, cover, and bring to a simmer.

This is the weird part, where I wish you could see the cookbook so you could see the photos. Make a little envelope out of tinfoil, put the saffron threads in it, and toast them in a pan over medium heat for one minute. Don’t le it burn! Remove from the pan and let it cool.

In a large pan or pot, heat the oil over medium heat, then add the onions. Once they’re soft, but not browned, add the wine and scrape up any browned bits from the bottom of the pan. When most of the wine has cooked off, add the rice and let it cook for 3 minutes, stirring all the while. Add one ladle-full of stock, and cook for 2-3 minutes, stirring often to keep it from sticking. Pour the rest of the stock into the pot. Quickly chop the saffron and add it to the pot. Cook the rice for 16 minutes (what precision!), stirring frequently.

While the rice is cooking away, wipe the mushrooms clean with a paper towel, and slice them as thin as you can. You can use a mandolin if you’ve got one, or just a sharp knife. Put them in a bowl and set aside.

When the rice has absorbed the majority of the liquid and is a little al dente, add the butter, and then the parmesan. Stir until the rice is nice and creamy, and season it with salt, pepper, and lemon juice. Spoon the risotto onto plates and top with mushroom slices, and enjoy!

All-in Pesto by Serious Crust

All-In Pesto

All-in Pesto by Serious Crust

A few weeks ago, my dad and Darla came down to Portland for my cousin Lia’s oral thesis defense. I really wanted to go to the farmer’s market before brunch, and Dad came along. My dad is a lover of produce. I cannot tell you how excited he got about the range of items available at our market (and how decently priced everything was compared to his fancy Seattle market). I’ve never seen someone so excited over nettles before.

Anyway, between the two of us, we bought 3 bunches of radishes. My dad, needing to drive back to Seattle with a large dog in the car, was trying to minimize his load as much as possible, ripped the radishes from the greens, and left the greens to me. A la Tamar, I knew I could use them, I just had to figure out how. And then it hit me: pesto.

I have since made 2 batches of the stuff, and people LOVE it. And you can use greens other than radish tops: kale, kohlrabi greens… anything green and leafy. The other beautiful thing about this recipe is that it’s not really a recipe – it’s more like guidelines. Use whatever you’ve got around (ergo the all-in title: you can put it all in), and put it on anything and everything. We started with pasta and went from there: we used it as a rub for a whole chicken and potatoes that we roasted, ate it with cheese and crackers and charcuterie, and (my favorite) topped some crusty bread with fromage blanc, the pesto, and a soft boiled egg.

All-In Pesto

Ingredients

Radish tops, stems picked off, and rinsed
Basil, rinsed
A hard salty cheese, like pecorino romano or parmesan
Pine nuts or shelled pistachios (or any combination of the two)
Garlic, peeled and roughly chopped
Olive oil
Salt

Instructions

In a food processor combine all ingredients. It’s best to start with all of your greens, but about half of everything else, so that you can adjust flavor and texture to your liking. Pulse until smooth, and enjoy!

Strawberry Rhubarb Crisp by Serious Crust

Strawberry Rhubarb (and Orange) Crisp

Strawberry Rhubarb Crisp from Serious Crust

Strawberry Rhubarb Crisp from Serious Crust

Well friends, my favorite season is upon us. The season of rhubarb. The time of year when I try to fit in as many strawberry-rhubarb (or just rhubarb) recipes as my taste buds can handle, which is usually not a problem. These days, I buy a large bag of rhubarb every weekend at the farmers market, and then I whip something up late in the week to enjoy over the weekend. Thus far, I’ve made a pie, some compote, rhubarb simple syrup so I can make these, and this strawberry rhubarb crisp.

I found the inspiration for this recipe on a blog I love, and read at least a few times a week called Design Sponge. It’s a beautiful design blog, full of postings about furniture DIYs, beautiful spaces, colors, living in, city guides, recipes, party ideas, women running their own businesses… the list goes on and on. I find so many things on this blog that inspire me, and so many of their pictures make me wish I could be wherever the photo was taken. Seriously, I recommend it.

Anyway, I thought this recipe would be especially nice because of the addition of the sweet citrus of orange to the usual strawberry-rhubarb-ness. It’s always nice to try a little twist to shake things up, no? I made the filling (based on the recipe I found on the website), and my roommate Carmelle made the topping (and did not follow a recipe at all – she’s like that), so while mine had a different topping, I’ll give you the topping they have on Design Sponge. I also doubled the amount of filling, mostly because I had a ton of strawberries and rhubarb to use up, but I’ll give you the smaller portions, and you can double if you’d like.

Strawberry Rhubarb Crisp

Ingredients

Strawberry Rhubarb Filling

2 cups fresh rhubarb, diced (about 3 stalks)
2 cups fresh strawberries, hulled and sliced into large pieces
3/8 cup sugar
1 teaspoon orange zest
1/2 tablespoon cornstarch (depending on how juicy your strawberries are, you may want more)
1/4 cup orange juice (preferably fresh-squeezed, as per usual)

Crisp Topping

3/8 cup sugar
1/2 cup light brown sugar, lightly packed
3/4 cup all-purpose flour
1/4 teaspoon kosher salt
3/4 cup quick cooking (not instant) oatmeal
7 tablespoons (about 3/4 stick) cold unsalted butter, diced

Whipped cream or ice cream for serving

Instructions

Strawberry Rhubarb Filling

Preheat your oven to 350 degrees. To make the filling, mix the rhubarb, strawberries, sugar, and orange zest together in a large bowl. In a measuring cup, dissolve the cornstarch in the orange juice and mix it into the rest of the filling. Drain about 1/2 cup of juice from the mixture into a cup and set aside (you will use this later to pour over individual servings). The best way to do this is get an extra person to help you tip the bowl while keeping the fruit in with a wooden spoon. Pour the filling into an 8×8 baking dish and place it on a sheet pan (not a terrible idea to line it with parchment paper or foil).

Crisp Topping

In the bowl of an electric mixer with the paddle attachment, combine the sugars, flour, salt and oatmeal. With the mixer on low speed, add the butter and mix until the dry ingredients are moist and the mixture is in crumbles. You want the butter to stay cold, so if you don’t have a mixer, either work quickly with your hands or use a pastry cutter type thing. Sprinkle the topping over the filling, covering it completely, and bake for about 45 minutes, until the filling is bubbling and the topping is golden brown.

Allow to cool, and once it has you can pour that drained juice from earlier over the top of each serving (Or, if you’re lazy, you can pour it over the whole dish). Serve warm with fresh whipped cream (or vanilla ice cream, if that’s how you roll).

Fried Baby Artichokes

Fried Baby Artichokes

Fried Baby ArtichokesFried Baby Artichokes

We have been hitting up our local farmers market like crazy. If you live in Portland and you don’t go to the PSU Farmers Market on Saturdays, you are seriously missing out. Especially when the weather is beautiful and there is SO MUCH PRODUCE everywhere to be found. It’s really incredible.

Lately, Jonah and I have bought chanterelles, fennel, fiddlehead ferns, rhubarb (so much rhubarb), strawberries, a chicken, radishes, leeks, lamb steaks, sunchokes, spring onions, cheese… the list goes on. There is so much delicious local food to be found, it’s like being in heaven. And these mounds of food and people walking around in sundresses and shorts with bouquets of flowers are all so beautiful.

Anyway, one of my favorite things we’ve found at the market is baby artichokes. Have you ever had fried baby artichokes at a restaurant? It’s a common Italian dish. The leaves get crispy and a little burnt and it’s really yummy. So when we brought these home, we knew we wanted to make that dish. We found a simple recipe on Martha Stewart’s website, and Jonah took over the making of these little guys. We bought 8 of them to cook, but the recipe is obviously variable depending on how many you want to make.

Fried Baby Artichokes

Ingredients

8-12 baby artichokes
1/2 cup olive oil
1/2 tsp sea salt, plus some for serving
4 cloves garlic (or more, if you want), lightly crushed
lemon for serving

Instructions

Prepare the artichokes by removing the tough outer leaves, cutting off the top third of the , and peeling the tough dark green layer from the stems with a paring knife. I know, it seems like you’re losing a lot of artichoke here, but you’re really just getting rid of all the really tough parts that would make this whole thing harder and far less pleasant to eat.

Pour the oil and 1/2 cup water into a medium sized, deep, heavy pot and add the artichokes and 1/2 tsp of sea salt. Turn the heat on to medium-high, and let them cook, turning them over occasionally (you don’t want them to get burned on one side). Cook them until the water has evaporated and the oil starts to spit, which, trust me, it will. This will take about 8-10 minutes.

When the water has cooked off, add the garlic to the pot and reduce the heat to medium. Cover the pot with a spatter screen or an sieve turned upside down (Nice tip Martha! Sadly our sieve wasn’t big enough for our pot… I’m thinking it’s time to invest in a spatter screen). Continue cooking the artichokes and turning them occasionally, until they’re tender and golden brown all over (should be another ~10 minutes). Now take some tongs and put them upside down (or cut-side down, however you want to think about it) in the pan, pressing them down and wiggling them around to kind of loosen up and separate the leaves. Leave them upside down and let them cook like that for another 5 minutes, until the leaves/edges are dark and crispy. Using your tongs, transfer artichokes and garlic from the pan to a plate covered in paper towels. Put the artichokes cut sides down at first, if you can, so they can drain a little bit.

Sprinkle them with salt, squeeze some lemon over top, and serve!

Kale, squash, and a runny yolk

Kale, Squash, and a Runny Yolk

Kale, squash, and a runny yolk

Sometimes you just need an easy dinner. You need to comb through your fridge, scrounge what ingredients you can, and stand there, for a minute, gazing at your collection, trying to figure out what you can make with all of this. It doesn’t have to be fancy, or even graceful, but tasting good and mildly cohesive would be nice. You’ve got a bunch of kale that you really should use soon, a small, friendly looking butternut squash, and a jalapeño. And eggs. Luckily, the roommates always keep lots of eggs around. And do you know what brings a dish together with ease? A runny yolk.

So you slice up the butternut squash, drizzle with olive oil and salt, mix in some chopped garlic, and lay it out on a baking sheet, laying a couple rosemary springs atop it all, sliding it into the oven to roast. You sautée up the kale with more oil, salt, and garlic, and even some jalapeño. And then, to finish it all off, you soft boil a couple of eggs (one for you and one for the tall fellow you eat dinner with). Simple as that, you have dinner.

Kale, Squash, and a Soft Boiled Egg

Ingredients

A small butternut squash, olive oil, and salt (and anything you’d like to roast with it)
1 bunch of kale, garlic, olive oil, and salt
Eggs

Instructions

Peel and cube or slice the butternut squash into whatever shapes you like to eat. Slide into the oven at about 375 and roast until easily pierced with a fork. Sautée kale with a tsp of olive oil, chopped garlic, and a sprinkling of salt. If you want the kale to steam and wilt a little more, you can add some water to the pan (no more than 1/4 cup) and cover with a lid. After letting the kale steam for a bit, remove the lid and let the water cook off.

To soft boil the eggs, bring a pot of water to a boil. Drop the eggs in, allow to cook for 6 minutes (this can be adjusted depending on how you like your eggs). After 6 minutes, remove the eggs with a slotted spoon, run under cold water, and peel.

Put your egg on top of your kale and squash to let the yolk run over the veggies a bit. It adds a nice rich creaminess. Enjoy.