Season

Soba Noodles with Summer Squash and Mango

Soba Noodles with Summer Squash and Mango // Serious Crust

Soba noodles have become a staple in my kitchen. I have always liked them, but as the weather has been slowly getting warmer, and there’s lovely produce all around, they have been appearing more often in my kitchen. I love them with a light sauce made of rice vinegar and lime juice. But the true beauty of soba noodles, to me, is that they are delicious cold. The day after you make them, and they’ve been sitting in whatever sauce you’ve tossed them with, they become ultra flavorful and refreshing. I am a big fan. And I think you should be too.

Jonah came home this week, on Monday actually, and I had a feeling that cooking might not be exactly what he wanted to do the moment he stepped of the plane. So on Sunday night I made a big batch of soba noodles tossed with roasted zucchini, fresh mango, and a light citrus-y sauce. I ate a small bowl, and threw the rest in the fridge, knowing that it would be delicious the next day for dinner with some roasted green beens (also in the fridge).

I love how colorful this dish is, how summery it is, and how packed with flavor. I think it’d make a great cold side dish for a summer party (4th of July, anyone?), and it makes great leftovers to take to the office for lunch. You can add some seared tofu, or maybe even some grilled chicken.
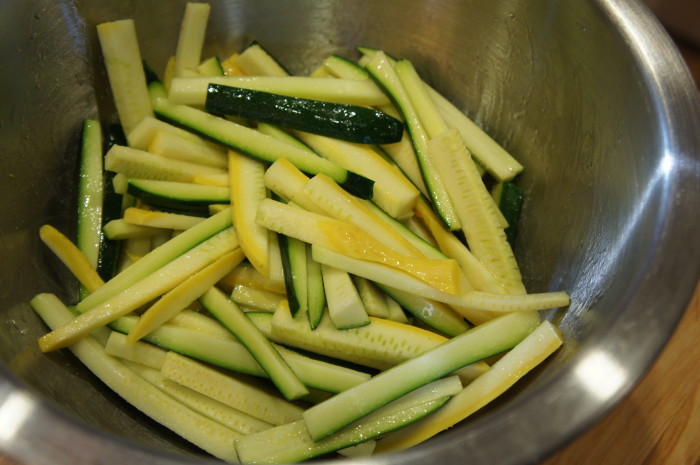
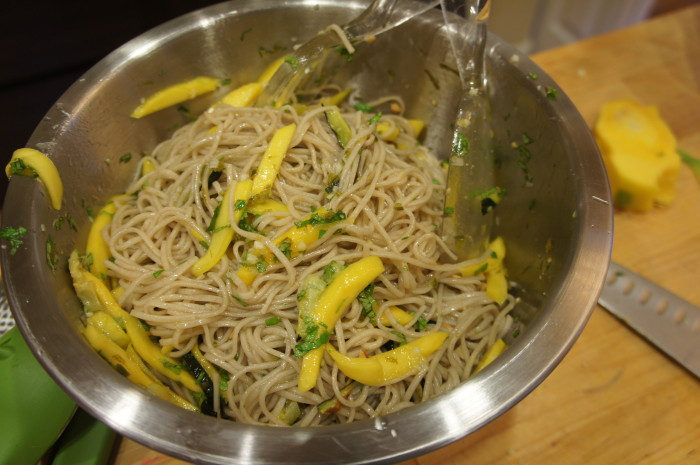
Soba Noodles with Summer Squash and Mango

Ingredients

2 zucchini, julienned
2 summer squash, julienned
olive oil
salt
1 9-oz package buckwheat soba noodles
3/4 cup rice vinegar
1/4 cup sugar
3/4 tsp salt
2-3 cloves garlic, finely chopped
1 jalapeño, finely chopped (and seeded, if you’re not feeling the heat)
juice and zest of 1 lime
1 Tbl sesame oil
1 ripe mango, peeled and julienned
~1/4 cup fresh basil, chopped
~1/4 cup fresh mint, chopped
optional but recommended: chopped peanuts to top (I used about 1/4 cup), lime wedges

Instructions

Preheat your oven to 400 degrees. Toss the julienned zucchini and squash with olive oil and salt. Spread on a parchment lined baking sheet. Roast for 20-30 minutes, until lightly browned, tossing halfway through. Set aside to cool.

Cook the soba noodles as instructed on the package. Usually, this means boil them for about 4 minutes, drain them, rinse them with cold water, drain them, and spread them out on a dish towel to try.

While boiling the water for the noodles, combine the rice vinegar, sugar, and salt in a small pot over medium heat, stirring until the sugar dissolves. Remove from heat and add garlic and jalapeño. Allow to cool, then add the lime juice and zest as well as the sesame oil. Whisk to combine. Put the soba noodles in a bowl, and toss with the dressing. Add the squash, mango, herbs, and nuts to the noodles, tossing to combine. Garnish with a sprinkle more of chopped peanuts and a lime wedge. Enjoy with a light beer on a hot day.

Apricot Foldover Pie

Apricot Foldover Pie // Serious Crust

I’ve been wanting to make this apricot foldover pie for a few weeks now. I’ve been dreaming about how soft the apricots will get, and how homey and rustic the crust will taste with whole wheat pastry flour. And yesterday was the perfect excuse, as it was Jonah’s last night before he left for 2 weeks in Europe for work. Hard life he leads, that guy.

So he heads to work, I whip up the dough and throw it in the fridge to chill before running to the store to pick up fruit. I found the most tender apricots and the juiciest raspberries to use for this pie. In fact, I couldn’t help myself and ate a couple raspberries on the approximately 2 minute drive back to my house.

I cut up the fruit and mix up the filling. All is going well until I try to start rolling out the dough. I was working up a sweat, I kid you not. It’s so tough, and it’s starting to get huge – way bigger than needed to fill the pie dish with some overhang. But no matter, I drape it into the pie dish, pour in the filling, and then start folding up the edges. As I’m folding it all up, I realize how thick the crust is despite having rolled it out to be far bigger than necessary. I knew something must be wrong. I go back to check the recipe, and there is my glaring mistake. I misread 1/2 cup of whole wheat pastry flour for 1 1/2 cups. So, you know, I basically doubled the flour.

At this point, I have to leave for work in about 40 minutes. What else could I do? I dump the filling back into the mixing bowl, toss the original crust, and start from square 1. Instead of chilling the dough for the prescribed 30 minutes, I stuck mine in the freezer for about 5. Rolled it out, filled it up, and threw it in the oven, asking my roommate Sophie to take it out when the timer beeped.

And it came out beautifully. Rustic, perfectly golden, all that. I can only imagine what a disaster it would’ve been trying to eat that crust if I hadn’t discovered my mistake and started over. But there you have it. It all works out in the end. And everyone makes mistakes.

Apricot Foldover Pie

Note: I like cardamom. A lot. So I used 1/2 tsp of it. However, it is a strong flavor. I suggest smelling it, and seeing if it’s something you would like lots of or a little of, and then add either 1/4 or 1/2 tsp based on your whiff.

Ingredients

Pie Dough

1 1/2 cups AP flour
1/2 cup whole wheat pastry flour
1/2 tsp salt
1 Tbl sugar
12 Tbl (1 1/2 sticks) cold unsalted butter, cut into chunks
1 egg yolk
1/2 tsp white vinegar
1/4 cup ice water, plus a few Tbl if needed

Apricot Filling

7-8 cups apricots, pitted and quartered (a little over 2 lbs)
1-2 cups raspberries (optional, though if you aren’t using raspberries, you’ll want to use more apricots)
1/3-2/3 cup sugar, plus 1 Tbl
3 Tbl AP flour
1/2 tsp cinnamon
1/4-1/2 tsp cardamom
2 Tbl unsalted butter, melted

Instructions

Pie Dough

To make the dough, mix the flours, salt, and sugar in a bowl. Add the chunks of butter, and cut them in with a pastry knife. You can also use an electric mixer with the paddle attachment (that’s what I did) or a food processor. Blend until the butter is roughly the size of uncooked chickpeas. In a separate small bowl, mix the egg yolk, vinegar, and 1/4 cup of ice water. Add the egg mixture to the flour mixture 2 Tbl at a time, until the dough starts to come together. If you need to add extra ice water, do so 1 Tbl at a time. Make the dough into a disc, wrap in plastic wrap, and refrigerate for at least 30 minutes or up to two days.

Apricot Filling

When the dough is fully chilled, start to preheat your oven to 450 degrees F. Taste a slice of your apricots – if they are sweet, use 1/3 cup sugar, if they’re less sweet add a little more. In a large bowl, toss the quartered apricots, raspberries, sugar, flour, and spices together. Set aside.

Roll the chilled dough out into a circle about 1/8 of an inch thick. Transfer it into a 9-inch pie plate, leaving the edges of dough hanging over the plate (you’ll have lots of excess dough, don’t trim it unless you are just aiming for a more even appearance). Pour the fruit into the pie crust, and gently fold the excess dough over the top of the fruit. Brush the dough with the melted butter, pouring any extra into the fruit. Sprinkle the dough with about 1 Tbl of sugar.

Line a rimmed baking sheet with parchment paper, and set the pie plate on the sheet. Bake for 15 minutes at 450, then turn the oven down to 375 degrees F. Bake for about 45 minutes, or until the crust is golden brown at the edges and the fruit is bubbling. Allow to cool before serving with some fresh whipped cream.

Shaved Asparagus Salad

Shaved Asparagus Salad // Serious Crust

Sometimes,  you make a meal, thinking one dish will be the star. Especially when you lay down a hefty chunk of change on a cut of meat. But things happen – you run out of time and you don’t season the meat properly or sear it the way you’d like, and then maybe you leave it in the slow cooker a little bit longer than you should have. And when that happens, there are side dishes that sneak up and surprise you. Like this shaved asparagus salad did.

Don’t get me wrong, I knew this salad would be good. I love asparagus, and there are seemingly a million shaved asparagus salad recipes out there (like this one, and this one, and this one). And yeah, they’re all relatively the same. But man, something about the freshness of this salad – crunchy, sour, salty – just got me. It was exactly what I needed after a long day of work. And it certainly was better than an underseasoned, overcooked (only slightly) piece of meat.

Shaved Asparagus Salad

Serves 4

Ingredients

1 bunch of asparagus
juice from half of a lemon
olive oil
salt (course is good, if you’ve got it)
freshly ground pepper
1/4 cup, roughly, of toasted pine nuts, sliced and toasted almonds, or shelled pistachios
parmesan cheese, though crumbled feta would work nicely too

Instructions

Don’t snap the tough ends off your asparagus just yet! Leave them on and use them as a handle. Lay the asparagus on a cutting board, and use a peeler to shave off wide strips, shaving away from you. You’ll have some thick pieces at the end, but do the best you can. Apparently the consensus is that y-shaped peelers are better for this, but I don’t have one of those. Make do with what you’ve got. Discard the woody ends. Put the peeled pieces into a bowl or on a platter or whatever you’re planning on serving on/in. Pour the lemon juice over top of the asparagus, and drizzle with olive oil. I can’t tell you how much olive oil, because I didn’t measure. A good glug should suffice. Sprinkle some salt and pepper over the top, as well as the toasted nuts. Rinse your peeler and use it to shave some thin pieces of parmesan to top the salad (or use a fork and crumble the feta over top). We’re big cheese fans, so we did more cheese instead of less.

Enjoy on a spring or summer day, preferably with a glass of refreshing white or rosé wine. I think this salad would be perfect alongside some grilled fish or chicken for a summer soirée.

Herb and Lemon Shortbread with Straus Family Butter {Sponsored}

Herb and Lemon Shortbread // Serious Crust

I love butter. Let’s be clear here, I don’t like to grab a stick and eat it like a candy bar, the way my mother used to. Certainly not. But there is something to be said for a good piece of sourdough covered in melty butter. Or a roast chicken that’s been slathered in butter and salt and pepper. You know what I mean?

Recently, Jonah and I have become more interested in buying “good” butter. Butter is butter – it’s good. But we were wanting to buy butter made with milk from grass-fed cows. It started a couple months ago when our roommate’s dad, Bruce, came to visit. Bruce is very knowledgeable about diet and nutrition, and while he was here we had many conversations about foods that people think are bad for you (aka butter) but aren’t really if you eat them well. Good fats are good for you, guys! Things like good olive oil, good butter, even chicken livers (fatty, yes, but full of nutrients), are things we can enjoy without feeling guilty about it.

So when I was sent some coupons for Straus Dairy products, I knew immediately I wanted to try their butter. I started with ye old piece of toast. What better way to judge a butter’s character? It was good. It was richer and creamier than your average butter. So I took things to another level. I had bought some chicken livers the day before, so I made some chicken liver paté (Julia Child’s recipe, in case you were interested). And let me tell you, it was some incredibly creamy paté.

Let’s talk for a second about Straus Family Creamery. After spending a fair amount of time on Straus’s website, perhaps one of the things I find the coolest is that they were the first 100% certified organic creamery in the country. For real! Evolving from a family dairy farm, Straus Family Creamery was officially founded in 1994, when Albert Straus saw going organic as a way to differentiate himself and save the state of local family farming. The butter has 85% butterfat content, and is less moist than normal butter. What does this mean for us bakers? It means it’ll brown more evenly and be more flaky. And for the cooks? It doesn’t burn as easily. Now I know, this butter ain’t cheap. But when you’re making butter heavy things like paté or shortbread, I think it’s worth spending the extra few dollars. You don’t skimp on a pork shoulder or buy cheap-o chocolate for your chocolate chip cookies, do you? I thought not.

Enough waxing poetic about butter, Annie. Let’s get on to this recipe for herb and lemon shortbread. On our front steps, we have a little pot of herbs that we carried with us from our last home. Our thyme isn’t looking so hot, but the sage is coming back strong this spring. And every time I walk by that pot, I start thinking of things I could do with those herbs. This week, I had an idea for this herb and lemon shortbread. And lo and behold, I had one stick of this beautiful butter left. It was perfect.

Herb and Lemon Shortbread

Note: I used solely sage for this recipe, but any combination of sage, rosemary, and thyme would be great, I think.

Ingredients

1 cup flour
1/4 tsp salt
2 Tbl plus 1 tsp sugar
1-2 tsp freshly chopped herbs (I used 1 tsp of freshly chopped sage, and wish I had used more)
1/2 tsp lemon zest
1 stick (8 oz) Straus Family butter, unsalted, at room temperature

Instructions

Preheat your oven to 350 degrees.

Sift flour and salt together in a medium bowl, set aside. In a small bowl, combine 2 Tbl sugar plus chopped herbs and lemon zest. Rub these ingredients together with your fingers – this will make sure the sugar absorbs the oils from the herbs and lemon, making it perfectly aromatic. Add the sugar mixture to the flour, and stir until combined. Cut the butter into chunks, and combine it with the flour/sugar mixture with a fork or a pastry knife, blending until you’ve got a beautiful soft dough.

Gently press the dough into a 9×9 baking dish or a 9-inch pie plate. Sprinkle the remaining teaspoon of sugar over the top. Bake until it’s golden brown around the edges. Once you’ve removed it from the oven, carefully cut it into wedges or squares or whatever shape you like while it’s still hot. Allow to cool before separating it. It helps to run the knife along the lines again.

I think this shortbread would make a fantastic base for lemon bars or rhubarb bars or any kind of bar topped with curd. Just saying.

This is a sponsored post. I was given coupons for Straus Dairy products, and all of the opinions below are my own.