Course

Lamb & Love

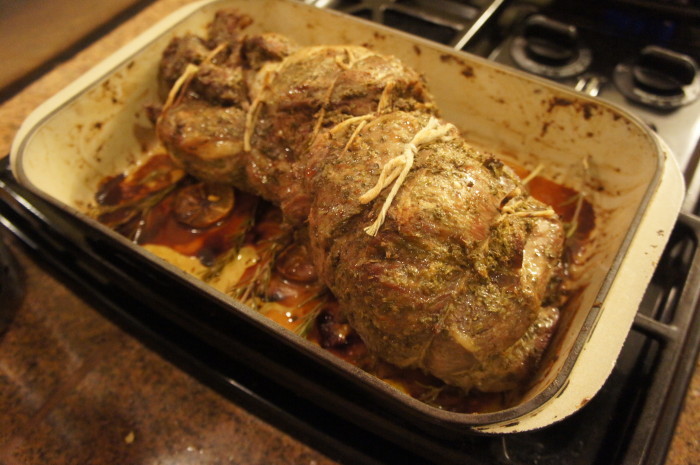
Look! We did it! The lamb out of the oven, ready for a little rest.

Yes, this is what arrived to my office. It was very exciting and bizarre.
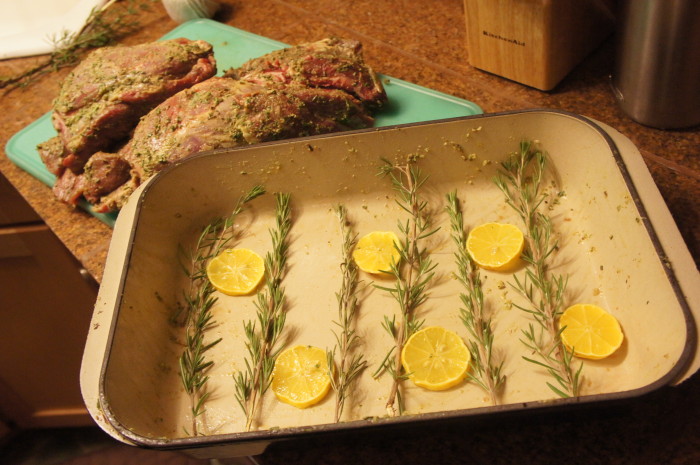
Prepping the baking dish while the lamb gets rolled

Clockwise starting at the top: brussels sprouts cooked in lamb fat/oil, salad, fingerling potatoes gremolata, and the star of the meal, the roasted lamb!

Did you know that February is Lamb Lover’s Month? Neither did I, until I was contacted by the American Lamb Board to participate in a lamb cooking contest (you can vote here, starting February 14th: www.lambloversmonth.com). Yes, that’s right folks. How could I possibly say no? So I filled out my registration, and got a boneless leg of lamb in the mail last Friday.

I immediately started researching lamb cooking techniques, and ended up kind of combining a few recipes. Because lamb is often used in Greek/Mediterranean cuisine, most recipes have lots of rosemary, lemon, mint, and even some yogurt sauces. I didn’t want to get too fancy because I wanted it to be something that we all could easily pull off. I wanted to do some kind of spice rub or marinade where I could leave the lamb overnight to really absorb the flavors of whatever I ended up going with.

So after some research, I decided to go with an adapted version of a recipe from The Herbfarm Cookbook. I used varied amounts of all of the ingredients to go for a little more of the taste I wanted (more lavender, thyme, adding lemon, etc.) and was very happy with the result: a strongly herb-flavored (but not overpowering), perfectly cooked piece of lamb.

For our sides, we cooked brussels sprouts in a combination of melted lamb fat and oil: slice each sprout, top to bottom, into 3-4 pieces, heat the fat/oil, toss in a layer of sprouts (careful, it will spit and it will hurt – long sleeves are your friend), and sprinkle with salt. Cook until the bottoms are nice and dark, tossing occasionally if desired. We also made a rough version of fingerling potatoes gremolata: slice up your potatoes, toss in oil and salt, sprinkle with some chopped garlic, roast them until tender, and then when you’ve removed them, top them with some melted butter and chopped parsley. And salad. We had salad too. If you like this recipe, the blog post, even just the pictures, head over to www.lambloversmonth.com to vote for our little blog to win the Lamb Lover’s Month cooking contest! It would be super awesome, and maybe I’d even invite you over to enjoy some free lamb…

Hope you all have a lovely Valentine’s day, featuring some kind of delicious food! (A latte with your loved one? A sexy seafood dinner? Roasted lamb? The possibilities are endless – get out there and try something new and adventurous!)

Herb Rubbed Lamb

Ingredients

Lamb

1/2 cup fresh rosemary pines
4 tsp fresh or 2 1/2 tsp dried lavender buds
4 tsp fresh thyme leaves
6 cloves garlic, peeled
1 Tbl Dijon mustard
1 tsp salt
1 tsp freshly ground pepper
zest of one meyer lemon
6 Tbl olive oil
1 boneless leg of lamb (about 3 pounds, though more also definitely works)
6 woody branches of rosemary
1 meyer lemon, sliced into thin rounds (and seeded, if necessary)
optional: a few more cloves of garlic, number is dependent on your passion for the garlic

Sauce

1/4 cup red wine
1 tsp dijon mustard
1 tsp balsamic vinegar

Instructions

Lamb

Start by processing all the herb paste ingredients except for the olive oil in a food processor until the herbs (particularly the rosemary leaves) are chopped. Now, with the machine running, slowly pour in the oil. Most machines have a spout type thing at the top you can remove so that you can pour ingredients in while blending. Continue to blend until it has reached a thick sauce consistency, scraping down the sides when necessary. There will still be little chunks of rosemary and garlic, you can’t make a complete paste out of it, but do the best you can.

If the lamb is tied, untie it. Spread the lamb out, and with a sharp knife, trim as much fat as you can from both sides of the meat. Think that fat is gross and that you’re going to toss it in the trash? Don’t! Fat can be used for lots of things. Melt it down and use it to cook veggies in or make a broth (I think? I’m not sure how well that would actually work if you haven’t got ANY meat attached, but it’s worth a shot.) Find a baking dish where the lamb will fit snugly. Rub the top of the lamb with about half of the herb paste, flip it over, and rub the other side. Set it in the dish, cover with plastic wrap, and stick it in the fridge for 8-24 hours (the longer the better). Now, I am not particularly a fan of recipes where you have to refrigerate anything for more than an hour – planning ahead is not my forte. But you know what I’m learning? It’s so worth it. When you let anything (particularly meat) absorb the flavors of your marinade or rub for a long time, it makes such a big, flavorful difference.

Preheat your oven to 425 degrees. Remove your lamb from the dish and, attempting to remove as little of the herb rub as possible, roll the lamb back into it’s original shape. If this seems relatively impossible (as it did for Jonah when he was rolling it), just roll it into whatever shape makes sense – you just want it to be kind of spiraled and uniform in size. Hopefully that makes sense. We also took some whole cloves of garlic and stuck them in little crevices in the lamb before rolling it up. They got gently cooked, and made for a nice look when the lamb was sliced for serving. Take a few pieces of kitchen twine and tie the lamb snugly in three places (or more, whatever you need to do to make it work – just as few as possible, mostly). Put the rosemary branches and lemon slices in the bottom of the baking dish and gently set the lamb on top. Roast the lamb at 425 for 10 minutes before reducing the heat to 350 degrees. Roast for about an hour and a half, or until an instant read thermometer inserted into the center registers 130-135 degrees. Note: ours DID NOT take an hour and a half. It was done a little over an hour at 350. Take the temperature in a few places and use the lowest . Remove the roast from the oven, transfer it to a board (preferably one with those grooves around the edges as it will be releasing lots of juices), cover it loosely with foil, and let it rest for about 10 minutes.

Sauce

While the meat is resting, whip up the sauce. Take the rosemary branches and lemon slices out of the baking dish, and tilt the dish so the drippings all run into one corner. Skim off as much fat as you can, transfer the remaining juices to a little saucepan. Add the wine and put it over low heat. Use a whisk to stir in the mustard and vinegar, and season to taste with salt and pepper if you’d like. Remove the strings from the meat and slice it thinly. Arrange on a platter (or just throw a couple slices on each plate) and pour the sauce over. Voila! A delicious dinner.

Kumquat Arugula Salad + A new cookbook

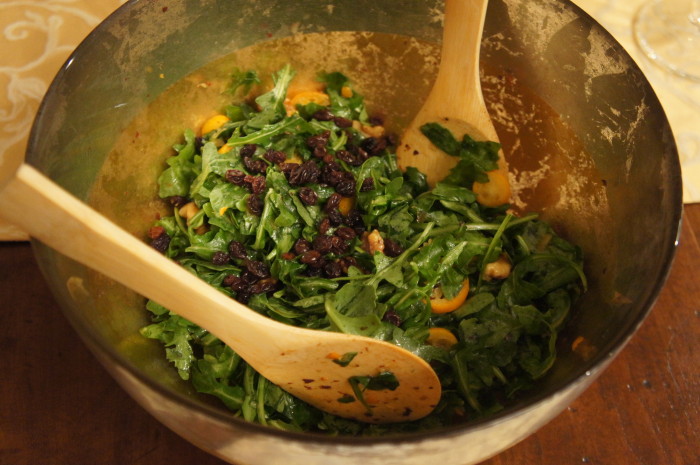
Everything all tossed together, ready to eat.

Alright, it’s been a while. Let’s rewind a little bit to the holidays. The holidays were great. Why? I got a white Christmas, lots of good food, time with Jonah’s family, time with my family, and 3 new cookbooks. My sister Emily gave me this beautiful book called “Ripe” by Cheryl Sternman Rule (not to be confused by a cookbook by the same title by the author of “Tender”). Emblazoned with a beautiful peach on the cover, Ripe is perfect for the artistic/visual cook because it is arranged by color. That’s right, color. The first section is reds (tomatoes, rhubarb, strawberries, pomegranate, cranberries, etc.), followed by orange (carrots, butternut squash, clementines, kumquats…), yellow, green, purple and blue, and white. In each color are pages of produce, and for each produce item, one recipe. Yep, only one. I was excited to get this for many reasons: it’s pretty, the recipes look delicious, and because there’s only one recipe per main ingredient, it is forcing me to branch out and try things I haven’t tried before. For example, kumquats.

When I was growing up, my grandfather’s favorite restaurant in Tucson called Caruso’s, was a frequent stop when we went to visit. And because my sisters and cousin and I were all young, we had trouble sitting at a dinner table for an hour or 2, as my family often does. So we would always run around the restaurant. In front of the restaurant and out in the courtyard, there were many kumquat trees; I don’t think I realized that kumquats weren’t just little oranges, but their own entity entirely. We would stand under the trees, reaching up and plucking these little orange gems from the branches, and squealing when we bit into them because they were so sour (we didn’t realize at that age that the fruit just probably wasn’t ripe yet). This memory of kumquats has always been sweet for me, but because especially so when I lost my grandfather a couple years ago. Remembering him reach up into the branches to pick kumquats for his granddaughters and the wonderful meals we had with him at that restaurant will always make me smile. This is possibly my favorite thing about food: the memories that are associated with it, the adventures it takes us on, whether new or past.

Anyway, coming back from memory lane: Jonah and I owed my mom dinner. See, Jonah is making an album, and raised the funds with Kickstarter. My mom chose the option to have us make her dinner in exchange for her donation, and so we decided to use my new cookbook (and an old favorite, Plenty). We picked the kumquat arugula salad with currant-walnut vinaigrette. And it was wonderful. Light and rich at the same time thanks to the walnut oil. The little pieces of kumquat were like little bursts of brightness in this salad.

Kumquat Arugula Salad

Ingredients

1/4 cup dried currants
15 kumquats, divided
3 cups packed baby arugula
1/2 cup walnut halves, toasted
1/3 cup walnut oil
1/4 tsp red wine vinegar (or more. I added quite a bit more.)
salt and pepper

Instructions

Put the currants in a small bowl and cover them with about half a cup of hot water. This will rehydrate them, or “plump” them. Let them sit in the water for about 5 minutes, then drain. Set aside.

Take 10 of the kumquats and slice them thinly, removing any seeds. You will want a nice sharp knife for this, as these little rinds can be tricky. Put the kumquat slices in a salad bowl atop the arugula, and sprinkle over the walnuts and half the currants.

Chop the rest of the kumquats, getting rid of any seeds, and put them in a mini food processor with the remaining currants. If you don’t have a mini food processor, a blender or a regular food processor should work… Pulse to mince. Add the walnut oil, vinegar, 3/4 tsp salt, and 1/8 tsp pepper. Puree until you have an emulsified dressing, or about a minute. There will still be little chunks of fruit, and that’s totally ok. Adjust seasoning to taste (as I said above, I added quite a bit of red wine vinegar as I just really thought it needed more acid. Pour about half of the vinaigrette over the salad and toss gently. You can put the rest of the vinaigrette on the table with the salad.

Latkes (and Belated Happy Hannukah)

These latkes get 2 thumbs up.

Yes, I know. By the time this post gets published, Hannukah and the time for latkes will be over. But if there is anything I’ve learned from the past week, it is that latkes should not be a “once a year” dish. They make a great little side dish, or a base for eggs benedict, or even just a fried egg on a Saturday morning. This is especially true once you’ve found a recipe you really like. And I have. After doing some hunting around and even trying another recipe I found, I made the latkes from “Jerusalem,” a cookbook I have previously written about, by Yotam Ottolenghi.

Now this recipe is what made me really want this cookbook. I thought it was interesting that there weren’t onions in it, and I also had never tried latkes with parsnips, although I know it’s not an uncommon thing. And here’s what I liked about these: Not too salty (an issue with the first recipe I tried this season), I liked having the chive flavor in there (although I halved the chives, because one of the people I was cooking for doesn’t like them), and the parsnip and very dried out potato made it extra crispy. Also, the fact that you fry them in a combination of butter and oil didn’t hurt.

Potato & Parsnip Latkes

Ingredients

5 1/2 cups peeled and grated waxy potatoes, such as Yukon Gold
2 3/4 cups peeled and grated parsnips
2/3 cup finely chopped chives
4 egg whites
2 Tbl corn starch
Butter and oil (preferably canola or sunflower) for frying
salt and pepper
sour cream and applesauce to serve

Instructions

For all of the grating, I recommend the grater attachment for a food processor, but if you haven’t got one, a box grater will work just fine. Then maybe you’ll have done enough physical activity to justify the fried potato goodness you’re about to eat.

Squeeze the grated potato out in a clean dishtowel (make a little satchel, twist the ends, and squeeze!) into the sink. Some recipes reserve the juice, let it separate, and then add the starch back in. This one doesn’t call for it, but if you want to, go for it. After you’ve squeezed out the potato, spread it out on a clean kitchen towel to dry as completely as you have time for. In a large mixing bowl, combine the potato, parsnip, chives, egg whites, corn starch, 1 tsp salt, and as much pepper as you’d like.

Preheat your oven to 250 degrees, and in the oven place a rimmed baking sheet with a cooling rack on it. Also prepare a plate or baking sheet with a couple layers of paper towel.

In a (preferably non-stick) pan, heat enough butter and oil so it’s ~1/4-1/2 inch deep over medium-high heat. To see if your oil is hot enough, drop in a little chunk of your potato mix. It should sizzle and bubble a bit without spitting violently. If it isn’t hot enough, take out the potatoes and keep heating and try again. When it is hot enough use a spoon to scoop about 2 Tbl portions of the potato mixture, squeeze out some of the juices, and shape into patties and carefully drop into the oil. Or, you can use my tried and true method: squeeze out the juices, drop into the oil, and then quickly use your spoon to spread and press the mixture into a patty. Fry for about 3 minutes a side, or until they are as dark/cooked as you like them, then flip and cook the other side. Remove from pan to the paper towels, then keep warm in the oven. Serve with sour cream, applesauce, and holiday cheer 😉 Enjoy!

Delicata Squash and Tofu with Miso & Molasses

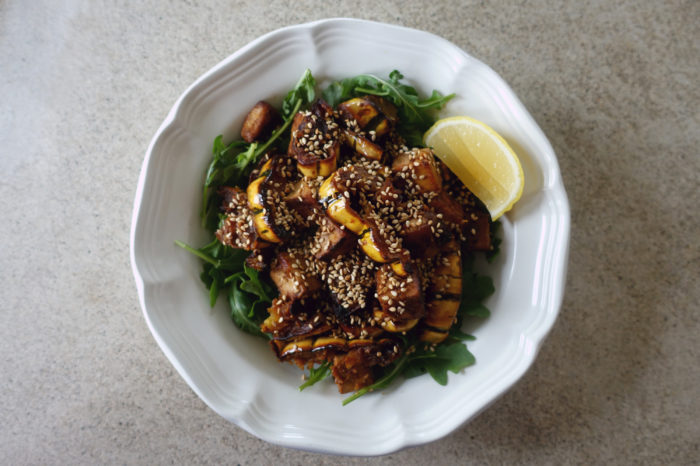
Delicata Squash and Tofu with Miso & Molasses | Serious Crust by Annie Fassler

Update October 2017: I made this recipe again for dinner last night, after seeing squash at the store and wanting to EAT IT ALL. One of the things about the re-design that happened about a year ago on this blog, and about having a blog that has been going for about six years now, is that I look at old pictures and old writing and I just cringe. So I took new pictures, gave the post a little love, and am sharing it again with the world. This is one of my absolute favorite fall dishes: it uses lots of Asian ingredients (miso, soy sauce, sriracha), delicata squash (my personal favorite), and greens (which means it’s healthy, right?).

When Jonah and I returned from Thanksgiving, we were in the mood for something wintery, but a little on the healthier side. Let’s just say that the weekend was full of heavy food and indulgences, as Thanksgiving is supposed to be. I found a dish on 101 Cookbooks a while back that I’d always wanted to make, so we pulled up the recipe, made a quick run to the grocery store, and whipped up this squash and tofu cooked with miso and molasses. It can be served with rice, but I recommend some roughly chopped arugula, like the recipe says.

Continue reading “Delicata Squash and Tofu with Miso & Molasses”