Restaurant Review: Biwa (and Ramen!)

This past Monday night, Jonah and I decided to head out into the city to get some food. We’ve both had a cold for a little while now, so we were riding the wave of Asian soup. Saturday night we went to Thai Peacock (a funny little Thai place by Powell’s with the best Tom Ka Gai I’ve ever had), and Sunday night we made pho (and decided the pho at Mekong, the place a block from our house, is superior to anything we could ever make ourselves). I’d read in the Portland Monthly Best Restaurant edition that Biwa is the place to go for ramen, and had been wanting to try it since.

Lucky for us, because it was a Monday night, it wasn’t packed. That being said, there were a couple large parties waiting for tables, and Jonah and I opted to eat at the bar to avoid waiting because we were super hungry. We pretty quickly decided on what to order, choosing to stick with familiar dishes since we were both sick and not feeling terribly adventurous. Jonah got a housemade ginger soda (which I was jealous of and of which I probably drank at least half).

I must say, that while ordering, I noticed that the restaurant has a little bit of a boys’ club vibe. All the cooks and all but two waiters were men, and I felt a little funny being a girl. The men were all very stereotypically “Portland”: facial hair, flannel shirts, skinny jeans, tattoos. I felt a little out of my element, which was odd to me. That being said, our waiter was very nice, though quick and with a very dry sense of humour (or maybe he was being serious… I couldn’t really tell).

We ordered the cucumber sunomono (vinegared cucumber salad with shrimp and seaweed), agedashi tofu (my favorite Japanese dish, fried tofu in broth), and of course, a bowl of ramen.

Ramen at Biwa
A beautiful bowl of delicious Biwa ramen.

The cucumber salad was delicious. Thinly sliced cucumbers with seaweed doused in delicious vinegar with huge juicy shrimp… Oh my goodness. I could have eaten a few of those and gone home happy. It was light and refreshing. I want to go back on a hot summer’s day and eat that dish. The agedashi tofu was also magnificent. Much lighter than most of the agedashi tofu I’ve had before: the tofu was more delicate, the batter was much lighter, and the broth tasted less “packaged,” if that makes sense. It was unique and delicious. I love soaking the crispy fried tofu in the broth and letting it soak up the flavor. Yum.

Now onto the ramen. It was delicious. The noodles were amazing, just the right texture, and very fresh tasting. The meat was some thinly sliced pork and was actually largely fat, which sometimes throws me off. But this fat had a wonderful texture that just fell apart in your mouth and tasted so rich and delicious. One thing I wasn’t crazy about, which I wanted to be crazy about, was the egg. The shoyu egg, which I think means they’ve been soft or hard boiled and then cooked in soy sauce, was a little…sweet? I’m not really sure what the taste was. Perhaps it’s just that I wasn’t used to the preparation of it, but I wasn’t a crazy big fan. The broth of the soup was good, but about halfway through the bowl, both Jonah and I were chugging our water because it was so salty. It was so salty that we almost asked our waiter if it was supposed to be like that or if it was over-seasoned or something. I can appreciate some salt as much as the next girl, but it was pretty extreme. But still delicious. Just… in smaller doses.

Overall, I was happy with our meal at Biwa. Next time I want to be a little more adventurous and also want to try their other noodle soup (udon. yum.). The atmosphere was nice, and the food was delicious, particularly the small plates. I would definitely recommend it for a diner who is interested in more traditional Asian cuisine with a touch of flare.

Eggplant with Buttermilk Sauce

Pomegranate seeds for the Eggplant with buttermilk sauce

Eggplant with buttermilk sauce

Eggplant with buttermilk sauce

The posting of the recipe is long overdue, as I made this dish quite a while ago.  So I may not remember the exact details of everything I did to make this – but here goes.  Have I told you about the unprecedented influx of cookbooks in Annie and I’s apartment?  I went from owning exactly zero cookbooks before Christmas and my birthday this year (Jan 6) to having 4.  That’s a 400% increase in cookbooks within the span of a month!  Anyway, Annie’s mom got me this great cookbook called Plenty, that has some fantastically new and different recipes. This is one of them.

A picture of this eggplant with buttermilk sauce recipe is on the cover of the Plenty cookbook, so I decided to make it.  It looked like nothing I had ever tasted before, and that’s what it ended up tasting like!

Eggplant with Buttermilk Sauce

Ingredients

2 eggplants
1/2 cup olive oil
4-6 thyme sprigs
salt and pepper
1 pomegranate (this is the fun part)
For the sauce:
9 Tbs buttermilk
1/2 cup Greek yogurt
1.5 Tbs olive oil
1 small garlic clove, finely chopped
pinch of salt

Instructions

Preheat the oven to 400 degrees. Cut the eggplants in half lengthwise (see photo below). Now cut some lengthwise incisions on each half, but not all the way through to the skin. This is just to let the oil and juices get around. Make some more diagonal incisions (I sort of did this like you would cut an avocado before you scoop the flesh out).

Place the eggplant halves on a baking sheet, and brush them with the 1/2 cup olive oil until it’s all used up.  Sprinkle with some thyme leaves and salt and pepper.  Roast for 45 minutes, when the eggplant flesh should be soft and browned.

While the eggplant is roasting away, let’s do something fun. To get all the seeds out without digging through the fruit like a raccoon, start by cutting the pomegranate in half.  Hold one half over a bowl with the flesh side facing down into your hand (watch out, your fingers are about to get juicy). Use the back of a wooden spoon and start whacking the back of the pomegranate gently, and then with increased force, until the seeds start to fall out into the bowl.  Don’t lose faith if seeds don’t start raining down right away: it takes a minute for them to start getting loose. It helps to flip the pomegranate half over once in a while to gently pull the membranes apart and pick them out. Do the same thing with the other half.

Make the sauce by whisking all of the sauce ingredients together in a small bowl.  I used Greek yogurt that was honey-flavored, which may have been a mistake.

When the eggplant halves are done, serve by spooning plenty of the sauce over the halves.  Sprinkle your expertly-harvested pomegranate seeds on top and garnish with some more thyme and drizzle with a bit of olive oil.

The taste was amazing – a combination of things I have never tasted in combination before!

Pizza Dough (and the pizza to go with it)

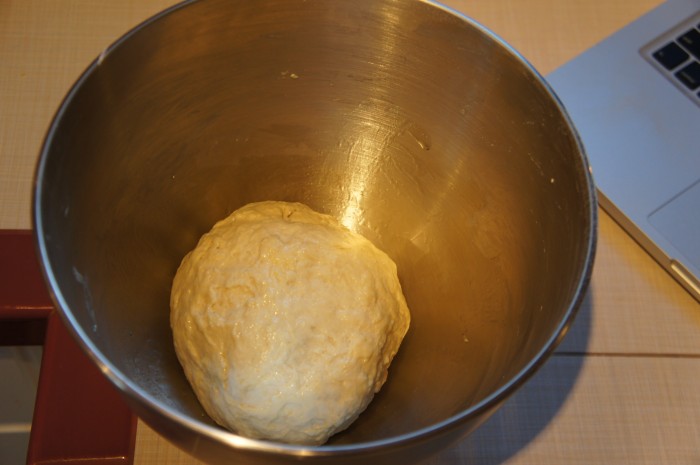
Pizza Dough

Pizza Dough

It’s been a rough week (and it’s only Thursday). So what do I do when I’m feeling down? I bake. Come on people, at this point you should know this about me. But with not a ton of time yesterday and not a ton of energy, I didn’t feel up to making some fancy bread, and Jonah and I are trying to cut down on sweets, so no cookies. What’s a baking girl to do?

Pizza dough. Not quite bread, but bread like, and can actually be put to use for dinner. So I ran with it. After finding many recipes online, I started up. The recipe calls for all-purpose flour, but I only had bread flour (Jonah bought me a giant bag, so for the time being I’m using it in the place of any all-purpose flour in recipes, which may or may not be altering things). We’ve bought pizza dough at our local grocery store (New Seasons) and it tends to be kind of halfway between thin crust and a puffier crust. The crust I made was definitely a little more on the doughy/puffy side.

Pizza Dough

Makes 1 full pan pizza dough

Ingredients

3 cups flour
2 teaspoon salt
1 1/2 teaspoon active dry yeast
1 cup lukewarm water (may want to add another 1 or 2 tablespoons)
2 tablespoons olive oil

Instructions

I used an electric mixer to combine the ingredients, but did the kneading by hand. Don’t ask me why, I just felt like it. So, in the bowl of the mixer, combine flour, salt, and yeast. Add the water and olive oil and stir until the dough comes together. Lightly flour a surface (kitchen counters work well) and dump the dough out onto it. Knead the dough for a couple minutes into a nice tidy ball. At this point my dough felt super lumpy, more-so than any other dough I’ve made this far, so I started to worry that this whole thing was going to be a failure. But I kept going because otherwise it would’ve been a waste of time and ingredients. What the hell.

Lightly oil the bowl from the mixer (or any bowl, really, just thought I’d save you a dish), put your ball of dough in and turn it so the whole thing is coated in oil. Cover the bowl with plastic wrap and leave for 1-2 hours, or until it has doubled in size.

After rising, dump the dough back onto the floured surface, punch the air out of it (a great way to take out some aggression, kind of like punching a pillow or pounding chicken), fold it back into a ball, and put it back under the plastic wrap for about 20 minutes. When I hit this point, we still had a couple hours till dinner, so I stuck the dough back in the bowl, covered it, and threw it in the fridge.

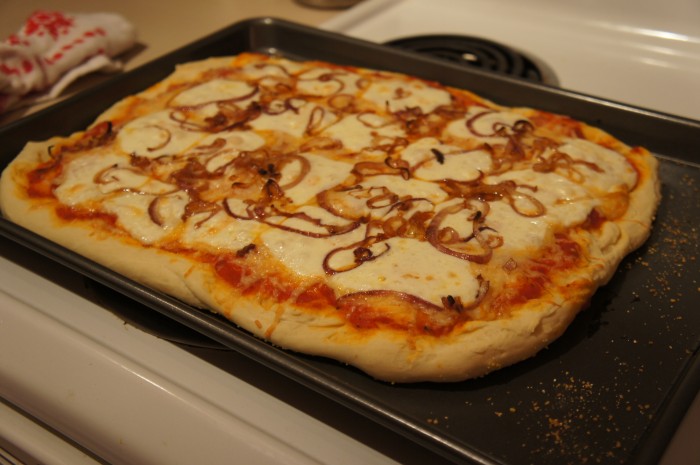
When you’re ready to make your pizza, preheat your oven to 475 degrees (or higher), sprinkle a baking sheet (or pizza stone, if you’re one of those people) with cornmeal, and roll/stretch out your dough on the sheet. This was a little tricky for us, as our dough did not want to be stretched. But I let Jonah beat it up a little and eventually it stayed. We covered our pizza with tomato sauce, italian mix cheese, caramelized onions (you know, that obsession I’ve been having lately), and fresh mozzarella. We baked our pizza for about 15 minutes, though it probably could’ve used a couple more. We were getting hungry. Just look for a little puffing up and some golden brown edges. After removing it from the oven, we sprinkled a little fresh basil on top, sliced it up, and ate it. Delicious.

Flip-flopping Brown Sugar Cookies

Brown Sugar Cookies

Brown Sugar Cookies

The other night, it was late, and Jonah and I decided on a whim to make some cookies. We figured we’d just make something we’d already made before, so we got out the recipe for the nutmeg maple butter cookies because they were so good. After we started creaming the butter and sugar for half the recipe (we didn’t want that many cookies) we realized “OH NO these cookies are supposed to refrigerate for 2 hours!” At this point it was already about 10:30 and we were not up for that. So we pulled up another recipe that I’d been looking at: Brown Sugar Cookies from Joy the Baker. So what were once nutmeg maple butter cookies became brown sugar cookies, with 1/2 cup of brown sugar replaced by granulated sugar. Jonah said we should call them flip-flopping cookies (he also inserted the name of a certain GOP candidate, but I’m not about to start getting political on my blog). Oh well. You can’t win them all. The cookies were still good. Not amazing, but a good solid cookie. The little bits of ground ginger and cinnamon add a nice touch. I’m going to give you the correct recipe instead of our version.

Brown Sugar Cookies

Ingredients

1 1/2 sticks (6 ounces) unsalted butter, softened
1 1/4 cups dark brown sugar
2 cups all-purpose flour
2 teaspoons baking soda
1/2 teaspoon salt
1/2 teaspoon ground cinnamon
1/2 teaspoon ground ginger
1 teaspoon pure vanilla extract
1 large egg

Instructions

In the bowl of your mixer, cream the butter and sugar until fluffy. While that’s happening, combine the dry ingredients – flour, baking soda, salt, cinnamon, and ginger – in another bowl, mix thoroughly, and set aside. When the butter and sugar are nice and creamy, add the egg and vanilla and mix them in well. Now add the dry ingredients all at once to the butter/sugar mixture. Mix on a low speed until it’s well combined. Now the recipe says to cover and refrigerate for half an hour. We didn’t do that. Maybe we should have. Whatever.

Preheat your oven to 350 degrees (while you’re “refrigerating your dough”… ha). Grease your cookie sheet or line with parchment paper, and drop the cookie dough by the Tablespoon onto the sheet. Bake the cookies for 10-12 minutes or until they’re just starting to brown around the edges. Take them out of the oven and allow them to cool for a few minutes on the hot cookie sheet before removing them to a cooling rack.

Panko Chicken Tenders with Aioli

Panko Chicken TendersPanko Chicken Tenders

Pinterest is kind of a dangerous place. It’s great because there are tons of recipes, DIYs, fashion tips, art, etc. It’s less great because it’s hard to tell which ones, among hundreds of recipes, are good. There are like 500 recipes for muffins… how do I know which one will taste good? So it can be a little bit of a crap shoot when you decide to actually make a recipe you found on Pinterest.

But that’s what I did. I actually found the blog Love and Olive Oil because of a Meyer Lemon and Olive Oil chiffon cake that was going around Pinterest like wildfire. So I clicked. But I found a whole bunch of other lovely looking recipes, including one for Baked Panko Chicken Tenders with Aioli. Sounds delicious to me, and even more so when you actually read the ingredients. We replaced the garlic powder for fresh garlic.

This dinner was wonderfully simple and tasted so good. Both the chicken and aioli had a nice bite to them (but not too spicy, mind you) because of the cayenne, paprika, and garlic. Enjoy!

Panko Chicken Tenders with Aioli

Ingredients

Panko Chicken Tenders

1 1/2 lbs boneless skinless chicken breasts
1 1/2 cups panko breadcrumbs
2 teaspoons dried basil
2 teaspoons garlic, minced
1 teaspoon smoked paprika
1/2 teaspoon cayenne
1/2 teaspoon salt
1/2 teaspoon pepper
2 eggs
1/2 cup flour
oil

Aioli

1/2 cup mayonnaise
2 teaspoons red wine vinegar
1 teaspoon garlic, minced
1/2 teaspoon dried basil
a squeeze of lemon juice
salt and pepper, to taste

Instructions

Panko Chicken Tenders

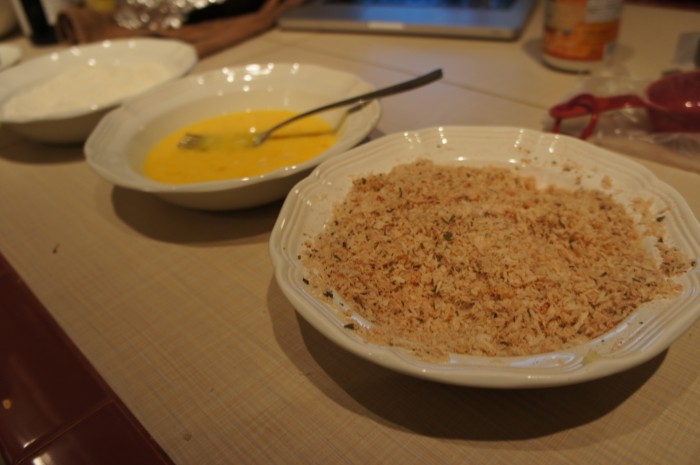
Preheat your oven to 350 degrees. Oil a baking sheet and set aside. In a shallow bowl, combine the flour with a little pinch of salt and pepper. In another shallow bowl, beat the eggs. In a third shallow bowl, mix the panko with the basil, garlic, paprika, cayenne, salt and pepper.

Now for the thinning of the chicken. Put your chicken between 2 layers of plastic wrap or just put it on a cutting board and cover it in the paper it came in from the grocery store. Pound it with either a meat pounder (is that what those things are actually called?) or a rolling pin. You want them to be about 1/2 an inch thick. Slice it into strips.

Now, coat each chicken strip, one at a time, in the flour mixture (shaking off any excess flour), then dip in the egg, and then the panko mixture. Arrange the chicken strips on the oiled baking sheet, and put them in the oven for 12-15 minutes, flipping halfway through. You want the breadcrumb coating to be nicely golden brown.

Aioli

Combine all the ingredients in a bowl and stir, and then season to taste with salt and pepper. Not so hard, right?