Course

World Peace Cookies (or Extremely Chocolate Cookies)

Chocolate Cookies

Chocolate Cookies
Chocolate Cookies

One of my favorite care packages that I got in college was from my dad. It arrived the week before finals, and included all kinds of stuff to help get me through the very stressful time: chocolate covered coffee beans to help with the all nighters, delicious tea to help me fight off illness, dried fruit and other healthy snacks to keep me going during the long days, etc. It made me feel so much better about all the work I had to do, and made it feel like he was there, pushing me to get everything done and do the best I could.

Anyway, so I was thinking about my baby sister, who is about to enter finals week. And she’s had a bit of a rough semester, with some health issues (she may have to haver her tonsils out this summer, ouch) and all kinds of yuck-o stuff. And I thought, you know what would make her feel better? A care package full of funny and delicious things to help her get through the toughest part of the school year. Plus, let’s face it, I’ll take any excuse I can get to make cookies. I’d been eyeing this recipe from Smitten Kitchen for these chocolate cookies called “World Peace Cookies.” Apparently the title is based on the idea that if everyone in the world had these cookies, there would be peace. And they are pretty dang good.

World Peace Cookies

Ingredients

1 1/4 cups all-purpose flour
1/3 cup unsweetened cocoa powder
1/2 tsp baking soda
1 stick plus 3 Tbl unsalted butter, at room temperature
2/3 cup (packed) light brown sugar
1/4 cup granulated sugar
1/2 tsp fleur de sel or 1/4 tsp fine sea salt
1 tsp vanilla extract
5 ounces bittersweet chocolate, chopped into chips, or a generous 3/4 cup store-bought mini chocolate chips

Instructions

Sift the flour, cocoa and baking soda together into a bowl. Set aside. In an electric mixer with the paddle attachment, beat the butter on medium speed until soft and creamy. Add both the brown and granulated sugars, the salt, and the vanilla extract before beating for another couple of minutes.

Turn off the mixer. Pour in the flour/cocoa mixture and pulse the mixer at low speed about 5 times, a second or two each time. (A nice trick when pulsing flour and or cocoa: cover the bowl with a dishtowel, draped over the mixer, to protect yourself from inhaling the ingredients and to protect your kitchen from a total mess.) If, after a few pulses, there is still a lot of flour on the surface of the dough, pulse a couple of times more. After everything is all mixed in, continue mixing on a low speed for about 30 seconds more, just until the flour disappears into the dough. As with anything with lots of butter, you want to work the dough as little as possible. Don’t worry, the dough will be crumbly. Toss in the chocolate pieces and mix to incorporate.

Dump the dough out onto a work surface, gather it together and divide it in half. One half at a time, shape the dough into logs about an inch and a half in diameter. Wrap them in plastic wrap and stick them in the fridge for at least 3 hours. Towards the end of the three hours, you can preheat your oven to 325 degrees. Line your baking sheets with parchment, silpats, or just grease them lightly like I did.

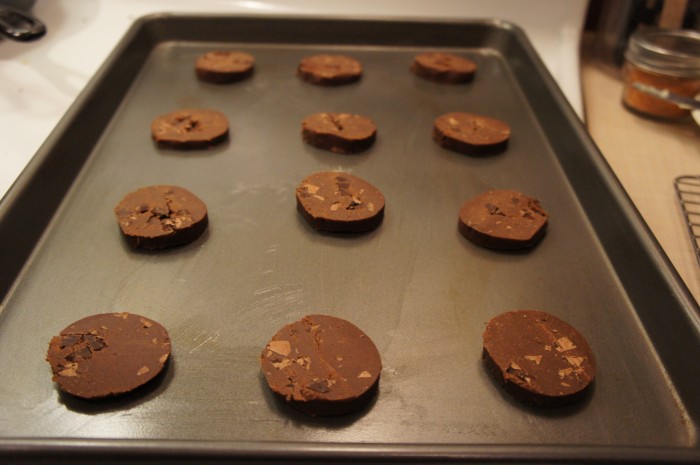
Pull the logs out of the fridge, unwrap, and with a sharp knife, slice them into 1/2-inch thick rounds. They may crumble: don’t worry, just squeeze the bits back together. Put the rounds on a baking sheet, leaving about an inch in between them. Bake for about 12 minutes. They won’t look that done, but they are. I promise. Allow to cool on the sheet for at least a couple minutes before transferring them to a cooling rack. Good luck letting them cool all the way before munching on a few accompanied by a glass of cold milk. Yum.

Momofuku Noodle Bowl

Momofuku Noodle Bowl

Momofuku Noodle Bowl

For those of you who saw the title of this post and went “What the hell is a Momofuku?” let me explain. Momofuku is a group of restaurants in New York owned by Chef David Chang. The group includes Momofuku Noodle Bar, Momofuku Ssam Bar, Milk Bar, and a few more. Anyway, I became mildly obsessed when I bought my dad the Momofuku cookbook for his birthday last year (he was obsessed after having eaten at one of the restaurants on a trip to NYC). Momofuku translates in Japanese as Lucky Peach, which is the name of a magazine that David Chang has recently published, all about cooking and eating. It includes articles by some other chef favorites like Anthony Bourdain, Wiley Dufresne, and Mario Batali.

Anyway! I found this recipe for a Momofuku noodle bowl on a blog called A Cozy Kitchen, which I’ve used before and I really enjoy. While the recipe is a little ingredient heavy, it’s really delicious, so although it may be a little extra work to get all this stuff (luckily Jonah and I already had the Asian ingredients), it’s worth it. We use stuff like soy sauce and rice wine vinegar all the time. They’re handy things to have around for a quick and easy meal (feeling lazy? marinate some chicken in soy sauce, mirin, garlic, and olive oil). We did fudge some things though, so I’m putting in the actual recipe and in parentheses what we did.

Momofuku Noodle Bowl

Ingredients

1 medium sized cucumber
¼+ tsp salt
½+ tsp sugar
2 ½ cups (or one bunch) thinly sliced scallions
½ cup (or just one large piece) minced ginger
¼ cup grapeseed oil (we used olive oil because we didn’t have grapeseed)
2 tsp soy sauce
1 tsp rice wine vinegar
1 Tbl olive oil
½ large head of cauliflower, cut into florets
1 lb noodles – ramen, soba, or lo mein (we used udon)

Instructions

Thinly slice the cucumber. In a bowl toss the cucumber with salt and sugar and let it sit for a few minutes and then taste one of the slices. Adjust the salt and sugar as necessary. I ended up probably using twice or even 3 times as much sugar and salt. Just because I wanted it. Thought it tasted better.

In a different bowl combine the scallions, ginger, 1/4 cup of olive oil, soy sauce and rice wine vinegar. Allow to sit and marinate for 30 minutes.

While those items are marinating, heat the Tbl of olive oil in a pan and add the cauliflower. Cook them on high till they start to brown and get a bit crispy. While the cauliflower is cooking, you can boil water and cook your noodles according to the package. Once the noodles are cooked, toss them with the scallion/ginger sauce. Now, serve the noodles in a bowl, and top with the cauliflower and cucumbers.

Now, this is a vegetarian dish, but Jonah and I were hankering for some more protein, so we bought a chicken breast. Jonah cut it up into bite size pieces and cooked it with a bit of fish sauce, hoisin sauce, and soy sauce, and it was good. A delicious addition to the dish. Yum!

Chicken Tacos with Cayenne and Avocado Salsa

Chicken Tacos

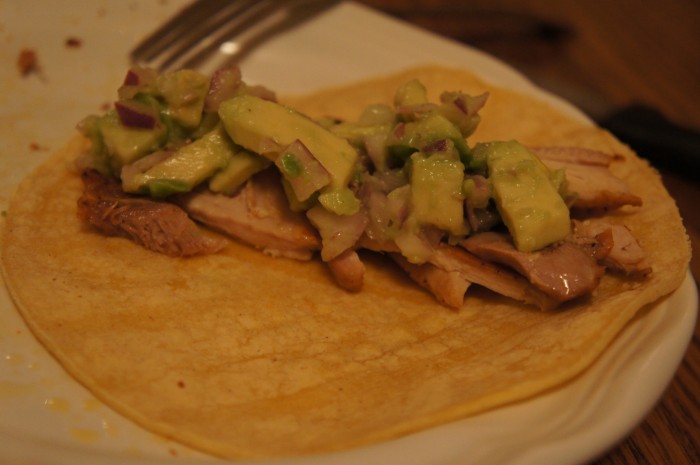
Again, it’s been a little while. But you guys, I have so much food to share with you! There has been much eating lately. And good eating too. YUM. This first recipe is a super easy recipe from Martha that was adapted into chicken tacos. Originally it was just the cayenne-rubbed chicken with avocado salsa, but everything is better in a tortilla (and sprinkled with cholula), am I right? So chicken tacos it is. This meal was so simple because we had everything except the chicken and the avocado. I love quick and easy trips to the grocery store that don’t require you to buy too much stuff for a meal.

Chicken Tacos with Cayenne and Avocado Salsa

Ingredients

salt and ground pepper
1/4 teaspoon cayenne pepper
4 boneless, skinless chicken thighs (you can use breast too, but we like dark meat a little better, plus it’s cheaper)
2 tablespoons olive oil
1 medium red onion, finely diced
2 tablespoons fresh lime juice
1 Hass avocado, pitted and cut into chunks
tortillas of your choosing (the little taco ones are good for this)
other condiments (think sour cream, cholula, salsa if you want, cheese…)

Instructions

In a small bowl, combine 1 teaspoon salt, 1/4 teaspoon pepper, and cayenne, mix to combine. Rub this spice mixture all over the chicken. In a large skillet, heat the oil over medium heat. Add the chicken and cook until cooked through and browned on the outside. Shouldn’t take too long (think 10-15 minutes). My trick with chicken is to cook it with a lid on the pan to get it cooked through, and then once it’s cooked through, take of the lid and turn up the heat a little bit to get the nice browned outside.

While the chicken is cooking, put the onion and lime juice in a bowl, and cut up the avocado. You can also heat up your tortillas now, which I did by throwing ours in a lightly greased pan, flipping them, and then storing them between two plates so they stayed warm. Just before serving, fold the avocado pieces into the onion mixture and season with salt and pepper. Serve and enjoy!

Matzoh Brei

Matzoh Brei
Matzoh Brei

Matzoh Brei

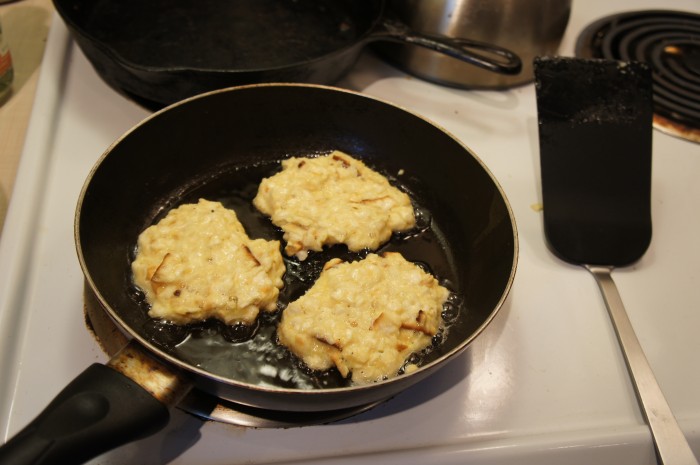
This is the last Passover related dish. I had been wanting to make matzoh brei for Jonah, that’s the real reason I bought a box of matzoh at all. This morning, after a weird run (there was a pretty bad house fire down the street from us, so went went out for a run, and then spent a little while watching all the fire trucks arrive and such before finally starting our workout) we came home and I got started.

I remember my parents making matzoh brei for us when we were kids. I think they did it as more of a scramble instead of like little pancakes (as I did here), but either way, it’s delicious. I think my parents also used a higher matzoh to egg ratio than I did, but it was still dang good.

Matzoh Brei

Makes enough for 2 hungry people

Ingredients

3 pieces of matzoh, broken into 1/2 inch pieces
3 eggs
salt
pepper
vegetable oil for frying
jam, syrup, and/or sugar for serving

Instructions

Break matzo into 1/2″ pieces and put them in a medium mixing bowl. Cover the matzoh with piping hot tap water and let stand for about 30 seconds, then drain. In another bowl, beat the eggs and season with salt and pepper. Pour the eggs over the matzoh (or the other way around, doesn’t really matter) and mix thoroughly until combined and a batter forms.

Heat a couple of tablespoons of oil in a skillet over medium-high heat. Scoop scant 1/4-cupfuls (or 1/5-cupfuls) of batter into the pan. You don’t want them to be too thick because you want them to cook through and get a little crispy on the edges. Fry, turning once, until golden and cooked through, about a minute per side. Serve hot with jam, sugar, and/or syrup! Enjoy!