Vegetarian

All-in Pesto by Serious Crust

All-In Pesto

All-in Pesto by Serious Crust

A few weeks ago, my dad and Darla came down to Portland for my cousin Lia’s oral thesis defense. I really wanted to go to the farmer’s market before brunch, and Dad came along. My dad is a lover of produce. I cannot tell you how excited he got about the range of items available at our market (and how decently priced everything was compared to his fancy Seattle market). I’ve never seen someone so excited over nettles before.

Anyway, between the two of us, we bought 3 bunches of radishes. My dad, needing to drive back to Seattle with a large dog in the car, was trying to minimize his load as much as possible, ripped the radishes from the greens, and left the greens to me. A la Tamar, I knew I could use them, I just had to figure out how. And then it hit me: pesto.

I have since made 2 batches of the stuff, and people LOVE it. And you can use greens other than radish tops: kale, kohlrabi greens… anything green and leafy. The other beautiful thing about this recipe is that it’s not really a recipe – it’s more like guidelines. Use whatever you’ve got around (ergo the all-in title: you can put it all in), and put it on anything and everything. We started with pasta and went from there: we used it as a rub for a whole chicken and potatoes that we roasted, ate it with cheese and crackers and charcuterie, and (my favorite) topped some crusty bread with fromage blanc, the pesto, and a soft boiled egg.

All-In Pesto

Ingredients

Radish tops, stems picked off, and rinsed
Basil, rinsed
A hard salty cheese, like pecorino romano or parmesan
Pine nuts or shelled pistachios (or any combination of the two)
Garlic, peeled and roughly chopped
Olive oil
Salt

Instructions

In a food processor combine all ingredients. It’s best to start with all of your greens, but about half of everything else, so that you can adjust flavor and texture to your liking. Pulse until smooth, and enjoy!

Fried Baby Artichokes

Fried Baby Artichokes

Fried Baby ArtichokesFried Baby Artichokes

We have been hitting up our local farmers market like crazy. If you live in Portland and you don’t go to the PSU Farmers Market on Saturdays, you are seriously missing out. Especially when the weather is beautiful and there is SO MUCH PRODUCE everywhere to be found. It’s really incredible.

Lately, Jonah and I have bought chanterelles, fennel, fiddlehead ferns, rhubarb (so much rhubarb), strawberries, a chicken, radishes, leeks, lamb steaks, sunchokes, spring onions, cheese… the list goes on. There is so much delicious local food to be found, it’s like being in heaven. And these mounds of food and people walking around in sundresses and shorts with bouquets of flowers are all so beautiful.

Anyway, one of my favorite things we’ve found at the market is baby artichokes. Have you ever had fried baby artichokes at a restaurant? It’s a common Italian dish. The leaves get crispy and a little burnt and it’s really yummy. So when we brought these home, we knew we wanted to make that dish. We found a simple recipe on Martha Stewart’s website, and Jonah took over the making of these little guys. We bought 8 of them to cook, but the recipe is obviously variable depending on how many you want to make.

Fried Baby Artichokes

Ingredients

8-12 baby artichokes
1/2 cup olive oil
1/2 tsp sea salt, plus some for serving
4 cloves garlic (or more, if you want), lightly crushed
lemon for serving

Instructions

Prepare the artichokes by removing the tough outer leaves, cutting off the top third of the , and peeling the tough dark green layer from the stems with a paring knife. I know, it seems like you’re losing a lot of artichoke here, but you’re really just getting rid of all the really tough parts that would make this whole thing harder and far less pleasant to eat.

Pour the oil and 1/2 cup water into a medium sized, deep, heavy pot and add the artichokes and 1/2 tsp of sea salt. Turn the heat on to medium-high, and let them cook, turning them over occasionally (you don’t want them to get burned on one side). Cook them until the water has evaporated and the oil starts to spit, which, trust me, it will. This will take about 8-10 minutes.

When the water has cooked off, add the garlic to the pot and reduce the heat to medium. Cover the pot with a spatter screen or an sieve turned upside down (Nice tip Martha! Sadly our sieve wasn’t big enough for our pot… I’m thinking it’s time to invest in a spatter screen). Continue cooking the artichokes and turning them occasionally, until they’re tender and golden brown all over (should be another ~10 minutes). Now take some tongs and put them upside down (or cut-side down, however you want to think about it) in the pan, pressing them down and wiggling them around to kind of loosen up and separate the leaves. Leave them upside down and let them cook like that for another 5 minutes, until the leaves/edges are dark and crispy. Using your tongs, transfer artichokes and garlic from the pan to a plate covered in paper towels. Put the artichokes cut sides down at first, if you can, so they can drain a little bit.

Sprinkle them with salt, squeeze some lemon over top, and serve!

Kale, squash, and a runny yolk

Kale, Squash, and a Runny Yolk

Kale, squash, and a runny yolk

Sometimes you just need an easy dinner. You need to comb through your fridge, scrounge what ingredients you can, and stand there, for a minute, gazing at your collection, trying to figure out what you can make with all of this. It doesn’t have to be fancy, or even graceful, but tasting good and mildly cohesive would be nice. You’ve got a bunch of kale that you really should use soon, a small, friendly looking butternut squash, and a jalapeño. And eggs. Luckily, the roommates always keep lots of eggs around. And do you know what brings a dish together with ease? A runny yolk.

So you slice up the butternut squash, drizzle with olive oil and salt, mix in some chopped garlic, and lay it out on a baking sheet, laying a couple rosemary springs atop it all, sliding it into the oven to roast. You sautée up the kale with more oil, salt, and garlic, and even some jalapeño. And then, to finish it all off, you soft boil a couple of eggs (one for you and one for the tall fellow you eat dinner with). Simple as that, you have dinner.

Kale, Squash, and a Soft Boiled Egg

Ingredients

A small butternut squash, olive oil, and salt (and anything you’d like to roast with it)
1 bunch of kale, garlic, olive oil, and salt
Eggs

Instructions

Peel and cube or slice the butternut squash into whatever shapes you like to eat. Slide into the oven at about 375 and roast until easily pierced with a fork. Sautée kale with a tsp of olive oil, chopped garlic, and a sprinkling of salt. If you want the kale to steam and wilt a little more, you can add some water to the pan (no more than 1/4 cup) and cover with a lid. After letting the kale steam for a bit, remove the lid and let the water cook off.

To soft boil the eggs, bring a pot of water to a boil. Drop the eggs in, allow to cook for 6 minutes (this can be adjusted depending on how you like your eggs). After 6 minutes, remove the eggs with a slotted spoon, run under cold water, and peel.

Put your egg on top of your kale and squash to let the yolk run over the veggies a bit. It adds a nice rich creaminess. Enjoy.

Rice Cakes

Rice Cakes (using rice gone wrong)

Rice Cakes
Rice Cakes

Rice Cakes

Sometimes you’re in the kitchen and you have a lot going on and you miss something going wrong. Maybe you accidentally over-salt your pasta or you burn your veggies. There’s a whole (albeit little) chapter in Tamar Adler’s book all about how to save your mistakes. For example, turn those burned veggies into a smoky veggie salad. Or take that over-salted pasta, mix it with some herbs and butter, and make a frittata. The possibilities are endless.

A while ago, Jonah and I made these rice bowls. We doubled the rice recipe, and I must’ve done some math wrong and put in way too much liquid. So, while the rice tasted good, it was definitely a little mushy. After sitting in the fridge sadly for a week, I was thinking of using it to make rice cakes. Jonah reminded me about the “Further Fixes” chapter in An Everlasting Meal, so to the book I went. It kind of told me what I was already thinking of doing, so on I went.

Rice Cakes

Ingredients

roughly 3 cups of overcooked rice
1 large shallot, finely chopped
1/2 leek (if I’d had a whole one, I’d have used it), thinly sliced
salt, pepper
garlic powder
parmesan cheese
olive oil for cooking

Instructions

I heated up the rice in the microwave, drizzling it with water to kind of re-steam it. If your rice won’t stick together (perhaps it’s not quite as mushy as mine was), feel free to stir an egg into the mix. Stir together the rice, shallot, and leek, and add any seasoning you like. I added a few shakes of garlic powder, probably 1/2-1 tsp salt, and probably 1/4 cup grated parmesan. But none of this has to be exact. Put a bunch of stuff you like in there. I bet chopped sage would’ve been good, as would onion and garlic.

Heat some olive oil in a nonstick pan over medium heat, form the rice mixture into patties, and cook on each side until golden brown, roughly 3-5 minutes. Add more oil as you need it. You want them to have a nice crispiness on the outside to add some texture.

We ate them alongside some delicious panko-crusted tilapia and roasted broccoli. They would make a great appetizer for a fancier dinner. Also, they would make a delicious breakfast had I put a fried egg on top. Or melted a slice of cheddar. With some breakfast sausage on the side. See, there are so many uses for botched food! Now go mess up some rice.

beet tart

Beet Tart

beet tart

OK people – I know we read a lot of food books and talk about them all the time, but if there is ONE book you are going to read from our suggestions, let it be An Everlasting Meal by Tamar Adler.  It is amazing book that changed my life, and is sure to make you think and act differently around food.  If you have not read it yet, go read our blog post on her book, and then continue below.

This beet tart is a perfect example of Tamar’s philosophy and grace: if you attacked this beet tart recipe from start to finish in one cooking session alone – it would take most of your day; first you would have to roast the beets (which takes a long time anyway), then make tart dough and chill it for an hour, then bake the tart dough, then put together the filling, bake some more, add the sliced beets, and bake once again.  Sounds daunting! I would never have done this recipe if it wasn’t spread out over many days and incorporated in the general meal preparations for the week.  However, the manner in which it was made made it feel like I was just throwing leftovers together in a very creative way, rather than a labor intensive ordeal.

Here’s what happened: A few days before, Annie and I roasted a whole bunch of veggies for dinner (or was it lunch?).  We filled the whole oven and roasted lots of different veggies with olive oil and salt.  I fit the beets in a small pan with a 1/2 inch of water in the bottom, covered them with foil, and let them roast for a long time (probably too long, I may have forgotten about them).  We ate the other roasted veggies as part of our dinner that night, but we had no intention of eating the beets that day, so we didn’t have to wait around for them to roast.  We let them cool and then peeled them and put them in the fridge before bed.  Now we had roasted beets peeled beets in the fridge.  We had no plan but we had ideas: beet salad, beet pasta, or beet anything; they were simply a nice starting point.

A few days before roasting the veggies, we had made a different veggie tart using the Olive Oil Tart dough recipe that can be found in Tamar’s book, so we had some leftover in the fridge.  A few days later, I looked in the fridge and saw that a perfect storm had brewed for a beet tart.  There, sitting in the fridge waiting to be used, were roasted peeled beets, tart dough, and some leftover ricotta cheese.

If you want to make this recipe from start to finish, more power to you.  However, I would suggest at least making the tart dough a day ahead, and then looking through your fridge to find any vegetables that would work, roast them, and put them on top of the tart in place of beets.

Beet Tart

Note: You’ll want to roast your beets or other vegetables before you make the tart dough.

Ingredients

Olive Oil Tart Dough

2 1/2 cups all-purpose flour
1/3 cup olive oil
1/2 cup ice water
1 teaspoon salt

Beet Tart Filling

1 1/2 cups ricotta (fresh)
1/4 cup olive oil
2 Tb. cream (I think I just used leftover creme fraiche)
1/2 t. salt
2 egg yolks
a pinch of fresh thym or rosemary

Instructions

Olive Oil Tart Dough

Mix all ingredients together in a bowl. If its too dry, add more water, a tablespoon at a time. Divide the dough in half and roll into balls, then put them in the fridge to chill.

Take out one dough ball (you get to save the rest for another day!) and roll it out on a floured counter until its about 1/4 inch thick. Heat the oven to 400 degrees.  Grease the bottom of a 9-inch pie pan and dust with a bit of flour. Lay the crust in the pan and trim the edges. Prick the bottom a few times (this dissuades bubbles from appearing in your tart dough). Cover the crust in aluminum foil and put some dried beans or pie weights in to fill the tart and hold down the dough. Bake for 20 minutes.

Beet Tart Filling

Whisk together filling ingredients. Pour into the pre-baked tart dough (remember to take out the dried beans and aluminum foil!) and bake at 400 degrees for 15 minutes.  Now lay your beet slices (I cut mine into half-moons) on top of the ricotta filling in a single layer and bake for another 10 minutes.  Let it cool and eat at room temperature.

It is very filling and great for lunch the next day and many days after!

Soba Noodles with Mango and Eggplant

Soba noodles, eggplant, onion, mango, cilantro, basil, and dressing all tossed into a bowl.

Jonah slices and dices all the colorful ingredients for the soba noodles.
It feels very weird to spread a pile of noodles on a dish towel to dry... But I'll do pretty much anything Ottolenghi tell me to.

As I mentioned in an earlier post, Jonah and I made dinner for my mom and her boyfriend back in December. Now I believe I have told you of my love for Yotam Ottolenghi’s cookbook “Plenty,” yes? This meal was no exception. The meal was all vegetarian, and 2/3 dishes were from that cookbook. The meal was light, refreshing, and packed with flavor. Not to mention the great company.

I fear that I am reaching a point where I cannot keep posting variations of these recipes, I just need to tell you to please, please, please go buy this cookbook. Even if vegetarian food isn’t your thing, even if the photos don’t make your stomach growl, even if the lists of ingredients leave you with questions swirling around in your hear. I beg you. Just go buy it. And then, please proceed to make everything in it, even if it doesn’t jump off the page. Every single dish I have made from this book (as well as his other book, “Jerusalem”) has been so lovely and flavorful that I wish I had tripled them all so I could enjoy the leftovers or share with a bunch of my friends.

Back to the dinner. These room temperature soba noodles are one of the few recipes in the book that did jump off the page for me. But somehow, I still hadn’t made it. While it’s a little prep-heavy, trust me, it’s worth it. Packing a lot of flavor and lots of little bites with different tastes (onion, eggplant, peppers, mango, the list goes on…), this recipe is bound to be a crowd pleaser. I can see it being especially good for kids. What kids don’t love noodles and mango? That’s what I thought: none.

Soba Noodles with Mango and Eggplant

Ingredients

1/2 cup rice vinegar
3 Tbl sugar
1/2 tsp salt
2 crushed garlic cloves
1/2 of a red chile, finely chopped
1 tsp sesame oil
zest and juice of a lime
1 cup sunflower oil (we used canola)
2 eggplants, cut into ~1 inch cubes
a bag of soba noodles
1 large ripe mango (let’s be honest, more than one probably couldn’t hurt…), cut into ~3/4 inch cubes or thin strips
1 2/3 cups fresh basil leaves, roughly chopped
2 cups cilantro leaves, roughly chopped
1/2 red onion, thinly sliced (think paper thin, if you can)

Instructions

In small pot, warm the vinegar, sugar, and salt until the sugar just dissolves. Remove from heat, then add the garlic, chile, and sesame oil, and, once it’s cool, the lime zest and juice.

In a large saute pan, heat the oil and fry up the eggplant. You’ll probably need to do this in a few batches. But you want the eggplant to be nice and golden brown. After all the eggplant is cooked, put it in a colander in the sink, sprinkle (“liberally”) with salt, and leave to drain.

While cooking the eggplant, bring a large pot of salted water to a boil. Cook the soba noodles in the boiling water – you want them to be soft, but still a little al dente. Drain the noodles and rinse them under cold water to stop them cooking. Spread them on a dish towel to dry.

Now the fun part: throw the noodles, dressing, mango, eggplant, onion, and half the basil and cilantro in a bowl and toss to coat/combine everything. You can make this a couple hours ahead of serving, and stop here, letting it sit to absorb flavors and come to room temperature. When you’re ready to serve it, add the rest of the herbs. Enjoy!

Mom's dinner prep activities: playing tug-of-war with Lulu while Jonah and I chopped and sauteed in the kitchen a few feet away.

Latkes (and Belated Happy Hannukah)

These latkes get 2 thumbs up.

Yes, I know. By the time this post gets published, Hannukah and the time for latkes will be over. But if there is anything I’ve learned from the past week, it is that latkes should not be a “once a year” dish. They make a great little side dish, or a base for eggs benedict, or even just a fried egg on a Saturday morning. This is especially true once you’ve found a recipe you really like. And I have. After doing some hunting around and even trying another recipe I found, I made the latkes from “Jerusalem,” a cookbook I have previously written about, by Yotam Ottolenghi.

Now this recipe is what made me really want this cookbook. I thought it was interesting that there weren’t onions in it, and I also had never tried latkes with parsnips, although I know it’s not an uncommon thing. And here’s what I liked about these: Not too salty (an issue with the first recipe I tried this season), I liked having the chive flavor in there (although I halved the chives, because one of the people I was cooking for doesn’t like them), and the parsnip and very dried out potato made it extra crispy. Also, the fact that you fry them in a combination of butter and oil didn’t hurt.

Potato & Parsnip Latkes

Ingredients

5 1/2 cups peeled and grated waxy potatoes, such as Yukon Gold
2 3/4 cups peeled and grated parsnips
2/3 cup finely chopped chives
4 egg whites
2 Tbl corn starch
Butter and oil (preferably canola or sunflower) for frying
salt and pepper
sour cream and applesauce to serve

Instructions

For all of the grating, I recommend the grater attachment for a food processor, but if you haven’t got one, a box grater will work just fine. Then maybe you’ll have done enough physical activity to justify the fried potato goodness you’re about to eat.

Squeeze the grated potato out in a clean dishtowel (make a little satchel, twist the ends, and squeeze!) into the sink. Some recipes reserve the juice, let it separate, and then add the starch back in. This one doesn’t call for it, but if you want to, go for it. After you’ve squeezed out the potato, spread it out on a clean kitchen towel to dry as completely as you have time for. In a large mixing bowl, combine the potato, parsnip, chives, egg whites, corn starch, 1 tsp salt, and as much pepper as you’d like.

Preheat your oven to 250 degrees, and in the oven place a rimmed baking sheet with a cooling rack on it. Also prepare a plate or baking sheet with a couple layers of paper towel.

In a (preferably non-stick) pan, heat enough butter and oil so it’s ~1/4-1/2 inch deep over medium-high heat. To see if your oil is hot enough, drop in a little chunk of your potato mix. It should sizzle and bubble a bit without spitting violently. If it isn’t hot enough, take out the potatoes and keep heating and try again. When it is hot enough use a spoon to scoop about 2 Tbl portions of the potato mixture, squeeze out some of the juices, and shape into patties and carefully drop into the oil. Or, you can use my tried and true method: squeeze out the juices, drop into the oil, and then quickly use your spoon to spread and press the mixture into a patty. Fry for about 3 minutes a side, or until they are as dark/cooked as you like them, then flip and cook the other side. Remove from pan to the paper towels, then keep warm in the oven. Serve with sour cream, applesauce, and holiday cheer 😉 Enjoy!

Delicata Squash and Tofu with Miso & Molasses | Serious Crust by Annie Fassler

Delicata Squash and Tofu with Miso & Molasses

Delicata Squash and Tofu with Miso & Molasses | Serious Crust by Annie Fassler

Update October 2017: I made this recipe again for dinner last night, after seeing squash at the store and wanting to EAT IT ALL. One of the things about the re-design that happened about a year ago on this blog, and about having a blog that has been going for about six years now, is that I look at old pictures and old writing and I just cringe. So I took new pictures, gave the post a little love, and am sharing it again with the world. This is one of my absolute favorite fall dishes: it uses lots of Asian ingredients (miso, soy sauce, sriracha), delicata squash (my personal favorite), and greens (which means it’s healthy, right?).

When Jonah and I returned from Thanksgiving, we were in the mood for something wintery, but a little on the healthier side. Let’s just say that the weekend was full of heavy food and indulgences, as Thanksgiving is supposed to be. I found a dish on 101 Cookbooks a while back that I’d always wanted to make, so we pulled up the recipe, made a quick run to the grocery store, and whipped up this squash and tofu cooked with miso and molasses. It can be served with rice, but I recommend some roughly chopped arugula, like the recipe says.

Continue reading “Delicata Squash and Tofu with Miso & Molasses”

Shakshuka

Shakshuka for breakfast! Looks amazing.

I have discovered possibly the best Israeli-inspired brunch dish of all time. You think that’s a really specific category? It’s not. I know this because I now have two whole cookbooks from chef Yotam Ottolenghi (“Plenty” and “Jerusalem”). Born and raised in, guess where, Jerusalem, Ottolenghi moved to London in 1998 where he has a deli chain and a restaurant (or two… I’m not positive). Anyway, last year, my mom gave Jonah “Plenty” for his birthday, and while the pictures are absolutely beautiful and the food looks delicious, the recipes are a little intimidating. Lots of kind of obscure ingredients like muscovado sugar and tamarind paste and harissa. So we made maybe one or two things from it. But in the last year, we have grown much more ambitious in the kitchen, so when I was in Berkeley visiting my sister and I saw “Jerusalem” (and it’s latke recipe, which I will sharing with you shortly) I wanted it. Badly. And guess what. I got it. For my birthday. From my sister. Because my family is awesome and gifts each other beautiful cookbooks and kitchen appliances.

Anyway, when I was home for Thanksgiving, my dad made the shakshuka out of “Plenty” for brunch one morning. (Let it be noted that there is ALSO a shakshuka recipe in “Jerusalem” and that they are, indeed, different.) Now, as one who has only recently grown to love bell peppers, I was skeptical about liking this dish. It is, afterall, mostly bell peppers. But oh my gosh you guys. Go make this NOW. It’s so amazing. Really complex flavors (thanks saffron and muscovado sugar), brilliant colors, and delicious leftovers. Best enjoyed with some crusty bread (think rye or a French batard or something like that).
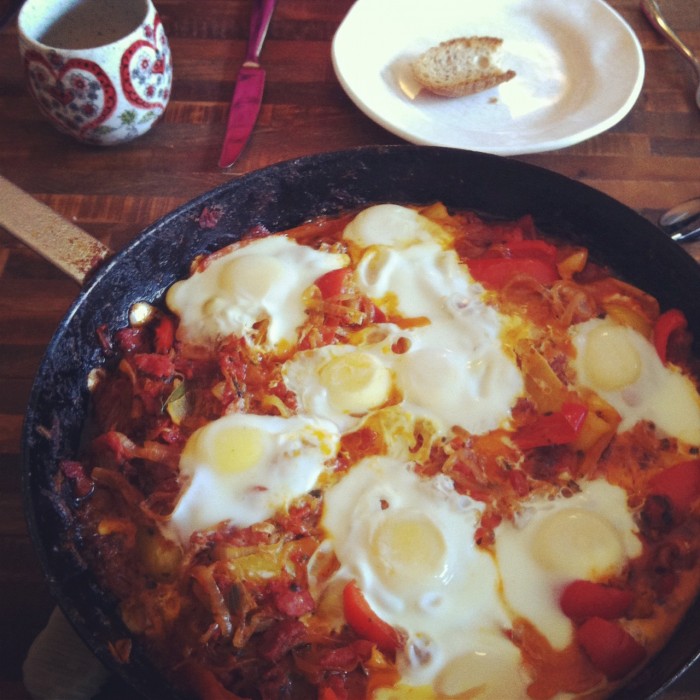
Shakshuka

Serves 4 generously

Ingredients

1/2 tsp cumin seeds
3/4 cup olive oil or vegetable oil (I would maybe do a little less than this, but try it and see what you think)
2 large onions, sliced
2 red bell peppers, sliced into 3/4-inch slices
2 yellow bell peppers, same preparation
4 tsp muscovado sugar (yes, it’s an obscure ingredient, but now I want to put it in everything)
2 bay leaves
6 sprigs worth of thyme leaves, roughly chopped
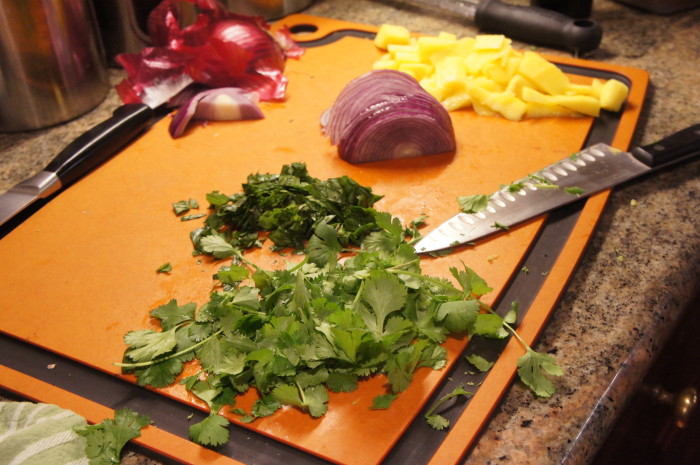
2 Tbl chopped parsley
2 Tbl chopped cilantro, plus extra for garnish
6 ripe tomatoes, roughly chopped (if it’s not tomato season, 2 small cans of canned tomatoes will work perfectly, but I would recommend draining most if not all of the juice first.)
1/2 tsp saffron threads
pinch of cayenne
salt and pepper
up to 1 1/8 cups water
4-8 eggs

Instructions

In a very large pan (seriously, probably the biggest pan you’ve got is a good idea), dry roast the cumin seeds on high heat for a couple of minutes. Add the oil and onions, and saute for about 5 minutes. Then add the peppers, sugar, bay leaves, thyme, parsley, and cilantro, and keep cooking it on high heat for 5-10 minutes, until everything is starting to get some nice color to it.

Now add the tomatoes, saffron, cayenne, and a bit of salt and pepper. Bring the heat down to low and cook for 15 minutes. If you aren’t using canned tomatoes, keep adding water during this time so that the mix has kind of a chunky spaghetti sauce consistency. Because the canned tomatoes were pretty juice and I didn’t drain them completely, I found no need to add water. Give the mixture a taste, and adjust the seasoning as you see fit. More salt? More pepper? More muscovado sugar? Go nuts.

After 15 minutes on low heat, go ahead and remove the bay leaves. Now Ottolenghi has you divide the mixture among 4 little frying pans, but let’s face it, I’m not going to unnecessarily dirty 4 extra dishes. If it’s a fancy breakfast and you’ve got those adorable mini cast-iron skillets, maybe that’s your thing. But I just kept it all in the same one big pan for this part. Make some gaps in the pepper mix, and break one egg into each gap. (I surveyed my crowd to see how many eggs we each wanted, so I did 6.) Sprinkle with some salt and cover the pan with a lid (or tightly with some foil, if your pan doesn’t have a lid). Cook on “a very (!) gentle heat” for 10-12 minutes, or until the eggs are just set. A runny yolk is preferable. Sprinkle with cilantro and serve with some crusty bread. Enjoy! I promise, once you make this, you’ll come up with a million excuses/occasions to repeat it. It’s so delicious. And as I said, it makes great leftovers because the flavors just get to deepen even more.

Brussels Sprouts and Tofu

brussels sprouts
brussels sprouts and tofu

brussels sprouts, tofu, and rice.

I hated Brussels sprouts as a kid, as most kids do.  I remember my mom making them on occasion, usually steamed with butter melted on them.  She was the only one who ate them.

(Also, “Brussels sprouts??” I was under the impression until about 2 weeks ago that it was “Brussel sprouts.”)

Now that I am a so-called “adult,” I have only become slightly more receptive to these small green balls of vegetable. However, this recipe from Plenty by Yotam Ottolenghi has me almost craving them.  The best part about it is the way they are fried: with lots of oil and salt, face down on hight heat for a couple of minutes.  One side gets black and crispy, one side is still green.

Also, with the addition of tofu, this recipe makes a meal in one bowl!

Brussels Sprouts and Tofu

Ingredients

2 Tbs sweet chile sauce (the most common brand is Mae Ploy, we had a bottle in the fridge that was “borrowed” from our cafeteria back in college)
1 1/2 Tbs soy sauce
3 Tbs toasted sesame oil (don’t skip this! It makes the dish)
1 tsp rice vinegar
1 Tbs maple syrup
5 oz firm tofu
1 lb Brussels sprouts
about 3/4 cup canola oil
salt
1 cup sliced green onions
1/2 small fresh red chile, deseeded and minced (we used a jalapeño, so it was green.  Whoops.)
1 1/2 cups shiitake mushrooms, halved or quarted
1 cup cilantro leaves
1 Tbs toasted sesame seeds (optional, for garnish)

Rice for serving

Instructions

Find a medium bowl and in it, whisk together the sweet chile and soy sauces, 2 Tbs of the sesame oil, the vinegar and maple syrup. Cut the tofu into 3/8-inch-thick slices and then each slice into two squarish pieces.  Stir the tofu into the marinade and set aside.

Trim the bottoms off the Brussels sprouts and cut each into three slices from the top down.  Find a large frying pan, add 4 Tbs of canola oil, and heat up well.  Throw in half the Brussels spouts, or less than depending on the size of your pan (when I did this the oil spit like crazy, so watch out!).  You want most the sprouts in the pan to have at least one side touching the pan, so no sprouts are stacked on top of one another.  Sprinkle some salt on them and cook on high heat for about 2 minutes.  Don’t stir to much, but shake it around if necessary.  You want the sprouts to be almost burnt on one side. Remove to a bowl and add the rest of the sprouts to the pan with more canola oil.  Add more salt, and 2 minutes later, transfer the rest to the bowl as well.

Add 2 more Tbs of canola oil to the pan and sauté the green onions, minced chili, and mushrooms for 1-2 minutes.  Transfer to the bowl that the sprouts are in.

Leave the pan on high heat and use tongs to lift half of the tofu pieces from the marinade to the pan (again, oil spits!) (don’t throw away marinade!). Space them apart and leave in one layer so that they can fry properly.  Reduce to medium heat and cook for 2 minutes on each side.  Transfer to the sprouts bowl and repeat with the rest of the tofu.

Remove the pan from the heat and return all the cooked ingredients from the spouts bowl back to the pan.  Add the leftover tofu marinade and half of the cilantro leaves.  Toss everything together, and let the pan cool down a bit.  Then taste and add salt if needed.  Stir in the remaining Tbs of sesame oil and serve warm, garnished with sesame seeds and/or the rest of the cilantro.  Eat with rice or by itself.

Butternut Squash Enchiladas

Squash for Enchiladas

Carmelle makes enchilada sauce
Squash enchiladas pre-cheese

Squash Enchiladas

Fall is a perfect excuse to put squash in, oh, just about everything you make. Squash ravioli? Yes. Squash cake? Absolutely. Squash enchiladas? Of course.

The inspiration for this meal came from 1) the abundance of squash at the grocery store, 2) the fact that I’d had something similar (some kind of squash taco) at a restaurant here in Portland called Oba, 3) there were people coming for dinner, and I wanted to make something easy that was basically a meal in a dish. This was exactly that, a delicious, relatively easy meal in a dish. I’ll also say this: this was loosely based on a squash enchilada recipe I found, but I was quasi-doubling it. Also, I bought too big of a squash because it was pretty. So we had lots of extra filling, which I just threw in a pan, covered with enchilada sauce and cheese, and baked on it’s own, sans tortillas. But I’ll try adjusting amounts below so that you don’t have that same problem.

Butternut Squash Enchiladas

Ingredients

One ~2 lb butternut squash, peeled, seeded, and cubed
Olive oil & salt
1 can black beans, rinsed
1 medium onion, diced
mild green salsa (we used one of those little cans from the grocery store)
12 small corn tortillas
1-2 cans enchilada sauce (Carmelle made our enchilada sauce because she is a Mexican food guru… but I was prepping the filling, so I wasn’t paying attention. Dang!)
1 bag of mexican blend shredded cheese

For serving: sour cream and sliced avocado

Instructions

First, preheat your oven to 400 degrees. Spread your squash on a large baking sheet, toss with olive oil and salt, and bake for 20 minutes, or until squash is tender. Remove from oven and allow to cool for a few minutes before putting into a large mixing bowl. Add the black beans and onion and mix to combine. At this point, you can lower the temperature of your oven to 350 degrees.

Cover the bottom of a large casserole dish with a layer of enchilada sauce and about half the can of salsa. Warm the tortillas a little bit, one by one, in a pan with a little bit of olive oil, just so that they won’t break when you stuff them. Take a warm tortilla, fill it with the squash/bean/onion mixture, a sprinkle of the cheese, and roll it up. The ends don’t need to be all nice and tucked in, but you want the tortilla to overlap enough… Does that make sense? Fill the dish with filled, rolled tortillas, and cover with enchilada sauce, salsa, and the rest of the cheese (or just however much cheese you want).

Throw that dish in the oven (don’t throw it, actually… that would be bad) for 30 minutes, or until the cheese is bubbling and a bit brown. Allow to cool for a few minutes before serving with sour cream and slices of avocado. Enjoy!

Caprese Salad

Caprese Salad

In the summer, when the heirloom tomatoes are big and soft and perfect, there is perhaps nothing better to do with them than to make a caprese salad. For the past two summers, my little sister has worked at a tomato stand at the farmer’s markets in the greater Seattle area. And sometimes, if I’m lucky, when she comes to visit she brings me the most beautifully colored, gigantic, perfectly ripe tomatoes.

The other day after work, I went to the grocery store to grab some beer (it had been a long day – and I’m currently in love with Deschutes Brewery Chainbreaker White IPA… if you can get your hands on it, I highly recommend it). At the store, I saw this giant pile of tomatoes and almost bought some until I remembered I had my own even better ones at home. So I bought the freshest mozzarella I could (my local grocery store doesn’t carry mozzarella de bufala, but if yours does, that’s what you want), brought it home, sliced up the tomatoes and cheese, drizzled a little olive oil and balsamic vinegar, and voila: the most wonderful summer salad, great for an appetizer or snack. (If you feel like buying basil OR you’re one of the lucky ones who has it growing in their garden, throw a leaf on top).