Mains

Indian Dinner: Chicken Makhani and Spiced Cauliflower

Indian Dinner: Chicken Makhani and Indian Spiced Cauliflower and Potatoes

Indian Dinner: Chicken Makhani and Indian Spiced Cauliflower and Potatoes

Indian Dinner: Chicken Makhani and Indian Spiced Cauliflower and Potatoes

Indian Dinner: Chicken Makhani and Indian Spiced Cauliflower and Potatoes

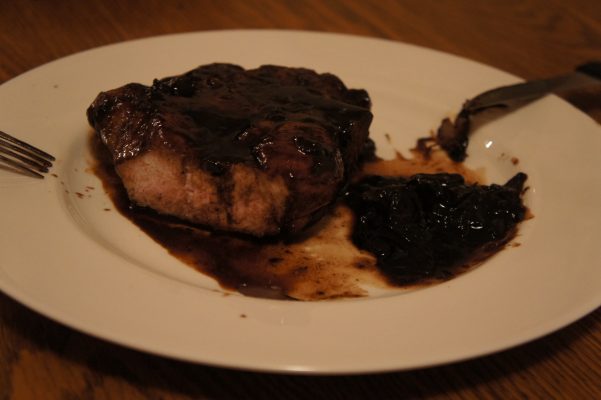
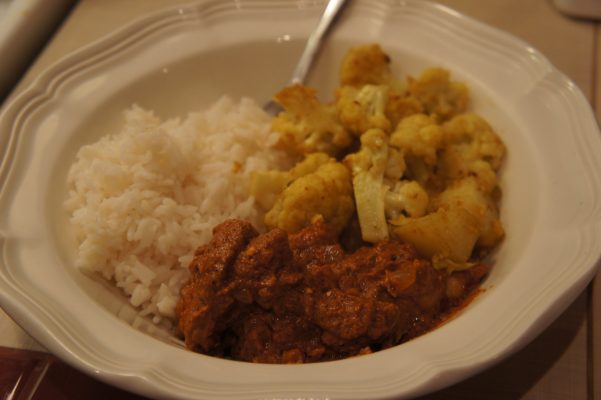
For a while now, I’ve been wanting to cook an Indian dinner. But I don’t have a cookbook with the kind of curry I wanted to make, so I took to the internet. After much hunting, I found many websites with the same Chicken Makhani recipe, so I decided to try it. If you’ve never had Chicken Makhani, you should. It’s a very creamy, mild curry that is this beautiful orange color. And I’ve been wanting to make it forever. Let me say before you jump in here that this recipe did not taste like the dish I get at our favorite Indian restaurant. Not at all. It was still good, just not what I was expecting. So if you have had Chicken Makhani before, just know that this won’t taste like the dish you’re thinking of. (My grandmother would kill me for ending that sentence with a preposition, but whatever.) Also, I will say that I forgot the step with the cornstarch and water at the end… So maybe it would have turned out different, but I don’t think the taste would have been affected at all. So there you go.

Now, when I was at the grocery store, shopping for this lovely meal, I thought to myself, “Gee, I really should cook a vegetable too.” So I quickly looked up a recipe on Smitten Kitchen (have I made it clear that I love this site yet?) for Indian spiced cauliflower and potatoes. I adapted this so that I wouldn’t have to buy too many more ingredients. I also didn’t do the full recipe; I probably ended up making 3/4 of the original, which yielded plenty for both of us plus leftovers.

Chicken Makhani and Spiced Cauliflower

Ingredients

Chicken Makhani

2 Tbl peanut oil
1 shallot, finely chopped
1/4 white onion, chopped
2 Tbl butter
2 tsp lemon juice
1 Tbl garlic-ginger paste (I wasn’t sure what this was, so I just minced one Tbl worth of ginger and garlic and called it good)
2 tsp garam masala
1 tsp chili powder
1 tsp ground cumin
1 bay leaf
1/4 cup plain yogurt
1 cup half and half
1 cup tomato puree
1/4 tsp plus a pinch cayenne pepper
1 pinch each of salt and pepper
1 lb boneless skinless chicken thighs, cut into bite size pieces
1 Tbl cornstarch
1/4 cup water

Spiced Cauliflower

1 (1 3/4-lb) head cauliflower, cut into 3/4-inch-wide florets
1 1/4 lb potatoes, peeled and cut into 1/2-inch cubes (the recipe called for Yukon Golds, but I just used Russets)
5 tablespoons vegetable oil
1 1/2 teaspoon cumin
3/4 teaspoon salt
1 medium onion, finely chopped
2 garlic cloves, finely chopped
2 teaspoons minced peeled fresh ginger
1/4 teaspoon turmeric
1/4 teaspoon cayenne
1/2 cup water

Instructions

Chicken Makhani

In a large saucepan, heat 1 Tbl peanut oil over medium-high heat. Add the shallot and the onion and cook them until they’re soft and translucent. Add the butter, lemon juice, ginger-garlic paste, 1 teaspoon of the garam masala, chili powder, cumin, and bay leaf. Phew. Cook for a minute, stirring to combine everything thoroughly. Add the tomato sauce and cook for a couple minutes, stirring frequently. Now stir in the the half and half and the yogurt. Bring the heat down to low, and allow the curry to simmer for about 10 minutes, stirring frequently. Season with salt and pepper to taste, remove the curry from heat, and set it aside (preferably covered).

In a skillet, heat the rest of the oil over medium heat. Add the chicken, and cook until lightly browned. Reduce the heat, and add the rest of the garam masala and the cayenne, mixing around until the chicken is evenly coated with the spices. Add a few spoonfuls of the curry to the chicken, and simmer until the liquid has reduced and the chicken is cooked through. Then stir the chicken into the sauce. (Now is when you’re supposed to do the cornstarch: mix together the cornstarch and water in a bowl, then add to the sauce. Stir in thoroughly and cook for 5-10 minutes, or until the sauce is thickened.)

Spiced Cauliflower

Preheat your oven to 475 degrees. In a bowl, toss the cauliflower and potatoes with 3 Tbl of oil, 1/2 tsp of the cumin, and 1/4 tsp of salt. Spread the veggies onto a rimmed baking sheet and bake for about 20 minutes, stirring occasionally. You want the cauliflower tender and browned in spots.

While the veggies are roasting, cook the onion, garlic, and ginger in the rest of the oil in a heavy skillet over medium heat. Stir frequently, and cook until the onions and garlic are soft and starting to brown. Add the rest of the cumin (1 tsp), the turmeric, cayenne, and remaining 1/2 tsp salt, and cook for a couple of minutes, stirring to evenly coat the onions in the spices. Add the water, being sure to scrape up any brown bits from the bottom of the pan, and stir in the veggies. Cover and cook for about 5 minutes, stirring occasionally, or until the potatoes are tender.

Serve curry and cauliflower with rice (I like to add a capful of rice cooking vinegar with the water to give it a little extra flavor), and enjoy!

Polenta Torta with Eggplant Sauce

Polenta Torta with Eggplant Sauce

Polenta Torta with Eggplant Sauce

Polenta Torta with Eggplant Sauce

Polenta Torta with Eggplant Sauce
Jonah, Sophie, Johnny, and Mo at the table and ready to eat!

Last weekend, our friends (and newlyweds) Sophie and Johnny were in town. Sophie and Jonah were housemates senior year of college, along with the lovely Maureen (Mo). So we invited the three of them (Mo, Sophie, and Johnny) over for dinner for a little reunion. Mo is a vegetarian, so I immediately went to “Plenty,” that vegetarian cookbook that we are quickly falling in love with. I found a recipe for some eggplant sauce, to be served on top of sweet corn polenta. Alas, it is not corn season, so I decided to use the eggplant sauce to make a polenta torta (recipe found in Alice Waters’ “The Art of Simple Food”). It was a really simple dish, and while we didn’t execute it to the best of our abilities (our dish was too big which made the layering hard) it was still very good. The mozzarella brought a nice pop to the dish, and was really stringy which I love. The eggplant sauce, as I said above, was nice and creamy. It was kind of like a layered pizza, except no crust, just polenta.

Polenta Torta with Eggplant Sauce

Ingredients

Eggplant Sauce

2/3 cup vegetable oil
1 medium eggplant, cut into 3/4 inch pieces
2 tsp tomato paste
1/4 cup white wine
1 cup chopped peeled tomatoes (we used canned, and I ended up using the whole can just to yield a little more sauce)
6 1/2 Tbl water
1/4 tsp salt
1/4 tsp sugar
1 Tbl chopped oregano

Polenta

4 cups water
1 cup corn grits (polenta)
1 tsp salt
3 Tbl olive oil
1/2 cup parmesan cheese (freshly grated)

Polenta Torta

4 cups polenta (hopefully the above recipe yields 4 cups… we didn’t end up measuring)
2 cups tomato sauce (or in this case, Eggplant sauce)
1 cup parmesan cheese (freshly grated)
1/2 pound (2 medium balls) fresh mozzarella

Instructions

Eggplant Sauce

Heat the oil in a large saucepan, add the eggplant. Cook the eggplant on medium heat for ~15 minutes, or until it’s soft and nicely brown. When the eggplant is cooked, drain as much oil from the pan and discard it. Now add the tomato paste and stir it into the eggplant. Cook for about 2 minutes, then add the wine and cook for another minute or so. Now add everything else (tomatoes, water, salt, sugar, and oregano) and cook for another 5-10 minutes to let the flavors deepen. You probably want to keep the pot covered so the sauce doesn’t cook down too much. On the other hand, if it’s looking a little too liquid for your liking, cook it uncovered so it can cook down a little bit. At this point, you can set this aside until you are ready to use the sauce. I made this sauce the morning of the meal, and actually left it on the stove, covered, for many hours.

The great thing about this sauce is the creaminess that the eggplant brings to it. When eggplant has been cooked this long, it kind of falls apart, and I love it when that happens.

Polenta

Now, I’ll be honest with you: I didn’t cook the polenta. Jonah did while I was getting in my workout at the bouldering gym. So I’ll relay what he did to you, but I don’t have any insider tips because I wasn’t there. But here’s what he did: Boil the 4 cups of water in a saucepan. When it’s boiling, whisk in the corn grits and the salt. Now, turn down the heat and whisk until the polenta is suspended in the water and no longer sitting on the bottom of the pan. Cook for 30 minutes – 1 hour (the longer the better, according to Alice Waters), stirring occasionally. Don’t let the polenta get above a low simmer. If at any point the polenta seems to be getting too dry, add a little water. Once the polenta is all cooked, add the olive oil and parmesan cheese.

Polenta Torta

Preheat your oven to 350 degrees. Oil a baking dish (like I said, ours was too big, so keep this in mind when picking what dish to use), and spread 1 1/3 cups of polenta out over the bottom of the dish. Over the polenta, spread half of the eggplant tomato sauce, then half the mozzarella cheese, and sprinkle half the parmesan cheese. Repeat: spread 1 1/3 cups polenta, the other half of the sauce, mozzarella, and parmesan cheese over the dish. End with a layer of the polenta. Because our dish was too big, we only did one layer, which was ok, but it didn’t look as nice as it could/would have if we’d done it right.

Once it’s all layered up, you can put it in the oven for 30 minutes, or until it’s hot and bubbling. Allow to cool for a bit before serving and eating. Enjoy!

French Onion Soup

French Onion Soup

French Onion Soup
French Onion Soup

French Onion Soup

Yesterday, I was craving French Onion Soup. I found a recipe on Smitten Kitchen (duh) and luckily, we had most of the ingredients except wine, broth, and swiss cheese. After work, I swung by the grocery store, picked up what I needed, and I was ready to go. I halved the recipe, but I’ll give you the original in case you’re cooking for more than just two people (but half was the perfect amount for me and Jonah).

French Onion Soup

Ingredients

1 1/2 pounds (5 cups) thinly sliced yellow onions
3 tablespoons unsalted butter
1 tablespoon olive oil
1 teaspoon table salt (or less)
1/4 teaspoon granulated sugar
3 tablespoons all-purpose flour
2 quarts beef stock (mushroom stock is a good vegetarian substitute)
1/2 cup dry white wine
Freshly ground black pepper
1 to 2 cups (to taste) grated Swiss or Gruyere cheese
Butter
Crusty bread, sliced into 1 inch thick pieces toasted until hard

Instructions

Melt the butter and oil together in a large saucepan over medium-low heat. Add the onions, tossing to coat them in the butter/oil, and spread them so they cover the bottom of the pot. Reduce the heat and let the onions cook, covered, for 15 minutes. You don’t need to stir them during this step.

After 15 minutes, turn up the heat a little bit and stir in the salt and sugar. Cook them for 30-40 minutes until they have become a lovely golden brown, stirring frequently so they don’t burn. Yes, 30 minutes seems like a long time to stir onions, but allowing them to caramelize well will make for really nice flavor later on and will make the soup taste much more complex and, well, just better.

Once the onions are browned, add the flour, stirring it in well, and cook for another 3 minutes. Now add the wine (all at once) and the stock, a bit at a time, stirring between additions. Add a little salt and pepper. Be sure not to over-salt! The stock is plenty salty and the cheese on the gratinée is plenty salty, so don’t overdo it now. Once the stock is all in, bring the pot to a simmer and let is cook, partially covered, for another 30-40 minutes. And stir in the cognac if you’re using it.

Now for the gratinée. Jonah and I didn’t follow instructions, but rather chose to just try out our own process and see if it worked. It did. Turn on your broiler (we put ours on high). Pour the soup into oven safe bowls, and stir in about 1 Tbl of the cheese. Toast whatever bread your using (we used the bread I made in the previous post) until it’s hard. Butter the toast, and set it afloat on the soup. Now put on as much cheese as your little heart desires. We probably did 1/3 of a cup per bowl of soup. Put the bowls on a foil-lined baking sheet, and pop it in the oven. I watched the soups in the oven, and when the cheese was bubbling and starting to turn golden brown, I pulled them out of the oven. Be careful as the bowls will be HOT. Put them on plates and warn whoever is eating them not to touch the bowl, only the plate. Serve and enjoy!

Pasta with Fresh Pesto

Pasta with Fresh Pesto

Pasta with Fresh Pesto

So last week I was in tech and then the run of a show. I had to make really quick dinners because by the time I got done nannying or doing whatever I was doing, I usually had only an hour to cook and eat before heading out to the theater. I pulled out the Alice Waters cookbook and looked for something incredibly quick and delicious. I came across a recipe for fresh pesto (which takes like no time at all to make), and immediately got very excited. Many years ago, a friend of mine named Sierra studied abroad in Italy. When she returned she came over to our house and made us fresh pesto, and man, there is nothing like pasta with fresh pesto. So, with that delicious meal in mind, I set out on my own pesto expedition.

Pasta with Fresh Pesto

Ingredients

1 lb dry pasta
1 garlic clove
salt
1/4 cup lightly toasted pine nuts
1/4 cup (or more) freshly grated parmesan cheese
1 cup lightly packed basil
1/2 cup olive oil

Instructions

First, you’ll want to boil a big old pot of water that has been abundantly salted. While that’s boiling, you can get started on the pesto. Now the cookbook said to use a mortar and pestle but a) who has those anymore and b) why use those when you have a food processor? If you don’t have a food processor, then I suggest you return to the mortar/pestle technique.

In your food processor, combine garlic and salt, pulse. Then add the pine nuts, pulse again until finely minced. Now add in the cheese, pulse again. Ready for the green? Coursely chop your basil, and add it to the food processor, and… you guessed it… pulse! Now add your olive oil and pulse again.

While you’ve been doing all this pesto stuff, hopefully you’ve not forgotten about cooking your pasta. The recipe in the book said to reserve 1 cup of pasta water and add it along with the pesto, but I did not do this… Mostly because I didn’t read the recipe (STUPID ANNIE. You should always ALWAYS read through a recipe completely before you make it). I think I just figured pasta + pesto = delicious, what else could you possibly need to do? Anyway, it all still worked out just fine. As I was saying, cook your pasta, strain it (reserving pasta water if you’d like), and put it back in the pot with the pesto. Mix it up and serve with a light dusting of parmesan cheese.

This meal is brought to you by Alice Waters

This meal is brought to you by Alice Waters

This meal is brought to you by Alice Waters

This meal is brought to you by Alice Waters

This past weekend my dad and his girlfriend came down to Portland to visit me and Jonah. They had given Jonah a cookbook, “The Art of Simple Food” by Alice Waters, for his birthday, and so we decided to make them a full meal straight out of the book as a little thank you. If you don’t know who Alice Waters is, she’s a chef at a restaurant called Chez Panisse in Berkeley, CA. The restaurant is known for organic, local ingredients and simple cooking. She has written about a million cookbooks. Anyway, for dinner we made: salad, Baked Wild Salmon with Herb Butter, Chard with Butter and Parmesan, and Roasted Butternut Squash for dinner. It was quite a meal. I’ll do one recipe at a time here so they aren’t all intertwined. Make things a little easier.

The meal was really delicious, fresh tasting, and best of all, SIMPLE. I guess the title of the cookbook doesn’t lie. These vegetable dishes were really filling and would make a great vegetarian meal. Enjoy!

Herb-Butter Salmon, Roasted Butternut Squash, and Chard with Parmesan

Ingredients

Herb-Butter Salmon

1 stick of butter at room temperature
1/2 cup chopped herbs (we used parsley, chives, and tarragon)
1 finely chopped garlic clove
a squeeze of lemon juice
salt
pepper
cayenne
1-1 1/2 pounds wild salmon fillet

Roasted Butternut Squash

2 small butternut squash
1 medium shallot, coursely chopped
4 cippolini onions, peeled and quartered
about 1 Tbl of roughly chopped (or torn) sage leaves
olive oil
salt

Chard with Parmesan

one bunch of Chard
2-3 Tbl butter (depending on how buttery you want your chard)
1/2 – 1 cup of grated parmesan cheese

Instructions

Herb-Butter Salmon

Preheat the oven to 425 degrees. Stir the ingredients for the herb butter in a small bowl. Add lemon, cayenne, salt, and pepper to taste.

Season the salmon with salt and pepper. Oil a baking dish/sheet and put the salmon on skin side down. Drizzle the fish with oil. Bake 7-10 minutes, until the flesh is “just set and still pink in the center.” After taking the salmon out of the oven, spoon some of the soft herb butter over each piece of fish, and put the rest in a small bowl on the table.

Roasted Butternut Squash

Preheat your oven to 350 degrees. Peel the squash, cut in half, and remove the seeds. Cut the squash into 1/2 inch pieces. Throw them into a baking dish with the chopped shallot, cippolini onions, and sage. Drizzle with olive oil and sprinkle with salt. Pop the dish into the oven for about an hour and a half, stirring about halfway through. Test the doneness of the squash before taking it out of the oven to make sure it’s cooked through.

Chard with Parmesan

Remove the leaves from the ribs of the chard, wash the leaves, and cook them in salted boiling water. When the leaves are tender, about four minutes, drain them in a colander and allow to cool, then squeeze out the excess water.

In the same pot you used to cook the chard, melt the butter over medium heat. While the butter is melting, roughly chop the chard. Add the chard to the butter and heat through. Stir in the parmesan, remove from heat, and serve! Sometimes I’m a little skeptical of cooked leafy greens (the texture can be a little slimy for me) but I really enjoyed this. I was careful not to overcook the chard, and the butter and cheese certainly added to the flavor. Because really, what doesn’t taste good with butter and cheese on top?

Spaghetti and Meatballs with Molly!

Spaghetti and Meatballs

Spaghetti and Meatballs

Spaghetti and Meatballs

Spaghetti and Meatballs

Last weekend, my baby sister came down to Portland to visit me and Jonah (as well as some of her college friends who live here). On Saturday night she came over for dinner, and we whipped up a quick and delicious spaghetti and meatballs. The sauce recipe came from my Cook’s Illustrated Cookbook and the meatball recipe came from Martha Stewart.

This pasta was actually way better than I anticipated it being for how easy it was. The sauce was really light and simple, which was a good balance for the meatballs which were a little creamier (because of the parmesan and milk and bread). It was filling and delicious and made for good leftovers. Enjoy!

Spaghetti and Meatballs

Ingredients

Tomato Sauce and Pasta

3 Tbl olive oil
2 cloves of garlic, minced
1 (28-ounce) can of diced tomato
2 Tbl (or more) of course chopped fresh basil
1/2 tsp salt
1/4 tsp sugar
1 lb spaghetti

Meatballs

8 ounces ground beef
8 ounces ground pork
1 garlic clove, minced
1/2 cup finely grated Parmesan cheese
3 tablespoons parsley, finely chopped
2 large eggs, lightly beaten
Coarse salt and freshly ground pepper
1 1/2 slices white bread (Martha says to just tear the bread up into small pieces, which we did, but I think it would have been better if we’d thrown it into the food processor because then it would’ve been in smaller pieces)
1/4 cup milk

Instructions

Tomato Sauce and Pasta

First, make the sauce. Heat 2 Tbl of oil and the garlic in a saucepan over medium heat. Cook the garlic until it’s golden, but not too brown, a few minutes. Add the tomatoes (including their juice, of course) and bring to a simmer. Cook until the mixture is slightly thickened, about 10 minutes. Remove from heat, then add the basil, sugar and salt. We didn’t want our sauce too chunky, so before adding the basil, we blended it a little bit with a hand blender. While we were making the sauce, we also cooked the pasta alongside.

Meatballs

In a bowl, combine the beef and pork (using your hands). Add the garlic, cheese, parsley (we didn’t have any so we skipped that part), and eggs. Season with 1 1/4 tsp salt and some pepper. While you’re adding all these things, soak the bread in the milk for a few minutes, then stir into the meat.

Now roll the meat into 1 1/2 inch balls. The recipe also said to refrigerate them for 1 hour, which probably would have helped them hold their shape, but whatever. We were hungry. So we just heated a couple tablespoons of olive oil in a pan over medium-high heat. Cook the meatballs until browned on all sides (6-ish minutes) and then transfer them to the simmering sauce. This is where they’ll actually cook through. Be sure to check and make sure they’re done by just cutting a meatball open.

Drain your pasta a teensy bit before it’s fully cooked (if you haven’t already at this point) and put it back in the pot. Add the pasta sauce and meatballs to the pasta and cook a little bit longer in the sauce. According to Molly, this is what Anthony Bourdain says to do. I trust that guy. And serve!

Serve it up and garnish with some fresh basil and parmesan cheese!

Seared Sea Scallops with Carrot-Marjoram Sauce

Seared Sea Scallops with Carrot-Marjoram Sauce

Seared Sea Scallops with Carrot-Marjoram Sauce

Seared Sea Scallops with Carrot-Marjoram Sauce

When Jonah’s parents were in town, we had them over for dinner. My dad had sent me a recipe for these scallops with reduced carrot sauce that he made a couple times when I was younger. This is the recipe that made me discover scallops. I used to think scallops were gross, the texture was a little too slimy for me, so I never ever ate them. But this sauce was so good that I tried one of the scallops that was drenched in it, and now scallops are one of my favorite seafoods.

This recipe is from The Herbfarm Cookbook, which is a book my dad uses all the time. The Herbfarm is a restaurant in Woodinville, Washington (near where I grew up). I’ve never eaten there, partially because $$$$$$ and partially because you have to make reservations hella in advance. Anyway, if you’re in the market for a beautiful cookbook with lots of good recipes, here’s one to check out.

Seared Sea Scallops with Carrot-Marjoram Sauce

Serves 4 people

Ingredients

2 cups fresh carrot juice (one of those personal Odwalla bottles is usually 2 cups)
1/2 cup dry white wine or dry vermouth
3 Tbl freshly squeezed lemon juice
1 medium shallot, finely chopped (about 1/3 cup)
1/4 tsp salt
4 Tbl unsalted butter, room temperature, cut into 8 pieces
8 3-inch sprigs fresh marjoram, tied together with kitchen twine (if you can’t find marjoram, you can substitute fresh tarragon or fresh lemon thyme)
1 1/2 pounds large sea scallops (~12), untreated (dry-pack)
salt and pepper
2 Tbl vegetable or olive oil

Instructions

A warning before we start. This recipe is long. But it’s not really that hard, it just seems hard because there are a lot of steps. However, it is totally worth it because these scallops and this sauce are so delectable. I promise. Just try it. I’m going to type it out in the same steps as in the cookbook because it breaks it down into little pieces. Quite nice if you ask me.

Combine the carrot juice, 1/4 cup of the wine, the lemon juice, shallot, and salt in a medium saucepan. Bring to a boil over high heat, then reduce the heat just enough to maintain a steady boil. Cook the mixture until reduced to about 1/2 cup of liquid. The sauce should be thicker, about “the same consistency as pulpy orange juice.” This should take about 20-30 minutes. You can do this step ahead of time and stick the mixture in the fridge overnight.

Reduce the heat so the sauce is gently simmering and add the butter, one piece at a time. Whisk the butter in, and wait until each piece is melted and incorporated before adding another. Return the sauce to a simmer, whisking constantly. Add the bundle of marjoram, submerging it completely in the sauce, and remove the pan from heat. Set aside till you’re done cooking the scallops!

It’s time to sear the scallops. I’ll let you know that Jonah and I struggled a little bit with this step, mostly because we decided to try to use our cast iron skillet (the recipe says to use a heavy bottomed saute pan). We’ve had some trouble, despite reading about how to cook in a cast iron and clean and care for it, with things sticking to the pan, and can’t really figure out what we’re doing wrong. Anyway. The recipe also says to heat your oven to 175 and then turn it off and you can put the scallops in there to warm them, but our oven was otherwise occupied, so we just put them on a rack on a pan.

Pat the scallops dry and season them lightly with salt and pepper. Heat the oil in whatever pan you choose to use until it is very hot and smoking. Using tongs, carefully put the scallops flat side down in the pan. Let them cook without touching them for 2-3 minutes or until the side touching the pan is a deep golden brown. Then turn them and cook them another 1-2 minutes on the other side. When you turn them, you want to preferable put them in a different part of the pan, where there has not just been a scallop. When they’re done cooking, remove them from the pan and put them in the oven or on a rack or whatever you choose to do.

Reduce the heat to medium and add the other 1/4 cup of wine. Scrape up the little browned bits in the pan and add the liquid from the pan to the carrot juice.

Remove the marjoram bundle from the carrot sauce, squeeze it dry, and get rid of it. Reheat the sauce over medium heat, whisking in the oil/wine mixture from the scallop pan. Season to taste with salt and pepper if needed. If you want the sauce to be super smooth, you can put it through a fine sieve. I like the little scallop bits and shallots, so we skipped the straining. Now put the scallops on plates, dress them with the sauce, and enjoy!

Seared Sea Scallops with Carrot-Marjoram Sauce

Salmon rice bowl

Spicy-Miso Salmon and Citrus Rice Bowl

Salmon rice bowl
Miso Salmon
Miso Salmon

Miso Salmon

This meal all started because Annie gave me a wonderful Christmas present: The Sriracha Cookbook.  You’ve probably seen Sriracha at your local asian restaurant, and you may know it as “rooster sauce” – or if you don’t know it, its basically an asian hot sauce made with chiles and garlic and its ohhh so good.  And you need it for the recipe that follows.

So the Sriracha Cookbook, as one might expect, is chock full of recipes that include Sriracha in them.  I picked the Miso-Sriracha Glazed Salmon recipe for dinner, mostly because we already had miso paste and Sriracha in our house.  The recipe in the book tells you to serve it atop steamed rice, but I wanted to do something more interesting, so I found a great recipe on Martha Stewart.com that I adapted to include the miso-Sriracha salmon.  Its a wonderful rice bowl that includes salmon, orange slices, and sugar snap peas atop some brown rice with a great orange sauce and mint to sprinkle on top of it all.  It tasted so light and substantial at the same time, and was a wonderful meal in a bowl!

A note on the rice: I actually used a rice called Camargue Red Rice, which Annie’s mom brought us from the south of France, where it grows.  The package had no English on it so I actually had to get online and do a little research before cooking it.  Anyway, it was delicious but I don’t think its necessary to make this dish great, so I put brown rice in the recipe below.

Spicy Miso Salmon and Citrus Rice Bowl

Ingredients

Spicy Miso Salmon

1/2 Tb. toasted sesame oil
1/4 cup brown sugar
2 Tb. soy sauce
2 Tb. white miso paste
1/2 Tb. Sriracha
1 clove garlic, minced
1 lb. salmon fillet(s)

Citrus Rice Bowl

4 oranges (I used Valencia)
A 1-inch piece of fresh ginger, peeled and thinly sliced
1 bay leaf
1 tsp. coriander seeds
1 Tb. rice vinegar
1 tsp. soy sauce
1 tsp. honey
1 tsp. toasted sesame oil
1 cup uncooked brown rice
1/2 cups sugar snap peas
1/4 cup fresh mint, chopped, for garnish
sliced green onions, green part only, for garnish

Instructions

Cook the rice according to the package directions.  I added a bit of chopped garlic and butter into 3 1/3 cups of water, brought it to a boil, and then simmered for about an hour.

In a small mixing bowl, make the Spicy Miso Salmon glaze: combine the oil, brown sugar, soy sauce, miso paste, Sriracha, and garlic.  Set aside.

Peel and separate 2 oranges into individual boats.  Now comes the hard part: you are supposed to detach and discard the membranes in order to get to the meat of the orange slice.  I experimented a lot during this step, and eventually found that I could cut down the back of each orange segment, pull it apart, and pull off the membrane from each side.  You could just skip this step entirely, but the orange slices won’t look as pretty, and you won’t get the same taste.  Regardless, put these orange segments in a bowl and set aside.

Remove the stems from the sugar snap peas, rinse, and chop into 1/2-inch pieces (I just chopped each pod in half).  Set aside.

Now juice the remaining 2 oranges into a small saucepan, and add the sliced ginger and bay leaf.  Crush the coriander seeds with the side of a knife and add them to the orange juice mixture, then bring to a boil.  Cook the mixture until it reduces to about 2/3 cup, about 6 minutes.  Take it off the heat and let it cool, then strain into a bowl to get rid of the ginger, bay leaf, and seeds.  Now whisk in the vinegar, soy sauce, honey, and oil.

Preheat the broiler to high. Lay the salmon fillet(s) across an aluminum foil-lined broiling pan (or any baking sheet with a rim).  Take out the glaze you made in step 2 and spread it generously on top of the salmon.  Broil the salmon 6 inches from the flame (or heat coil, as the case may be), until the fish flakes easily, about 10 minutes.  I spread more of the glaze on the fish after 5 minutes of broiling.

Dish the rice into bowls, and top with salmon, peas, and orange segments. Garnish with mint and green onion slices.  Reheat the orange sauce/mixture if it needs reheating, and drizzle it generously over everything.

Enjoy!

Braised Short Ribs

Braised Short Ribs

Braised Short Ribs
Braised Short Ribs

Braised Short Ribs

Last Friday Jonah and I were supposed to host a dinner party. We had already gone grocery shopping and planned the menu and everything when Jonah came down with the bug that the family upstairs had earlier in the week. It was not good. So we switched locations, I did all the cooking, and carted it all over to our friend Warren’s house. Jonah ended up feeling better and was able to come. Yay! I made braised short ribs with mashed potatoes and apple pie for dessert (post coming soon). This recipe is adapted from the Gourmet Today cookbook, which is wonderful. It’s really pretty easy.

This meal is so freaking good. The meat gets so tender, the sauce is so rich, the carrots soak up all the juices. Oh man. I whipped up some mashed potatoes to serve it with (peel potatoes, boil them, mash them, add some cream, butter, salt, and pepper and stir). The meal was greatly enjoyed by our friends Erica, Corey, and Warren as a little celebration of their having successfully completed a stressful semester.

Braised Short Ribs

Ingredients

1 bottle (750 ml) dry red wine
4 pounds beef short ribs, cut into 2 1/2 inch lengths by butcher
salt and pepper
2 Tbl olive oil
10 shallots, trimmed
4 large carrots, peeled and cut into 1 1/2 inch pieces (or whatever size pieces you like cooked carrots)
3 Tbl Dijon mustard
6 plum tomatoes, halved lengthwise

Instructions

In a saucepan, boil the wine, uncovered, until reduced to about 1 cup. Meanwhile, pat the ribs dry and season them with salt and pepper. Heat the oil in a large pot (5 quart) over medium-high heat. When oil is shimmering, add ribs in two batches, turning occasionally until browned on all sides (about 8 minutes per batch). Move the ribs to a large bowl, set aside.

Reduce heat to medium and add shallots and carrots to fat and oil remaining in the pot. Cook for about 5 minutes, stirring occasionally. Transfer to another bowl, leaving behind as much of the juices as possible. Now add the reduced wine and mustard to the pot and stir. Put the ribs in too, meat side down, cover tightly, and let simmer for 1 1/2 hours. (Now is a good time to make the mashed potatoes if you’re going to make some.)

After all that time waiting, gently stir the shallots, carrots, and tomatoes into the pot (I forgot to add our tomatoes, so that’s why you don’t see them in any pictures). Cover again and simmer until meat is very tender, about another hour.

Now, carefully transfer ribs and veggies to a platter. Skim fat off the cooking liquid. To use the liquid for sauce (which you’ll really want to do), it should coat a spoon (and supposedly measure ~1 cup). If you need, you can boil it to reduce it some more.

Balsamic-Glazed Pork Chops

Pork Chops

I made these great pork chops for dinner the other night (actually, the other week by now). It has a wonderfully sweet-and-tangy dark taste. They were really yummy, but to be perfectly honest, they didn’t look the greatest.  Also to be perfectly honest, I had a little trouble making them, although they came out fine in the end.  This happens to me sometimes when I make meats that you fry in pan (or bake… or prepare with heat in any way) with some sort of sugary sauce.  Sugary sauces always seem to start burning really quickly (because of the sugars, duh!), so when you make them — just watch out for the smoking and potential charring.  Turn on the fan above your stove.

Balsamic-Glazed Pork Chops

Ingredients

2 pork chops
Salt and pepper
2 Tb. olive oil
4 shallots, pealed and quartered
2/3 cup balsamic vinegar
1 1/2 t. sugar

Instructions

Sweet! Only 6 ingredients!

Sprinkle pork with s + p, let it sit out on the counter for 10 minutes to come to room temperature.

Heat olive oil in a skillet.  Add pork and shallots, turning pork until both pork and shallots are browned, about 5 minutes.  Remove the pork to a plate, leaving shallots.

Add the balsamic vinegar, sugar, and some more salt and pepper, and cook.  Stir a lot so sugar dissolves, and let it thicken for about a minute or two.  Put the pork back in there and coat with the sauce.  Cook, turning the pork over once, until its cooked through to your liking, about 3-5 minutes.

Take the pork back out and put on a plate, letting sauce thicken 1-2 minutes more.  Pour sauce over pork, and eat!

Soy Glazed Salmon and Asparagus with Miso

Soy Glazed Salmon and Asparagus with Miso

Soy Glazed Salmon and Asparagus with Miso

Soy Glazed Salmon and Asparagus with Miso

The other day Jonah and I were feeling up to cooking a big fancy meal. I picked the menu: Soy Glazed Salmon, Eggplant with Miso, served with rice. We got to the store and they didn’t have eggplant though, so I picked up some asparagus instead. Not sure why. But it was the right decision. This salmon is so unbelievably easy. Boil some delicious stuff in a put, put it on a hunk of fish, cook it, put on more stuff, and then eat it. Oh my goodness.

While Jonah was making the salmon, I had to find a new recipe. Lucky for me, I types in “asparagus with miso” and I quickly found a delicious recipe on…Oprah.com. I adjusted ingredients based on what we had as well as some of the eggplant recipes I’d read.

This meal was honestly one of the easiest, most delicious meals I’ve had. I have a tendency when I cook fish to put too much sauce or whatever on it so that it doesn’t really tasted like fish anymore. This salmon still tasted like salmon, but with a little kick of salty and sweet, it was perfect. And the asparagus had little charred bits (which I love) and was a little sweet, a little spicy, and a little tart. They tasted delicious together too. I highly recommend cooking this meal when you want to impress but don’t want to do too much work.

Soy Glazed Salmon with Miso Asparagus

Ingredients

Soy Glazed Salmon

1 lb salmon
1/8 cup soy sauce
1/8 cup maple syrup

Miso Asparagus

1/8 cup miso paste
1-2 clove garlic , minced
1 teaspoon minced fresh ginger (I didn’t have fresh ginger, so I used about half a teaspoon of powdered ginger, I’m sure more than that would be good too)
2 teaspoons fresh lime juice
1 pinch red pepper flakes
1/2 tablespoon sugar (to make it caramelize a little bit)
1 tablespoon mirin
3/4 pounds asparagus , bottoms trimmed
1/2 tablespoon olive oil
Pinch of salt

Instructions

Soy Glazed Salmon

Preheat oven to 450 degrees. The recipe (from the Gourmet Today cookbook which we got on sale at Powell’s for $15) says to line a broiler pan with foil and then oil the broiler rack. We don’t have those things, so we just used an oiled pyrex baking dish, which worked just fine.

Bring the soy sauce and maple syrup to a boil in a small saucepan over medium heat, uncovered, and boil until it reduces to a little more than half (of what you originally had). Put salmon skin-side-down in the dish or on the pan or whatever and pat dry. Set some of the glaze aside for later, and brush the salmon generously with the remaining glaze. Let stand for 5 minutes, then brush again with glaze. Roast the salmon for 10 minutes in the oven. Turn on broiler, brush salmon with glaze again and broil close to the heat (think 6 inches or so, no need to be terribly exact) until cooked through, 3-5 minutes. Once you take the salmon out of the oven, you can brush on the remaining glaze.

Miso Asparagus

Preheat broiler. In a small bowl, combine all ingredients EXCEPT asparagus, olive oil, and salt. Stir well and set aside. On a baking sheet, toss asparagus with olive oil and salt. Cook close to heat (about 6 inches) for about 3 minutes (if you like softer asparagus, like me, cook for 4 minutes), then remove from oven. Spread miso mixture over the asparagus and place back under broiler for 3-5 minutes.

Pizza Pizza

Pizza

Pizza
Pizza

Sometimes we don’t have time to make elaborate, fancy meals. I assume it’s the same for everyone out there. There are days when you want to eat something really delicious, but you just don’t have the time or energy. Enter: Pizza. A lot of grocery stores have pre-made pizza dough. And not the kind that are already in discs in plastic bags, the kind that is still in a gooey ball. Sometimes you can ask for it at the deli counter (like at Market of Choice) or sometimes it’s in the refrigerated section (like at New Seasons). Anyway, whoever decided to sell pre-made pizza dough at the store is a genius. Extremely quick, easy, and delicious, this meal is easily tailored to who will be eating with you and what you’re in the mood for!

If you are not feeling lazy and instead are feeling ambitious, you could make your own dough. This is something I am planning on doing soon, I swear. This recipe looks good:

http://www.101cookbooks.com/archives/001199.html

This one also gives step by step pictures, which is really helpful!:

http://www.annamariavolpi.com/pizza_recipe.html

Cook on my friends!