Mains

Lemon Baked Cod

Lemon Baked Cod

Lemon Baked Cod

The other day I went to the grocery store in search of something to make for dinner. There was this lovely cod fillet that looked especially appetizing, and, knowing there was a lemon in the fridge with which to dress it, I bought some. After looking at a few recipes online, I decided to make up my own little recipe for lemon baked cod. It was really light and delicious AND easy.

Lemon Baked Cod

Ingredients

1 lb of cod fillet (I actually used about 3/4 of a pound, but this rounds things out and you’ll have leftovers)
1/4 cup butter, melted
2 Tbl lemon juice
1/4 cup flour
1/2 tsp salt
a pinch of pepper
paprika

Instructions

Preheat your oven to 350 degrees. Cut the fish into serving sized pieces. In a small bowl, mix the butter and lemon juice. In another small bowl, combine the flour, salt, and pepper. Dip each piece of fish into the butter mixture to coat, and then into the flour mixture, turning to coat. After dipping, you can put the fish on a baking sheet or dish. Pour the rest of the butter/lemon mixture over the fish and sprinkle it with paprika. Bake for 25-30 minutes, or until the fish flakes easily with a fork. Enjoy! We served ours with couscous and spinach. Yum.

Beet Tart with Goat Cheese and Greens

Beet Tart

Beet Tart
Beet Tart

Last week, I was in the mood for something light but nice for dinner. After a little hunting, I found a recipe on Desserts for Breakfast for a delicious looking beet tart with goat cheese. Sounds good, no? And, the other great thing? It was super easy. Really though, I’m not just saying that.

Beet Tart with Goat Cheese and Greens

Ingredients

6 large or 4 GIANT beets
olive oil
8 – 10 sprigs of fresh thyme
salt
pepper
1 sheet of puff pastry
1 small package goat cheese
1 small package blue cheese
frisee or mixed greens
freshly squeezed lemon juice

Instructions

Preheat your oven to 400 degrees. Prepare two baking sheets: line one with foil and the other with parchment paper, a silpat, or just grease it with some olive oil. Peel your beets and slice them into slices about 1/4-1/2 inch thick. Remove the thyme leaves from the sprigs, and toss with the beets, olive oil, and a little salt and pepper. Lay the beets on the foil-lined baking sheet and bake for 10-12 minutes.

While the beets are roasting, roll out the puff pastry so it’s a little thinner (into a 10 by 10 inch square or comparably sized rectangle). Also, I didn’t really think about that whole thawing thing, so remember that, otherwise the time will come to use your puff pastry and it will still be a big hunk of ice. I mostly just stretched mine out because I was in someone else’s kitchen sans rolling pin. Anyway, once you’ve rolled or stretched it or whatever, transfer it to the other baking sheet (the one lined with parchment paper or greased). Arrange the beet slices on the puff pastry, leaving a nice edge around the beets, 1-2 inches. Roll the edges of the puff pastry up to create a little crust.

Bake at 400 degrees for 10 minutes, then turn the temperature down to 350 and bake for another 25-30 minutes or until the pastry is golden brown and puffed up and the beets are tender. Remove from the oven and let cool for a little bit.

While the tart is cooling, mix together some of the goat cheese and blue cheese with a fork. I didn’t give exact measurements of how much cheese because you know what cheese you like and how much cheese you’ll want on your tart, so I’m not gonna tell you how to do it. You can figure it out. Toss the greens or frisee with lemon juice, olive oil, and pinch of salt to coat it evenly and serve it alongside or over the tart. Enjoy!

Gnocchi with Spicy Tomato Sauce

Gnocchi
Gnocchi
Gnocchi
Gnocchi
Gnocchi
Gnocchi
Gnocchi

I’ve been lusting after the pasta attachments for my KitchenAid. Dreaming of them, of all the beautiful pasta I would make if I had them. Oh man. I want them so badly. But I don’t have them. And I probably won’t for a while. But I want to make pasta, so I after eyeing a few gnocchi recipes, I thought, hell, I’ll try it.

This may not have been my best decision ever. I mean, you have to start somewhere, right? But I decided to do it when we had a friend coming for dinner. But she was supportive of my endeavors. After reading many recipes and such about how to handle your potatoes and how much flour and egg to add, onward I went. One important thing is you don’t want to put your potatoes in a food processor or use an immersion blender or anything like that. You want to put it through a ricer or a grater or mash it with a fork. I chose the last route.

These gnocchi were pretty good for a first try. As I mentioned before, I think they were a little over-cooked. They also were a little dense, and I’m not sure why. There are a few possible explanations: 1) boiling them instead of roasting them? 2) added to much flour? 3) added too much egg? Who knows, but all of these are variables I plan on futzing with the next time around.

Potato Gnocchi and Spicy Tomato Sauce

Ingredients

Potato Gnocchi

2 lbs russet potatoes
1 tsp salt
1 egg, slightly beaten
1 1/2 cups flour, plus some for rolling/dusting

Spicy Tomato Sauce

1 tsp butter
2-3 large shallots
1/2 tsp red pepper flakes
1 tsp salt
1 28-oz can whole tomatoes, drained
1 15-oz can tomato puree/sauce
a pinch (or two) of sugar

Instructions

Potato Gnocchi

Cut your potatoes in half and put them in a pot of water. Bring the pot to a boil and cook until the potatoes are tender throughout. This will take about 40-50 minutes. When the potatoes are cooked, remove each half one at a time onto a cutting board and peel each piece before you move onto the next. Be careful as they’ll be very hot! But the skins come off pretty easy, and if not, just use a paring knife. Once all the potatoes are removed and peeled, mash them. I used a fork so that I could be more thorough and make sure there weren’t any big clumps. Anyway, mash the potatoes and spread them out on the cutting board so that they can cool.

Once cool, put the potatoes in a bowl, add the egg and salt and mix together. Now add the flour a little bit at a time (I probably did 1/4 cup at a time) and mix it in. You don’t have to add all the flour. In fact, it’s probably better if you don’t (I don’t know this for a fact) because I assume the gnocchi will be less dense when cooked. Just add flour until the dough doesn’t stick to your hands anymore. Now dump the dough onto a lightly floured surface (read: counter) and knead it gently for a few minutes, incorporating more flour if necessary.

After kneading, divide the dough into 6 equal parts, and roll each chunk one at a time into a rope about 3/4 inch thick. Cut each rope into 1 inch pieces. You’ll want to be sure to do this on a floured surface, as the rolling and cutting especially can result in the dough stick to the counter, which makes it hard to…ya know…remove them.

While you’re rolling out your dough, you can bring a large pot of salted water to a boil. When it’s boiling, add the gnocchi in batches. I made the mistake of putting all of mine in at once and I think this caused the ones that were put in at the beginning. So do it in batches. After a little bit, your gnocchi will rise to the top of the pot. Let them cook for another minute after they do that, and then remove them with a slotted spoon to a bowl or colander or whatever. Do the same with the rest of the gnocchi.

I also decided to cook them in a pan after boiling them for 2 reasons: 1) they were pretty mushy and I wanted to dry them out a bit, and I knew this would help. 2) I love gnocchi that has that little bit of crunch from being lightly seared in a pan of butter. Yum. So if you want to do that, melt a bit of butter in a pan and cook the gnocchi in batches until it’s lightly browned on each side.

Spicy Tomato Sauce

Be warned, this pasta sauce has quite a bite to it from the chili flakes. I thought it was a perfect amount of spiciness, but if you are nervous about it, add less than 1/2 a tsp and add more till it suits your tastebuds.

Melt the butter in a saucepan. Add the shallots, pepper flakes, and salt. Cook until the shallots are translucent and beginning to brown. At this point, add the wine and let it cook down. Now add the whole tomatoes and tomato puree, breaking the whole tomatoes up with a wooden spoon as they cook. Taste the sauce, and if it’s a little too spicy, add some sugar (a little bit at a time) and perhaps some wine. Allow the sauce to cook down until it’s the right consistency and put it atop your favorite pasta (or perhaps the gnocchi you just made).

Asparagus Salad with Prosciutto and Poached Eggs

Asparagus salad with croutons, prosciutto, and poached eggs

Asparagus salad with croutons, prosciutto, and poached eggs

In the Ad Hoc cookbook (by Thomas Keller), there’s this delicious looking asparagus salad with croutons, prosciutto, and poached eggs. Sounds good, right? I don’t know about you, but I love all of those things. Jonah and I were in the mood for a light dinner, so we decided to make it the other night. The only problem? Neither of us had ever poached an egg before. It’s one of those things, like baking with yeast, that scared me even though it’s probably not actually that hard.

But I did it! And you can do it! I did! My first attempt was much more successful than my second attempt. After having some little egg bits in the pot from the first egg and then swishing it all around to create my whirlpool, the visibility was not so good, so I had trouble telling where my egg was in it’s cooking process. And then it broke when I removed it. Don’t worry, I made Jonah eat that one. Hahaha.

Fall Salad with Poached Eggs, Asparagus, and Proscuitto

Ingredients

2 eggs
1 bunch asparagus
olive oil
salt
8 slices of prosciutto
Croutons (fresh! our grocery store has some really delicious ones made in house. please don’t buy those gross ones in the resealable bags. blech.)
balsamic vinegar, olive oil, salt, and pepper for finishing

Instructions

Poached eggs

Put a few inches of water in it plus a dash of vinegar (white distilled, because that was the only kind I had that seemed reasonable), and started heating it. The important thing (it would seem, from my research) is to have the water hot enough but not so hot that it’s boiling or even simmering. Got that? No bubbles breaking the surface. While your water is heating, break your egg into a small bowl or ramekin. It’s good to not break the egg directly into the water because it gives you a little more control.

When the water is hot enough, take a wooden spoon or spatula (I would advise a spatula… I liked it better for helping the egg along later) and stir it so that it creates a nice little whirlpool. Pour your egg gently into the middle of the whirlpool. It will look, for a moment, like you’ve done something horribly wrong and this will never work and you’ll be asking yourself why you even tried in the first place. But just wait! After the egg has been in the water for about 30 seconds or so, you can start to help it along by nudging it with your spatula, pushing the bits together. After a minute or so, you may notice that your egg has stuck to the bottom of your pan. Gently slide your spatula underneath it to get it unstuck. I also liked to roll my egg over because the bottom of the pot is hotter (duh) and it helped it to cook a little more evenly. Now, after about 3-5 minutes, you should be done! Remove the egg with a slotted spoon and put it in one of 3 places: 1) an ice bath, and then reheat it in the pot of water when you’re ready to serve (Thomas Keller). 2) on a paper towel to dry a little bit (Smitten Kitchen). 3) If you are out of paper towels and don’t feel like preparing an ice bath and then reheating your eggs, a lint-free dishtowel (me).

Fall Salad

Preheat your oven to 375 degrees. Trim your asparagus, put on a baking sheet, and toss with olive oil and salt. Put it in the oven for about 20 minutes, or until the asparagus is cooked to your liking (some people like it crunchy, some people like it soft). Note: Thomas Keller wanted us to grill our asparagus, but we don’t have a grill. Roasting it is a wonderful and winter-friendly alternative.

On a plate, arrange your asparagus, eggs, prosciutto, and croutons. Season to taste with salt and pepper and drizzle with oil and vinegar.

This meal was delicious and light. I can see it being lovely for a summer dinner party. It’s fairly easy too, once you get the whole egg poaching thing down (I’m still working on that part). Enjoy!

Mexican Bowls

Mexican Bowls

Mexican Bowls
Mexican Bowls

Mexican Bowls

The other night, dinner rolled around, and I was feeling incredibly lazy. Nothing that I could think of eating actually sounded good to me, so I put Jonah in charge. There’s a restaurant here in Portland called Por Que Non that has really good Mexican food. They have this dish called a Bryan’s Bowl that is just a bowl of delicious rice and beans and meat and cheese and guacamole and salsa and everything you could ever want in a little bowl. It’s incredibly good. So Jonah suggested making something like the Bryan’s Bowl, and I was not particularly optimistic, because usually when restaurants have something like that they have some secret delicious sauce they pour over it to make it so freaking good. And we didn’t. But…oh well. So he searched something or other on the internet and found this recipe for Cilantro Lime Rice to use as the base for our Mexican bowls. And man oh man, it made all the difference.

Mexican Rice Bowls

Ingredients

Cilantro Lime Rice

1 cup uncooked white rice
1 teaspoon butter
2 cloves garlic, minced
2 tsp plus 1 Tbl lime juice, freshly squeezed is highly preferred
1 15-oz can vegetable or chicken broth
1 cup water
2 tsp granulated sugar
4 Tbl fresh chopped cilantro

Mexican Rice Bowl

Cilantro Lime Rice
Black Beans
Chopped Red Onion
Chopped tomato (or salsa)
Chopped avocado (or guacamole)
Sour Cream
Hot sauce
Lime wedges
Chopped cilantro
Tortilla chips

Instructions

Cilantro Lime Rice

Let’s start with the rice. Put the rice, butter, garlic, 2 tsp of lime juice, broth, and water in a pan. Bring the contents to a boil, reduce the heat to low, and cover and cook the rice until it’s tender (about 15-20 minutes). While the rice is cooking, mix the leftover Tbl of lime juice with the sugar and cilantro. When the rice is done, remove it from the heat and stir in the cilantro/lime mixture.

Mexican Rice Bowl

While the rice is cooking you can also prep the rest of your ingredients for your bowl. We drained the beans and just heated them in the microwave, chopped the onions, and got out the salsa, guacamole, sour cream, cholula, and some tortilla chips.

Now it’s time to assemble your bowl. I did mine kind of like you would if it were the filling of a burrito, making even layers of all the ingredients I wanted. I also used my bowl as kind of a layered dip and ate it with tortilla chips for an added bit of crunch. Oh man. I may not have been in the mood for this meal at the beginning of the evening, but it really hit the spot! Enjoy!

Chicken Pot Pie

Chicken Pot Pie

Chicken Pot Pie
Chicken Pot Pie

Chicken Pot Pie

I will tell you that while I write this, we are at Jonah’s office recording a cover of The Counting Crows’ “St. Robinson in his Cadillac Dream.” I discovered today that the band is holding a cover contest and if you place in the top three you win 1) a signed guitar, 2) $600 to Guitar Center, and 3) a spot on an EP that they’re distributing to fans, etc. By the time this is published, we will be long finished, but for now, we’re working away. We discovered the contest about 24 hours before the deadline, so we’ve recruited our singer/musician friend Jon to help us create an a cappella infused cover. It’s currently just after 1 am, and one of us (me or Jonah) has to wake up at quarter to 7 tomorrow morning to drive the kids to school, and then we both have to go on our couch-to-5k run… We may have bitten off more than we can chew, but by golly we’re gonna get something in for this contest!

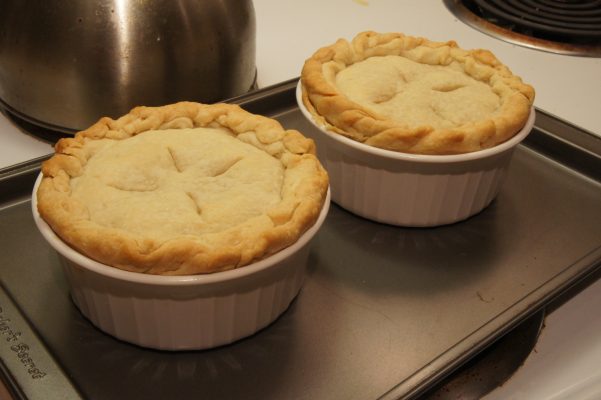
Now onto the food. Yesterday I wanted to make dinner. I wanted to make a dinner that was delicious and wintery, not too difficult, but a little bit impressive. After browsing a few recipes, I settled on Chicken Pot Pie. Relatively easy, but impressive because, you know, it’s a pie. I didn’t use a particular recipe, and also instead of making it in a pie dish, I made it in two little ramekins, so Jonah and I each had our own little servings. Which was cute. So I’m gonna give you the measurements I used, but I suggest doubling it if you’re looking to feed more than 2 people (though we did have leftovers).

Chicken Pot Pie

Makes 2 personal pies

Ingredients

Pie Dough

2 cups flour
1 tsp salt
1/2 cup cold butter
1/2 cup cold shortening
3-5 Tbl of ice water

Chicken Filling

1 boneless skinless chicken breast
1 cup chicken broth
2 tsp vegetable oil
1 small onion, chopped fine
2 carrots, peeled and sliced 1/4 inch thick
2 stalks of celery, washed and sliced 1/4 inch thick
salt and pepper
2 Tbl butter
1/4 cup all-purpose flour
3/4 cup milk
1/2 tsp dried thyme
1/2 cup frozen peas, thawed

Instructions

Pie Dough

Start by making the pie dough, which you can find a recipe for here.

Chicken Filling

Start by putting the chicken and broth in a saucepan and bringing it to a nice simmer. Cook it until the chicken is tender and cooked through. Transfer the chicken to a mixing bowl, and strain the broth into a measuring cup or some other vessel. Don’t bother washing the pot, you’ll reuse it a bunch of times. Heat your oven to 400 degrees.

Heat the oil in the pot and when it’s nice and hot add the onion, carrots, celery, and about 1/8 tsp each of salt and pepper. Cook the veggies till they’re mostly softened (covering them while they cook helps with this by adding some steam). While the veggies cook, take a couple forks or a fork and knife and shred the chicken into bite-size pieces. When the vegetables are done cooking, add them to the bowl with the chicken.

Remove your pie dough from the fridge so it can start warming up. In that same dang pot, melt the butter over medium heat. Then add the flour and stir it up. You’ll have some clumps, but don’t worry about it. After cooking your clumps for a little bit, throw in most of the reserved chicken broth (I probably did about half of it, maybe 3/4), the milk, and the thyme. Whisk it up so the clumps dissolve, and cook it until the sauce thickens. Remove from the heat, and stir in the chicken/veggie mixture, the peas, and season it with salt and pepper to taste.

Now you can roll out your dough. Because we were doing the little ramekins, I split each disc of pie two in two and rolled each half out, laying it gently in the dish and making sure there were no pockets of air in the sides or bottom. Once both had their bottom crust in, I split the filling between the two dishes. Then roll out the second disc (again split in two) and cover the pies, trim the excess dough, and form an edge. Put the ramekins on a baking sheet (foil lined if you so wish), and put them in the oven for 30 minutes, or until the crust is golden brown.

Allow them to cool for at least 10 minutes before digging in and enjoying!

Korean Marinated Beef

Korean Marinated Beef

Korean Marinated Beef

This Korean marinated beef was the second part of our asian dinner the other night. I found this recipe in our Gourmet Today cookbook, which is wonderful. This recipe was crazy good and super quick. The meat was nice and tender and perfectly cooked and the marinade caramelized nicely in the pan. You’re supposed to serve the beef in a lettuce cup with kimchi and rice, but we just served it over rice alongside the Japanese cucumber salad seen in the previous post. Here’s what you’ll need:

Korean Marinated Beef

Ingredients

1/4 cup soy sauce
1 Tbl sugar
2 tsp Asian sesame oil
1 bunch of scallions, minced, with the white and green parts separated
1 Tbl minced garlic
1 Tbl minced peel fresh ginger
3 Tbl sesame seeds, toasted
1 lb flank steak (we did about 3/4 of a pound, just because the cut of meat is a little expensive and the recipe serves 4 people), cut across the grain into very thin slices (the recipe says no more than 1/8 inch thick, but I was like, hell no, so I just sliced it as thin as I could)
1 Tbl vegetable oil for cooking

Instructions

In a medium sized mixing bowl, stir together the soy sauce, sugar, sesame oil, the whites of the scallions, the garlic, ginger, and 2 Tbl of the sesame seeds. Whisk this up until the sugar is dissolved. Now add the steak, toss it around to make sure it’s evenly coated, and let it marinate for 15 minutes.

After that 15 minute wait, heat the oil in a pan over high heat. You definitely want the oil to be shimmering, if not smoking. Now add the steak in one layer and cook (ours took 2 batches), turning halfway through. If your heat is high enough, it’ll only take about 4-5 minutes for your meat to be cooked through and even get a nice sear/caramelization from the marinade. When the meat is just cooked through – don’t cook it too long or it will lose some of it’s tenderness – transfer to a plate, sprinkle with the rest of the sesame seeds and the scallion greens. Serve with rice and Japanese cucumber salad (see previous post). Enjoy!

Eggplant with Buttermilk Sauce

Pomegranate seeds for the Eggplant with buttermilk sauce

Eggplant with buttermilk sauce

Eggplant with buttermilk sauce

The posting of the recipe is long overdue, as I made this dish quite a while ago.  So I may not remember the exact details of everything I did to make this – but here goes.  Have I told you about the unprecedented influx of cookbooks in Annie and I’s apartment?  I went from owning exactly zero cookbooks before Christmas and my birthday this year (Jan 6) to having 4.  That’s a 400% increase in cookbooks within the span of a month!  Anyway, Annie’s mom got me this great cookbook called Plenty, that has some fantastically new and different recipes. This is one of them.

A picture of this eggplant with buttermilk sauce recipe is on the cover of the Plenty cookbook, so I decided to make it.  It looked like nothing I had ever tasted before, and that’s what it ended up tasting like!

Eggplant with Buttermilk Sauce

Ingredients

2 eggplants
1/2 cup olive oil
4-6 thyme sprigs
salt and pepper
1 pomegranate (this is the fun part)
For the sauce:
9 Tbs buttermilk
1/2 cup Greek yogurt
1.5 Tbs olive oil
1 small garlic clove, finely chopped
pinch of salt

Instructions

Preheat the oven to 400 degrees. Cut the eggplants in half lengthwise (see photo below). Now cut some lengthwise incisions on each half, but not all the way through to the skin. This is just to let the oil and juices get around. Make some more diagonal incisions (I sort of did this like you would cut an avocado before you scoop the flesh out).

Place the eggplant halves on a baking sheet, and brush them with the 1/2 cup olive oil until it’s all used up.  Sprinkle with some thyme leaves and salt and pepper.  Roast for 45 minutes, when the eggplant flesh should be soft and browned.

While the eggplant is roasting away, let’s do something fun. To get all the seeds out without digging through the fruit like a raccoon, start by cutting the pomegranate in half.  Hold one half over a bowl with the flesh side facing down into your hand (watch out, your fingers are about to get juicy). Use the back of a wooden spoon and start whacking the back of the pomegranate gently, and then with increased force, until the seeds start to fall out into the bowl.  Don’t lose faith if seeds don’t start raining down right away: it takes a minute for them to start getting loose. It helps to flip the pomegranate half over once in a while to gently pull the membranes apart and pick them out. Do the same thing with the other half.

Make the sauce by whisking all of the sauce ingredients together in a small bowl.  I used Greek yogurt that was honey-flavored, which may have been a mistake.

When the eggplant halves are done, serve by spooning plenty of the sauce over the halves.  Sprinkle your expertly-harvested pomegranate seeds on top and garnish with some more thyme and drizzle with a bit of olive oil.

The taste was amazing – a combination of things I have never tasted in combination before!

Pizza Dough (and the pizza to go with it)

Pizza Dough

Pizza Dough

It’s been a rough week (and it’s only Thursday). So what do I do when I’m feeling down? I bake. Come on people, at this point you should know this about me. But with not a ton of time yesterday and not a ton of energy, I didn’t feel up to making some fancy bread, and Jonah and I are trying to cut down on sweets, so no cookies. What’s a baking girl to do?

Pizza dough. Not quite bread, but bread like, and can actually be put to use for dinner. So I ran with it. After finding many recipes online, I started up. The recipe calls for all-purpose flour, but I only had bread flour (Jonah bought me a giant bag, so for the time being I’m using it in the place of any all-purpose flour in recipes, which may or may not be altering things). We’ve bought pizza dough at our local grocery store (New Seasons) and it tends to be kind of halfway between thin crust and a puffier crust. The crust I made was definitely a little more on the doughy/puffy side.

Pizza Dough

Makes 1 full pan pizza dough

Ingredients

3 cups flour
2 teaspoon salt
1 1/2 teaspoon active dry yeast
1 cup lukewarm water (may want to add another 1 or 2 tablespoons)
2 tablespoons olive oil

Instructions

I used an electric mixer to combine the ingredients, but did the kneading by hand. Don’t ask me why, I just felt like it. So, in the bowl of the mixer, combine flour, salt, and yeast. Add the water and olive oil and stir until the dough comes together. Lightly flour a surface (kitchen counters work well) and dump the dough out onto it. Knead the dough for a couple minutes into a nice tidy ball. At this point my dough felt super lumpy, more-so than any other dough I’ve made this far, so I started to worry that this whole thing was going to be a failure. But I kept going because otherwise it would’ve been a waste of time and ingredients. What the hell.

Lightly oil the bowl from the mixer (or any bowl, really, just thought I’d save you a dish), put your ball of dough in and turn it so the whole thing is coated in oil. Cover the bowl with plastic wrap and leave for 1-2 hours, or until it has doubled in size.

After rising, dump the dough back onto the floured surface, punch the air out of it (a great way to take out some aggression, kind of like punching a pillow or pounding chicken), fold it back into a ball, and put it back under the plastic wrap for about 20 minutes. When I hit this point, we still had a couple hours till dinner, so I stuck the dough back in the bowl, covered it, and threw it in the fridge.

When you’re ready to make your pizza, preheat your oven to 475 degrees (or higher), sprinkle a baking sheet (or pizza stone, if you’re one of those people) with cornmeal, and roll/stretch out your dough on the sheet. This was a little tricky for us, as our dough did not want to be stretched. But I let Jonah beat it up a little and eventually it stayed. We covered our pizza with tomato sauce, italian mix cheese, caramelized onions (you know, that obsession I’ve been having lately), and fresh mozzarella. We baked our pizza for about 15 minutes, though it probably could’ve used a couple more. We were getting hungry. Just look for a little puffing up and some golden brown edges. After removing it from the oven, we sprinkled a little fresh basil on top, sliced it up, and ate it. Delicious.

Panko Chicken Tenders with Aioli

Panko Chicken TendersPanko Chicken Tenders

Pinterest is kind of a dangerous place. It’s great because there are tons of recipes, DIYs, fashion tips, art, etc. It’s less great because it’s hard to tell which ones, among hundreds of recipes, are good. There are like 500 recipes for muffins… how do I know which one will taste good? So it can be a little bit of a crap shoot when you decide to actually make a recipe you found on Pinterest.

But that’s what I did. I actually found the blog Love and Olive Oil because of a Meyer Lemon and Olive Oil chiffon cake that was going around Pinterest like wildfire. So I clicked. But I found a whole bunch of other lovely looking recipes, including one for Baked Panko Chicken Tenders with Aioli. Sounds delicious to me, and even more so when you actually read the ingredients. We replaced the garlic powder for fresh garlic.

This dinner was wonderfully simple and tasted so good. Both the chicken and aioli had a nice bite to them (but not too spicy, mind you) because of the cayenne, paprika, and garlic. Enjoy!

Panko Chicken Tenders with Aioli

Ingredients

Panko Chicken Tenders

1 1/2 lbs boneless skinless chicken breasts
1 1/2 cups panko breadcrumbs
2 teaspoons dried basil
2 teaspoons garlic, minced
1 teaspoon smoked paprika
1/2 teaspoon cayenne
1/2 teaspoon salt
1/2 teaspoon pepper
2 eggs
1/2 cup flour
oil

Aioli

1/2 cup mayonnaise
2 teaspoons red wine vinegar
1 teaspoon garlic, minced
1/2 teaspoon dried basil
a squeeze of lemon juice
salt and pepper, to taste

Instructions

Panko Chicken Tenders

Preheat your oven to 350 degrees. Oil a baking sheet and set aside. In a shallow bowl, combine the flour with a little pinch of salt and pepper. In another shallow bowl, beat the eggs. In a third shallow bowl, mix the panko with the basil, garlic, paprika, cayenne, salt and pepper.

Now for the thinning of the chicken. Put your chicken between 2 layers of plastic wrap or just put it on a cutting board and cover it in the paper it came in from the grocery store. Pound it with either a meat pounder (is that what those things are actually called?) or a rolling pin. You want them to be about 1/2 an inch thick. Slice it into strips.

Now, coat each chicken strip, one at a time, in the flour mixture (shaking off any excess flour), then dip in the egg, and then the panko mixture. Arrange the chicken strips on the oiled baking sheet, and put them in the oven for 12-15 minutes, flipping halfway through. You want the breadcrumb coating to be nicely golden brown.

Aioli

Combine all the ingredients in a bowl and stir, and then season to taste with salt and pepper. Not so hard, right?

The Best Grilled Cheese

Grilled Cheese

Caramelized Onions for Grilled Cheese
Grilled Cheese assembly

When I was little, I called grilled cheese sandwiches “girl cheese” sandwiches. Makes sense, right? Boys had cooties and therefore shouldn’t be allowed to eat something as crispy and buttery with perfectly melted cheese. I thought it made perfect sense.

Last summer, my friend Corey worked at a food cart here in Portland called the Grilled Cheese Grill. If you haven’t heard of it, they have these really wonderful, creative, goofy grilled cheese sandwiches. My personal favorite is the jalapeno popper: roasted jalapenos, colby jack, cream cheese, and tortilla chips on sourdough.

Sometimes, when lunchtime rolls around in our apartment, I go hunting through our cabinets and fridge shelves and I am just so uninspired. But the other day, that was not the case. We had a fresh loaf of sourdough bread from New Seasons (usually we get whole wheat, but when I have my way, sourdough it is), and all I wanted was a grilled cheese. But I wanted to make it interesting, and the other thing I had been craving? Caramelized onions.

When I told Jonah of this amazing sandwich, he got jealous and made himself one for lunch the next day. The fever is catching…

Grilled Cheese with Caramelized Onions

Makes one sandwich

Ingredients

Two slices of bread (preferably sourdough)
Cheddar cheese, sliced into thin pieces (we buy Tillamook sharp cheddar)
Parmesan cheese, sliced into thin pieces
1 small onion, thinly sliced
1/4-1/2 tsp brown sugar
Salt

Instructions

The first step is to caramelize the onions. Throw your onion slices in a pan over medium-low heat. Cover and let them soften for a few minutes, then sprinkle the brown sugar and a pinch of salt over them and stir to coat evenly. Cover and cook, stirring occasionally, allowing the onions to brown and soften all the way. After the onions are softened turn the heat up to medium-high and let them cook for another couple minutes, stirring. This will give them a nice sear on the edges.

While your onions are softening, butter the outsides of your sandwich bread (the side that will hit the pan). Thinly slice the cheddar cheese and put it on BOTH sides of the bread. This is key. Nothing is worse than making a grilled cheese with stuff other than cheese on it and then having the bread slide around because there’s no cheese sticking it in place. I’m serious. I put slices of parmesan on just one side so there wasn’t too much of it: parm is a strong cheese and you don’t want it to overpower anything.

When your onions are ready, lay them on the bed of cheese you have created for them. Put the two sides of the sandwich together, and throw it in the pan over medium heat. Cover it while it cooks (this makes the cheese melt quicker so that you don’t have to burn the bread while you’re waiting for the melting to occur). When the bread is golden brown, flip, and cook until the other side is golden brown too. Put on a plate, cut down the middle, and serve, warm and gooey and cheesy. Enjoy!

Whole Roasted Chicken with Veggies

Whole Roasted Chicken with Veggies

Whole Roasted Chicken with Veggies

You may have noticed that roasted chicken was one of our previous blog posts, but this time its different.  There’s a couple different veggies, but the biggest difference is that I roasted an entire chicken!  I was excited and a little scared to do this.  I’ve seen my mom take apart a chicken many times – but for the most part Annie and I buy chicken parts as we need them; thighs and breasts mostly.

I bought a whole free-range fryer chicken at the store, after learning that the only differences between the fryer and roaster birds are their size – in other words, you can roast a fryer or fry a roaster.  For the most part, I followed a recipe from Thomas Keller’s Ad Hoc cookbook, although I tragically left out onions.  You can use any combination of root vegetables you want – I used leeks, carrots and potatoes.  The best thing about the Ad Hoc cookbook is that it has some great How-To’s with pictures for cutting and trussing a chicken.  For this recipe, I learned how to truss (tie up) a chicken!  Here’s a video of Thomas Keller himself trussing one up, although he does it in a more fancy way in this video than shows in the book.

We ate this last night for dinner, its a great winter-time meal-in-a-dish, and it makes lots of leftovers!

Whole Roasted Chicken with Root Vegetables

Ingredients

1 small whole chicken (smaller the tastier, mine was 4 lbs.)
2 leeks
3-4 carrots
8 golf-ball sized potatoes
1/4 cup oil (canola, olive)
6 garlic gloves, crushed and peeled
6 thyme sprigs
Herb butter (we used leftover herb butter we had from the salmon)
salt and pepper

Instructions

Let the chicken sit out for 1-2 hours to come to room temperature.  Remove anything that’s still in the cavity (neck, heart, etc) and season the cavity with salt and pepper, 3 of the garlic gloves, and 3 thyme sprigs.  Cut out the wishbone for better carving later (good luck, I completely failed at this.  Look up some videos online).  Truss the chicken.

Preheat the oven to 475 degrees. Cut the green tops of the leeks and trim the root end.  Slice them in half lengthwise and wash.  Cut the potatoes in half.  Cut the carrots in half lengthwise and cut into smaller sticks.  Combine all the root vegetables in a large mixing bowl with the remaining 3 garlic gloves and remaining 3 thyme sprigs, plus the oil and season with salt + pepper.

Lay out the veggies in a large baking dish, making a nest in the middle in which to nestle the chicken.  Place the trussed chicken in the bed of veggies, and rub/pour the herb butter on top of the chicken.

Bake for 25 minutes, then turn the heat down to 400 and bake for another 45 minutes. The internal temp of the bird should reach 160 degrees when its done…I had to put it in a bit longer.