Season

Rice Cakes (using rice gone wrong)

Rice Cakes
Rice Cakes

Rice Cakes

Sometimes you’re in the kitchen and you have a lot going on and you miss something going wrong. Maybe you accidentally over-salt your pasta or you burn your veggies. There’s a whole (albeit little) chapter in Tamar Adler’s book all about how to save your mistakes. For example, turn those burned veggies into a smoky veggie salad. Or take that over-salted pasta, mix it with some herbs and butter, and make a frittata. The possibilities are endless.

A while ago, Jonah and I made these rice bowls. We doubled the rice recipe, and I must’ve done some math wrong and put in way too much liquid. So, while the rice tasted good, it was definitely a little mushy. After sitting in the fridge sadly for a week, I was thinking of using it to make rice cakes. Jonah reminded me about the “Further Fixes” chapter in An Everlasting Meal, so to the book I went. It kind of told me what I was already thinking of doing, so on I went.
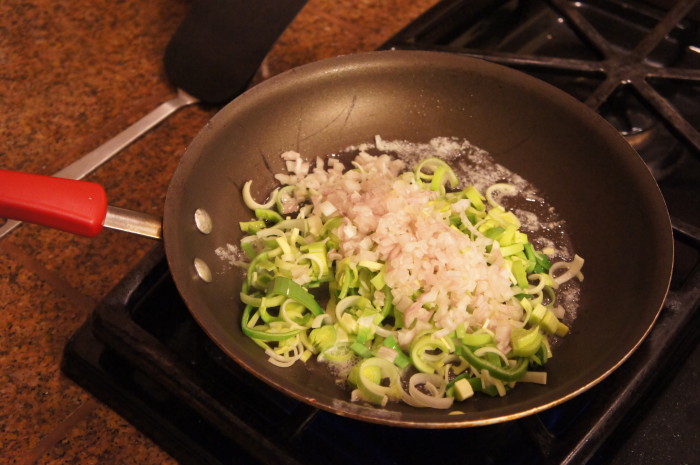
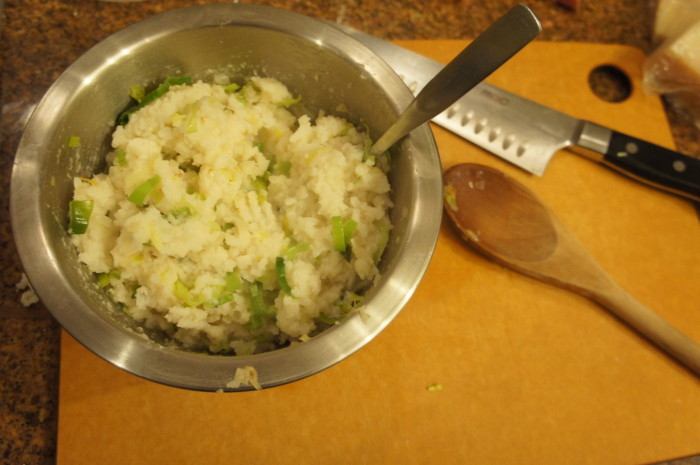
Rice Cakes

Ingredients

roughly 3 cups of overcooked rice
1 large shallot, finely chopped
1/2 leek (if I’d had a whole one, I’d have used it), thinly sliced
salt, pepper
garlic powder
parmesan cheese
olive oil for cooking

Instructions

I heated up the rice in the microwave, drizzling it with water to kind of re-steam it. If your rice won’t stick together (perhaps it’s not quite as mushy as mine was), feel free to stir an egg into the mix. Stir together the rice, shallot, and leek, and add any seasoning you like. I added a few shakes of garlic powder, probably 1/2-1 tsp salt, and probably 1/4 cup grated parmesan. But none of this has to be exact. Put a bunch of stuff you like in there. I bet chopped sage would’ve been good, as would onion and garlic.

Heat some olive oil in a nonstick pan over medium heat, form the rice mixture into patties, and cook on each side until golden brown, roughly 3-5 minutes. Add more oil as you need it. You want them to have a nice crispiness on the outside to add some texture.

We ate them alongside some delicious panko-crusted tilapia and roasted broccoli. They would make a great appetizer for a fancier dinner. Also, they would make a delicious breakfast had I put a fried egg on top. Or melted a slice of cheddar. With some breakfast sausage on the side. See, there are so many uses for botched food! Now go mess up some rice.

Rhubarb Thyme Hand Pies

Rhubarb Thyme Hand Pies

Rhubarb Thyme Hand Pies

It’s early spring. Do you know what that means? It means rhubarb. Yep. I couldn’t be more excited. Jonah and I went to the farmer’s market and I picked up about two pounds of the it and I decided to make Rhubarb Thyme Hand Pies. Now, I have only made hand pies once before, and they were delicious. I followed a recipe from the Dahlia Bakery cookbook, so the dough was specifically for hand pies, as was the filling. But I didn’t really have a recipe for these, so I decided to wing it.

Part of my concern with kind of winging it was that the dough would be too delicate and flaky to hold up as a handpie. Second, I worried that the filling, being mostly rhubarb which falls apart as soon as it’s cooked, would be too liquidy, not enough solid. So I did a little research, and while I wasn’t completely happy, it was certainly a first step. I think I made the pies a bit too big. I didn’t really want to do the 3.5 inch circular cookie cutter route (cutout two circles, run milk around the edge of the bottom one, fill inside the milk edge with filling, put another circle on top and seal the edges), so instead I divided my dough into 8 pieces and rolled each one out until it was about 1/4 inch thick. I like the way these are shaped better, a little more rustic seeming, but I do think that they might’ve held up better if I had gone the cookie cutter route. The dough was, as I was concerned about, a little too delicate and started to crumble when you picked it up. And I certainly could’ve put more filling in each pie (the leftover filling is in a tupperware at home, and I’m looking forward to stirring it in with some Greek yogurt for a snack later).

All that being said, they were definitely tasty, and I would recommend them! But hopefully I’ll be trying another batch here soon with a few changes. I’ll let you know how it goes.

Rhubarb Thyme Hand Pies

Ingredients

Pie Crust

2 cups flour
1 cup butter (2 sticks), cold, cut into cubes
1 tsp salt
up to 1/4 cup water

Rhubarb Filling

4 cups rhubarb, in a half inch dice
3/4 cup sugar
1/2 – 1 tsp fresh thyme
Milk for sealing

Instructions

Pie Crust

In a mixer or a food processor, combine the flour, butter, and salt. If the dough is not coming together, add water, 2 Tbl at a time, until it does. Form dough into two discs, wrap in saran wrap, and refrigerate for at least 1 hour.

Rhubarb Filling

While the dough is refrigerating, put cubed rhubarb, sugar, and thyme into a small saucepan. Over medium heat, cook the rhubarb until it breaks down and simmers for a couple minutes. Allow the filling to cool while the dough finishes up in the fridge.

Preheat your oven to 375 degrees. Divide each disc into 6 even pieces (I only did 4 and the hand pies were too big, in my opinion). On a floured surface, roll each piece of dough into as circular a shape as you can. You’re going to be folding them in half, so even if they’re not so round, symmetrically misshapen is best. Line a baking sheet with parchment paper, and assemble the pies on the baking sheet. What does assembling them entail? Well, dunk your fingers in milk and wet the edge of your circle of dough. Fill half of that circle, inside the milk line, with the rhubarb filling, and fold the opposite side of dough over the filling. Press around the edges, allowing the milk to seal the two sides of the dough together. With a fork, press around the edges, and use a knife to cut three little slits in the top for steam (this way the pies are less likely to explode). I was able to fit 4 on a pan, but because yours will probably be smaller, you may be able to fit 6. Bake for 20-35 minutes or until the dough looks cooked and the edges are golden brown. Allow to cool for about an hour before digging in.

Chicken Liver Pâté

Chicken Liver Pâté

Chicken Liver Pâté

Chicken Liver Pâté
Chicken Liver Pâté

Recently I have discovered my love of liver in pâté form. When I was younger and my parents would eat liver, I would screw up my face and impolitely decline a taste. Now I wonder why I was so against the stuff. It’s rich and creamy and makes a delicious spread for a snack or appetizer.

After seeing a recipe in An Everlasting Meal for chicken liver pâté, I had been wanting to try it. But, like anything I’ve never cooked before, I was a little nervous about it. I didn’t know if it could go wrong, and if it could, how badly. I had been checking the meat counter at my grocery store for a few weeks and hadn’t seen any chicken livers until one day, there they were, slimy and maroon, in all their glory. So I grabbed a pound of them. How much did a pound of chicken livers cost me? $2.73. This stuff is cheap AND delicious? I’m so in.

I got home, pulled out my book, and started cooking.

Chicken Liver Pâté

Ingredients

1 lb chicken livers
salt and pepper
roughly 12 Tbl butter (1 1/2 sticks)
2 Tbl white wine (sherry, bourbon, scotch, cognac, or brandy will also do)
1 shallot, finely chopped
1/2 leek, finely sliced
1 small clove garlic, minced
2 Tbl water
a pinch of cloves
a pinch of cinnamon
1/8 bay leaf, crumbled
1/4 cup fresh thyme leaves, chopped (I didn’t do quite a quarter of a cup)

Instructions

Trim any connective membrane type stuff from the livers and season them with some salt and pepper. Melt 1 Tbl of butter in a nonstick pan. When it’s starting to sizzle, add a batch of livers (depending on how big your pan is, you’ll need to cook the livers in 2-3 batches). Don’t crowd them in the pan; leave some space around each liver. Let each liver brown on one side, then flip and brown on the other side. Put the livers on a plate or in a shallow bowl – they will release some juices. Add 1 Tbl of wine to the pan and scrape the brown bits from the pan. Pour the wine over the cooked livers. Add more butter to the pan, and cook the rest of the livers as you did above, skipping the wine step.

After you’ve cooked all the livers, add the shallot, leek, and garlic to the pan with the remaining 1 Tbl of wine and 2 Tbl of water. This will help the veggies become tender. Cook the veggies over medium heat until they’re tender.

When the veggies are done, add them, the livers and their juice, the cinnamon, clove, thyme, and bay leave to the blender. Don’t blend yet! Cube one stick of butter and add the cubes to the blender too. Blend it up and taste. Season as you see fit (I found myself adding more salt…). When it’s seasoned to your liking, put the pâté in a bowl and allow to cool for 30 minutes before serving. It may seem liquidy, but it will solidify as it cools. If you’ve got leftovers (like we did), melt some butter and spread it over the top of the pate, and allow to cool. You can store it like this (according to Adler) for up to 2 weeks.

We liked our pate with crostini and herbed goat cheese, or nut thins and various cheeses from our grocery store’s scrap bin as well as one from the PSU Farmers Market.

Beet Tart

beet tart

OK people – I know we read a lot of food books and talk about them all the time, but if there is ONE book you are going to read from our suggestions, let it be An Everlasting Meal by Tamar Adler.  It is amazing book that changed my life, and is sure to make you think and act differently around food.  If you have not read it yet, go read our blog post on her book, and then continue below.

This beet tart is a perfect example of Tamar’s philosophy and grace: if you attacked this beet tart recipe from start to finish in one cooking session alone – it would take most of your day; first you would have to roast the beets (which takes a long time anyway), then make tart dough and chill it for an hour, then bake the tart dough, then put together the filling, bake some more, add the sliced beets, and bake once again.  Sounds daunting! I would never have done this recipe if it wasn’t spread out over many days and incorporated in the general meal preparations for the week.  However, the manner in which it was made made it feel like I was just throwing leftovers together in a very creative way, rather than a labor intensive ordeal.

Here’s what happened: A few days before, Annie and I roasted a whole bunch of veggies for dinner (or was it lunch?).  We filled the whole oven and roasted lots of different veggies with olive oil and salt.  I fit the beets in a small pan with a 1/2 inch of water in the bottom, covered them with foil, and let them roast for a long time (probably too long, I may have forgotten about them).  We ate the other roasted veggies as part of our dinner that night, but we had no intention of eating the beets that day, so we didn’t have to wait around for them to roast.  We let them cool and then peeled them and put them in the fridge before bed.  Now we had roasted beets peeled beets in the fridge.  We had no plan but we had ideas: beet salad, beet pasta, or beet anything; they were simply a nice starting point.

A few days before roasting the veggies, we had made a different veggie tart using the Olive Oil Tart dough recipe that can be found in Tamar’s book, so we had some leftover in the fridge.  A few days later, I looked in the fridge and saw that a perfect storm had brewed for a beet tart.  There, sitting in the fridge waiting to be used, were roasted peeled beets, tart dough, and some leftover ricotta cheese.

If you want to make this recipe from start to finish, more power to you.  However, I would suggest at least making the tart dough a day ahead, and then looking through your fridge to find any vegetables that would work, roast them, and put them on top of the tart in place of beets.

Beet Tart

Note: You’ll want to roast your beets or other vegetables before you make the tart dough.

Ingredients

Olive Oil Tart Dough

2 1/2 cups all-purpose flour
1/3 cup olive oil
1/2 cup ice water
1 teaspoon salt

Beet Tart Filling

1 1/2 cups ricotta (fresh)
1/4 cup olive oil
2 Tb. cream (I think I just used leftover creme fraiche)
1/2 t. salt
2 egg yolks
a pinch of fresh thym or rosemary

Instructions

Olive Oil Tart Dough

Mix all ingredients together in a bowl. If its too dry, add more water, a tablespoon at a time. Divide the dough in half and roll into balls, then put them in the fridge to chill.

Take out one dough ball (you get to save the rest for another day!) and roll it out on a floured counter until its about 1/4 inch thick. Heat the oven to 400 degrees.  Grease the bottom of a 9-inch pie pan and dust with a bit of flour. Lay the crust in the pan and trim the edges. Prick the bottom a few times (this dissuades bubbles from appearing in your tart dough). Cover the crust in aluminum foil and put some dried beans or pie weights in to fill the tart and hold down the dough. Bake for 20 minutes.

Beet Tart Filling

Whisk together filling ingredients. Pour into the pre-baked tart dough (remember to take out the dried beans and aluminum foil!) and bake at 400 degrees for 15 minutes.  Now lay your beet slices (I cut mine into half-moons) on top of the ricotta filling in a single layer and bake for another 10 minutes.  Let it cool and eat at room temperature.

It is very filling and great for lunch the next day and many days after!