Recipes

Revisiting Pie Dough

Pie Dough
Pie Dough
Pie Dough
Pie Dough
Pie Dough
Pie Dough

I know I’ve already posted my pie dough recipe, but I recently made another batch and took more pictures. I thought this might be helpful for first-timers so they have a better idea of what each stage looks like. Hopefully this is helpful!

Pie Dough

Ingredients

2 cups flour
1 tsp salt
1/2 cup shortening (I like to use vegetable, Crisco)
1/2 cup (1 stick) butter
3-5 Tbl ice water

Instructions

In a food processor, combine flour and salt. Then add shortening all at once, but in pieces, pulse. Do the same with the butter (cut it into pieces, add, and pulse). After pulsing in the butter and shortening, your mixture should have the appearance of rough sand. Drizzle the ice water, 2 tablespoons at a time, over the mixture and pulse. Stop adding water when your dough comes together in the processor and looks something like this. Dump the dough out onto a floured surface.

Dump the dough onto a lightly floured surface and form it into a large ball. Cut it in half. The less you handle the dough in these next couple steps, the better. Less handling means more flakiness. Gently form each chunk of dough into a disc, about 1 inch thick (roughly, it doesn’t really matter). Wrap the discs in saran wrap (or wax paper) and refrigerate for at least 30 minutes.

After the dough has been refrigerated, you can remove it and roll it out. Like I said before, I like to roll it out on the saran wrap it was wrapped in so that I can use that to help flip it into the pie dish. As you can see, this recipe makes enough dough for one covered pie or two uncovered pies. Enjoy!

Seared Sea Scallops with Carrot-Marjoram Sauce

Seared Sea Scallops with Carrot-Marjoram Sauce

Seared Sea Scallops with Carrot-Marjoram Sauce

Seared Sea Scallops with Carrot-Marjoram Sauce

When Jonah’s parents were in town, we had them over for dinner. My dad had sent me a recipe for these scallops with reduced carrot sauce that he made a couple times when I was younger. This is the recipe that made me discover scallops. I used to think scallops were gross, the texture was a little too slimy for me, so I never ever ate them. But this sauce was so good that I tried one of the scallops that was drenched in it, and now scallops are one of my favorite seafoods.

This recipe is from The Herbfarm Cookbook, which is a book my dad uses all the time. The Herbfarm is a restaurant in Woodinville, Washington (near where I grew up). I’ve never eaten there, partially because $$$$$$ and partially because you have to make reservations hella in advance. Anyway, if you’re in the market for a beautiful cookbook with lots of good recipes, here’s one to check out.

Seared Sea Scallops with Carrot-Marjoram Sauce

Serves 4 people

Ingredients

2 cups fresh carrot juice (one of those personal Odwalla bottles is usually 2 cups)
1/2 cup dry white wine or dry vermouth
3 Tbl freshly squeezed lemon juice
1 medium shallot, finely chopped (about 1/3 cup)
1/4 tsp salt
4 Tbl unsalted butter, room temperature, cut into 8 pieces
8 3-inch sprigs fresh marjoram, tied together with kitchen twine (if you can’t find marjoram, you can substitute fresh tarragon or fresh lemon thyme)
1 1/2 pounds large sea scallops (~12), untreated (dry-pack)
salt and pepper
2 Tbl vegetable or olive oil

Instructions

A warning before we start. This recipe is long. But it’s not really that hard, it just seems hard because there are a lot of steps. However, it is totally worth it because these scallops and this sauce are so delectable. I promise. Just try it. I’m going to type it out in the same steps as in the cookbook because it breaks it down into little pieces. Quite nice if you ask me.

Combine the carrot juice, 1/4 cup of the wine, the lemon juice, shallot, and salt in a medium saucepan. Bring to a boil over high heat, then reduce the heat just enough to maintain a steady boil. Cook the mixture until reduced to about 1/2 cup of liquid. The sauce should be thicker, about “the same consistency as pulpy orange juice.” This should take about 20-30 minutes. You can do this step ahead of time and stick the mixture in the fridge overnight.

Reduce the heat so the sauce is gently simmering and add the butter, one piece at a time. Whisk the butter in, and wait until each piece is melted and incorporated before adding another. Return the sauce to a simmer, whisking constantly. Add the bundle of marjoram, submerging it completely in the sauce, and remove the pan from heat. Set aside till you’re done cooking the scallops!

It’s time to sear the scallops. I’ll let you know that Jonah and I struggled a little bit with this step, mostly because we decided to try to use our cast iron skillet (the recipe says to use a heavy bottomed saute pan). We’ve had some trouble, despite reading about how to cook in a cast iron and clean and care for it, with things sticking to the pan, and can’t really figure out what we’re doing wrong. Anyway. The recipe also says to heat your oven to 175 and then turn it off and you can put the scallops in there to warm them, but our oven was otherwise occupied, so we just put them on a rack on a pan.

Pat the scallops dry and season them lightly with salt and pepper. Heat the oil in whatever pan you choose to use until it is very hot and smoking. Using tongs, carefully put the scallops flat side down in the pan. Let them cook without touching them for 2-3 minutes or until the side touching the pan is a deep golden brown. Then turn them and cook them another 1-2 minutes on the other side. When you turn them, you want to preferable put them in a different part of the pan, where there has not just been a scallop. When they’re done cooking, remove them from the pan and put them in the oven or on a rack or whatever you choose to do.

Reduce the heat to medium and add the other 1/4 cup of wine. Scrape up the little browned bits in the pan and add the liquid from the pan to the carrot juice.

Remove the marjoram bundle from the carrot sauce, squeeze it dry, and get rid of it. Reheat the sauce over medium heat, whisking in the oil/wine mixture from the scallop pan. Season to taste with salt and pepper if needed. If you want the sauce to be super smooth, you can put it through a fine sieve. I like the little scallop bits and shallots, so we skipped the straining. Now put the scallops on plates, dress them with the sauce, and enjoy!

Seared Sea Scallops with Carrot-Marjoram Sauce

Salmon rice bowl

Spicy-Miso Salmon and Citrus Rice Bowl

Salmon rice bowl
Miso Salmon
Miso Salmon

Miso Salmon

This meal all started because Annie gave me a wonderful Christmas present: The Sriracha Cookbook.  You’ve probably seen Sriracha at your local asian restaurant, and you may know it as “rooster sauce” – or if you don’t know it, its basically an asian hot sauce made with chiles and garlic and its ohhh so good.  And you need it for the recipe that follows.

So the Sriracha Cookbook, as one might expect, is chock full of recipes that include Sriracha in them.  I picked the Miso-Sriracha Glazed Salmon recipe for dinner, mostly because we already had miso paste and Sriracha in our house.  The recipe in the book tells you to serve it atop steamed rice, but I wanted to do something more interesting, so I found a great recipe on Martha Stewart.com that I adapted to include the miso-Sriracha salmon.  Its a wonderful rice bowl that includes salmon, orange slices, and sugar snap peas atop some brown rice with a great orange sauce and mint to sprinkle on top of it all.  It tasted so light and substantial at the same time, and was a wonderful meal in a bowl!

A note on the rice: I actually used a rice called Camargue Red Rice, which Annie’s mom brought us from the south of France, where it grows.  The package had no English on it so I actually had to get online and do a little research before cooking it.  Anyway, it was delicious but I don’t think its necessary to make this dish great, so I put brown rice in the recipe below.

Spicy Miso Salmon and Citrus Rice Bowl

Ingredients

Spicy Miso Salmon

1/2 Tb. toasted sesame oil
1/4 cup brown sugar
2 Tb. soy sauce
2 Tb. white miso paste
1/2 Tb. Sriracha
1 clove garlic, minced
1 lb. salmon fillet(s)

Citrus Rice Bowl

4 oranges (I used Valencia)
A 1-inch piece of fresh ginger, peeled and thinly sliced
1 bay leaf
1 tsp. coriander seeds
1 Tb. rice vinegar
1 tsp. soy sauce
1 tsp. honey
1 tsp. toasted sesame oil
1 cup uncooked brown rice
1/2 cups sugar snap peas
1/4 cup fresh mint, chopped, for garnish
sliced green onions, green part only, for garnish

Instructions

Cook the rice according to the package directions.  I added a bit of chopped garlic and butter into 3 1/3 cups of water, brought it to a boil, and then simmered for about an hour.

In a small mixing bowl, make the Spicy Miso Salmon glaze: combine the oil, brown sugar, soy sauce, miso paste, Sriracha, and garlic.  Set aside.

Peel and separate 2 oranges into individual boats.  Now comes the hard part: you are supposed to detach and discard the membranes in order to get to the meat of the orange slice.  I experimented a lot during this step, and eventually found that I could cut down the back of each orange segment, pull it apart, and pull off the membrane from each side.  You could just skip this step entirely, but the orange slices won’t look as pretty, and you won’t get the same taste.  Regardless, put these orange segments in a bowl and set aside.

Remove the stems from the sugar snap peas, rinse, and chop into 1/2-inch pieces (I just chopped each pod in half).  Set aside.

Now juice the remaining 2 oranges into a small saucepan, and add the sliced ginger and bay leaf.  Crush the coriander seeds with the side of a knife and add them to the orange juice mixture, then bring to a boil.  Cook the mixture until it reduces to about 2/3 cup, about 6 minutes.  Take it off the heat and let it cool, then strain into a bowl to get rid of the ginger, bay leaf, and seeds.  Now whisk in the vinegar, soy sauce, honey, and oil.

Preheat the broiler to high. Lay the salmon fillet(s) across an aluminum foil-lined broiling pan (or any baking sheet with a rim).  Take out the glaze you made in step 2 and spread it generously on top of the salmon.  Broil the salmon 6 inches from the flame (or heat coil, as the case may be), until the fish flakes easily, about 10 minutes.  I spread more of the glaze on the fish after 5 minutes of broiling.

Dish the rice into bowls, and top with salmon, peas, and orange segments. Garnish with mint and green onion slices.  Reheat the orange sauce/mixture if it needs reheating, and drizzle it generously over everything.

Enjoy!

Kolacky Cookies

Kolacky Cookies

For Christmas, Jonah and I went to Salem (where his Grandma Patty lives) with his parents. It was my first real Christmas and Jonah’s family made it so wonderful. They pulled out all the stops, and even though we’re adults we still left cookies and milk for Santa and carrots for his reindeer. And it was all worth it because he left us a thank you note!

Anyway, the day before Christmas was full of baking: I made cookies (the chocolate peppermint cookies I made with Carmelle), Susan (Jonah’s mom) made pies, and she also made these wonderful cookies called Kolacky cookies. Pronounced ko-lach-key, these are Slovak cookies from Randy’s (Jonah’s dad) aunt. They’re yeast cookies, so they rise and get kind of flaky like bread, and are filled in the center with jam.

Kolacky Cookies

Ingredients

3 cups flour
2 sticks butter, room temperature
1/4 cup sugar
1 teaspoon salt
1 package active dry yeast
1/4 cup warm water
1 cup sour cream
1 egg
Jam (we used the homemade raspberry jam that Jonah and I had made Susan for Christmas)
Powdered sugar

Instructions

Mix butter with flour, sugar, and salt using a mixer (or pastry blender). In a small bowl, dissolve the yeast in the water. Add the yeast mixture, sour cream, and egg to the flour mixture, combine well. If the dough is too dry , add a little bit of milk. If it’s too wet, add a little bit of flour. Ball the dough up, wrap it in buttered or greased wax paper, and refrigerate for at least 3 hours or overnight.

After removing the dough from the fridge, roll it out on a floured surface until thin. Fold it in thirds and re-roll it. Then do that again (the “fold it in thirds and re-roll it” part). The last time you roll it out, you want to get it to be about 1/4-inch thick. Now cut it with cookie cutters into round/square/diamond shapes, just nothing too crazy. Imprint the cookies with your thumb and fill the imprint with about 1/2 – 1 teaspoon of jam. Now let them rise for 1 hour. (During this time you can preheat your oven to 375 degrees. Back them for 15 minutes. After removing from the oven, sprinkle with powdered sugar.

These cookies were a nice change from a lot of the goodies we’d been eating because they weren’t so sugary sweet. But I liked the touch of fruitiness from the jam and that the cookies were a little more scone or bread-like. And they were a big hit with the family, as you can see from the photo below.

Kolacky Cookies

Chocolate Peppermint Cookies + Happy Holidays!

Chocolate Peppermint Cookies

Chocolate Peppermint Cookies

Chocolate Peppermint Cookies

So many of our friends have left Portland to go home for the holidays. Luckily for us, one of our dear friends, Carmelle, was still in town during the earlier part of this week. And her boyfriend, Mac (one of Jonah’s bestest friends ever), was out of town, so we had her all to ourselves. Carmelle is a baker extraordinaire (I believe I’ve mentioned her a couple times before), and so I thought it’d be fun if she came over and we made something together for the blog.

This recipe for Chocolate Peppermint Cookies is hers, and I just want to warn you all that while I usually have pretty good self control when it comes to not eating sweets that are laying around are kitchen, these cookies have broken my good habits. They are amazing. So incredibly good. So be warned, if you’re not taking them to a party or giving them as Christmas gifts, you will eat them all yourself.

Chocolate Peppermint Cookies

Ingredients

3/4 cup butter, room temperature
1/4 cup white sugar
3/4 cup brown sugar
1 egg
1 1/4 tsp vanilla extract
2 tsp peppermint extract
1 3/4 – 2 cups flour
1/3 cup cocoa powder
1 tsp baking soda
1/4 tsp salt
1 – 2 cups chocolate chips

Instructions

Preheat your oven to 350 degrees. In an electric mixer, cream the butter and sugars together. Then mix in the egg and extracts. Meanwhile, in a separate bowl, combine flour, cocoa powder, baking soda, and salt, mixing well. In batches, add the dry ingredients to the wet ingredients in the mixer.

Now fold in the chocolate chips. Grease a cookie sheet, and place balls of the dough (about 1 1/2 – 2 Tbl in size) on the sheet. These guys spread a bit, so leave enough space between them.

Put them in the oven for 7-11 minutes. I think we ended up doing 9 minutes. You want them not to fall apart, but you still want them to be a little gooey and chewy. After removing them from the oven, let them cool a little bit on the pan and then transfer them to a cooling rack. I advise trying one while still pretty warm and the chocolate chips are all melted. Oh lordy, very very good.

And that’s it! These are, once again, great holiday time cookies. Enjoy with a big ol’ glass of milk. After we had eaten our fill of cookies, we lit the menorah that Jonah made for me and played cards. It was a lovely, relaxing evening. I hope you all have just as lovely holidays!

Chocolate Peppermint Cookies

Roasted Carrots

Roasted Carrots
Roasted Carrots

I love roasting vegetables. It makes them a wonderful texture, a little crispy on the edges, condenses the flavors, often makes them a little sweeter. Oh man, it’s just so good. One of my favorite veggies to roast is carrots. I love to toss them with a little olive oil, honey, and salt. It brings out the sweetness and makes them caramelize a little more.

Roasted Carrots

Ingredients

Carrots
Honey
Oil (preferably olive, but vegetable oil is fine)
Salt

Instructions

Preheat your oven to 375 degrees (or 400, depending on how quickly you want them to cook). Peel and cut your carrots into bite size pieces (see picture below to see about how big I cut mine). Toss them in oil, honey, and sprinkle with salt. Measurements of each kind of depend on how you want them to taste. You want them to be evenly covered in oil. If you think you might want them sweeter, do quite a bit of honey, or not if you don’t. I know it’s kind of vague, but I promise you’ll just be able to tell depending on how many carrots you’re cooking and what you want them to taste like.

How long you cook them for is another guessing game. Firstly, it depends on how crispy/burnt you want them. I like mine to be fairly dark at the edges, so I roast them for about an hour at 375. But sometimes more and sometimes less. Second, it depends on how many carrots you’re roasting. You don’t want them too crowded on the pan otherwise they’ll do more of a steaming kind of thing. Also, you want to toss them about halfway through your cook time.

So this posting was really more of a “carrots tossed in this stuff and roasted are good” than an exact recipe, but it’s worth it just for anyone to discover the joys of this dish. Experiment a little and find the right amounts, temperature, and cook time for you! I promise, it’s worth it.

Sea Salt and Thyme Chocolate Chunk Cookies

Sea Salt and Thyme Chocolate Chunk Cookies

Sea Salt and Thyme Chocolate Chunk Cookies

Sea Salt and Thyme Chocolate Chunk Cookies

Sea Salt and Thyme Chocolate Chunk Cookies

Last weekend when I was in Seattle for my dad’s birthday, he informed me that he had been wanting some cookies or something sweet around the house. My sister and I were a bit dumbfounded because my dad always hated having sweets around the house when we were younger. Of course I told him I’d take care of it. So I pulled up a recipe I had saved on my pinterest for sea salt and thyme chocolate chunk cookies. This recipe is adapted from Desserts for Breakfast, a blog I discovered about 2 weeks ago, and it looks so lovely, so I couldn’t wait to try something from it.

These cookies were so delicious. After baking, the thyme becomes really aromatic. I was a little worried you wouldn’t taste it, but you definitely do. It’s not too strong though, so don’t worry. And the salt and chocolate is a perfect combination. These are just a really lovely grown-up version of a chocolate chip cookie. Enjoy!

Sea Salt and Thyme Chocolate Chunk Cookies

Ingredients

1 1/2 cups unbleached bread flour
1 2/3 cups all purpose flour
3/4 tsp baking soda
1 tsp coarse salt
2 Tbl fresh thyme leaves
2 sticks butter, room temperature
1 cup dark brown sugar
2/3 cup white sugar
1 Tbl molasses
2 eggs
1 cup semisweet chocolate chunks, more or less if you like
1 cup dark chocolate chunks, more or less if you like
sea salt

Instructions

Preheat your oven to 350 degrees. Grease your cookie sheets. In a large bowl, combine the dry ingredients: bread flour, all purpose flour, baking soda, salt, and thyme. Set aside. In your mixer, cream the butter, then add brown sugar, white sugar, and molasses. Beat until the mixture is light and fluffy. Add the eggs, mixing well after each addition. Then, slowly add the dry ingredients (think a few batches). Combine well! Now fold in the chocolate chunks.

Now, form the cookies using about 2 Tbl of dough, rolling it into a ball, putting it on the pan, and pressing down slightly. These guys spread a bit, so make sure they aren’t too close together. Now sprinkle a little bit of sea salt on each cookie.

Pop them in the oven for 12 minutes or until the edges are just turning brown, rotating the pan halfway through. When you remove the pan from the oven, let the cookies cool on the pan for 2 minutes and then move them to a plate or cooling rack to cool completely.

Pie Crust + Apple Pie

Apple Pie

Apple Pie
Apple Pie

Apple Pie

Alright folks. It’s time. Time for what, you ask? Time for me to give to you all the recipe for my pie crust, for which this blog is named.

My father’s favorite kind of pie is strawberry-rhubarb. “Favorite kind of pie” is kind of an understatement. He LOVES anything strawberry-rhubarb, but pie especially. Many years ago, when I was in high school, he and I spent an entire summer finding the perfect strawberry-rhubarb pie recipe. We tried every recipe we could find, and eventually perfected our own recipes for both the crust and the filling.

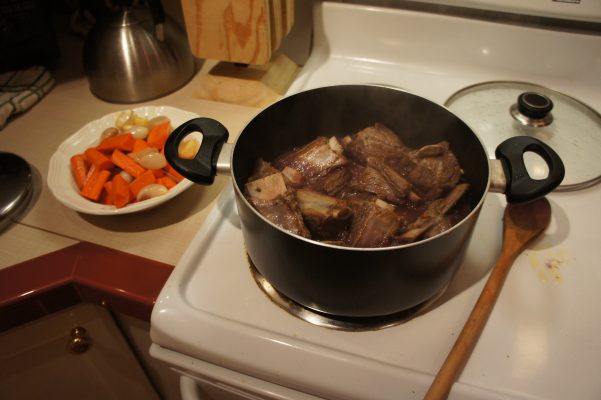
Last weekend, when Jonah and I had that dinner party (where we made the braised short ribs, the recipe for which you can find here), I made an apple pie for dessert. It seemed like the perfect thing to make, and I hadn’t made a pie in quite a while. Making a pie is, for me, one of the most therapeutic things in the world. Rolling out the dough, stirring up the filling, putting it all in a dish and waiting while the apartment fills with the smell… oh man. I just love it.

This post is dedicated to my friend Peri, who texted me today asking for my pie crust recipe because “they have no frozen pie shells in New Zealand.” First of all, I was disappointed to hear that Peri would ever rely on a frozen pie shell because they are simply horrible compared to a real homemade crust. But also, this recipe is my gift to her because she’s about to head off to New Zealand, where she has a Fulbright Scholarship to study the history of some fault lines (she’s a geologist). I wish her the best and I hope that now she can make delicious pies while she’s there!

Apple Pie

Makes 1 beautiful pie

Ingredients

Pie Dough

2 cups flour
1 teaspoon salt
1/2 cup (1 stick) butter, COLD, cut into chunks
1/2 cup vegetable shortening, ALSO COLD, and also cut into chunks
3-6 Tablespoons ice water

Apple Filling

12 apples (I used 9 granny smith, 3 braeburn because I really like them)
3/4 cup of sugar (plus more for sprinkling if you want)
Zest and juice of 1 lemon
1 1/2 teaspoons cinnamon
1/2 teaspoon nutmeg
1/8 teaspoon ground cloves
2 tablespoons cornstarch
2 tablespoons unsalted butter
1 egg, beaten (optional)

Instructions

Pie Dough

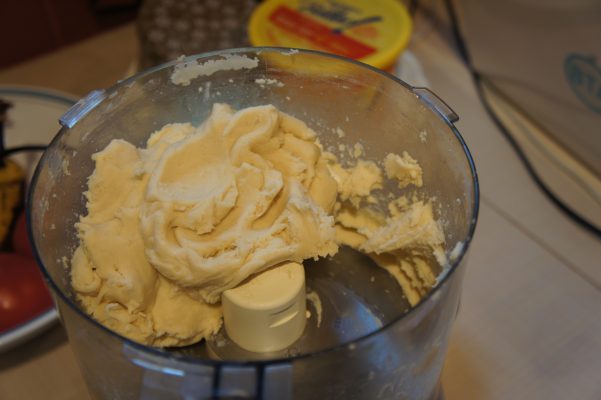
I always use a food processor for this, but I have done it without a food processor or a rolling pin. It is possible. Combine flour and salt in the food processor, pulse. Add butter, pulse again until mixture is slightly course. Add shortening (I like to use the stick form of crisco, it’s so easy to deal with), pulse. Now add water. I like to add the water a couple tablespoons at a time so that I don’t overdo it. You want to add as little as possible. Now, pulse again. When the dough is wet enough, it will come together in a large ball in your food processor. Dump this out onto a lightly floured surface, cut it in half, and form 2 discs. Wrap them in plastic wrap and put them in the fridge for at least 30 minutes. The dough can also be made and refrigerated or frozen for quite some time.

Apple Filling and Assembly

Preheat oven to 375 degrees. Peel, core, and thinly slice those apples (that’s right, all of them). In a large bowl, combine apples, sugar, lemon zest and juice, spices, and cornstarch. Toss well.

Now let’s talk about rolling out your pie dough. What I ALWAYS do is unwrap my discs and use the plastic wrap as a helper/barrier/thing. I lay the two pieces on top of each other so they’re kind of like a plus sign (perpendicular to each other…make sense?). I think sprinkle the plastic wrap generously with flour, plop my disc down, and roll that bad boy out. Be sure that your rolling pin and the surface of the dough are floured well too so that it doesn’t stick and then tear. The beauty of using the plastic wrap this way is that instead of rolling your dough on your rolling pin like many people advise (it never works for me because the dough is too fragile), you can just slip your hand under the plastic wrap, flip it into the dish, and then gently pull it off, leaving the dough perfectly laid in the pie dish. Hopefully all this makes sense.

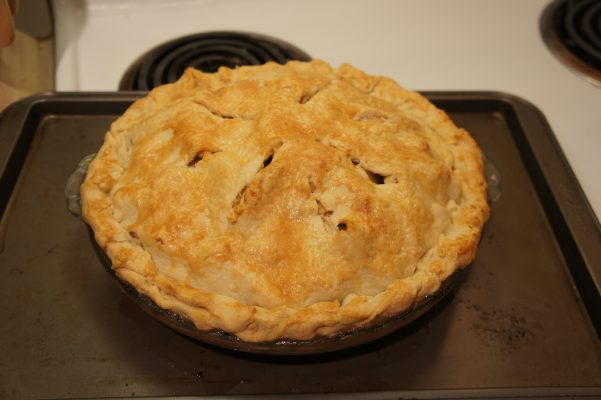
Now, spoon the apples into pie pan. Dot with butter, roll out your other disc of pie dough, and cover the pie. I trim the excess dough off the edges, and then pinch the two layers into a little edge around the pie. Be sure to cut several steam vents across top. If you want, you can brush the top with beaten egg, and sprinkle with additional sugar.

Now pop that sucker in the oven! I always like to put my pies on a cookie sheet when they bake, just incase some of the juices overflow. I hate it when things drip onto the bottom of the oven, and then it burns and gets smoky everytime you bake anything. So, yeah, it helps avoid that. Bake the pie for about an hour, or until the crust is golden brown and the juices are bubbling. I baked this pie for exactly an hour, and the apples still had a little bit of crunch to them, which I really enjoyed. Let the pie cool for a long time so that the filling can cool and congeal, I say at least 6 hours. Serve with vanilla ice cream (if you want, it also tastes really good plain OR with salted caramel ice cream if you can get your hands on some).

Sriracha Salt

Sriracha Salt

Today is my dad’s birthday! In honor of this, I will reveal to you all what I got him for his birthday.

He recently took a trip to New York and went to eat at David Chang’s Momofuku restaurant. He love love loved it, so my sister and I bought him the Momofuku cookbook. It looked beautiful, and I hope that the next time I’m there he and I get to cook something out of it.

Anyway, he and his girlfriend also really like 2 things: salt and spicy food. On my trip up to surprise him for his birthday, they informed me that they’ve been adding hot sauce to their already hot salsa. It’s a little pathetic. Anyway, I found this recipe for sriracha salt on pinterest (it’s actually from the new Sriracha cookbook though) and thought it would make a good little homemade gift.

It’s incredibly simple. You’ll need sriracha and, you guessed it, salt.

Sriracha Salt

Ingredients

5 tsp sriracha
1/2 cup table salt

Ingredients

In a bowl, combine sriracha and salt in a bowl and stir well. Spread the mixture out on a sheet of wax paper on a pan. Let it dry for 1-2 days. When it dries, it clumps up, so I broke it up everytime I noticed it getting hard and clumpy. Then I put it into a neat little jar!

I think it’d tasted good on raw vegetables, especially carrots, and also anything that you think needs a little spice and a little salt!

Braised Short Ribs

Braised Short Ribs

Braised Short Ribs
Braised Short Ribs

Braised Short Ribs

Last Friday Jonah and I were supposed to host a dinner party. We had already gone grocery shopping and planned the menu and everything when Jonah came down with the bug that the family upstairs had earlier in the week. It was not good. So we switched locations, I did all the cooking, and carted it all over to our friend Warren’s house. Jonah ended up feeling better and was able to come. Yay! I made braised short ribs with mashed potatoes and apple pie for dessert (post coming soon). This recipe is adapted from the Gourmet Today cookbook, which is wonderful. It’s really pretty easy.

This meal is so freaking good. The meat gets so tender, the sauce is so rich, the carrots soak up all the juices. Oh man. I whipped up some mashed potatoes to serve it with (peel potatoes, boil them, mash them, add some cream, butter, salt, and pepper and stir). The meal was greatly enjoyed by our friends Erica, Corey, and Warren as a little celebration of their having successfully completed a stressful semester.

Braised Short Ribs

Ingredients

1 bottle (750 ml) dry red wine
4 pounds beef short ribs, cut into 2 1/2 inch lengths by butcher
salt and pepper
2 Tbl olive oil
10 shallots, trimmed
4 large carrots, peeled and cut into 1 1/2 inch pieces (or whatever size pieces you like cooked carrots)
3 Tbl Dijon mustard
6 plum tomatoes, halved lengthwise

Instructions

In a saucepan, boil the wine, uncovered, until reduced to about 1 cup. Meanwhile, pat the ribs dry and season them with salt and pepper. Heat the oil in a large pot (5 quart) over medium-high heat. When oil is shimmering, add ribs in two batches, turning occasionally until browned on all sides (about 8 minutes per batch). Move the ribs to a large bowl, set aside.

Reduce heat to medium and add shallots and carrots to fat and oil remaining in the pot. Cook for about 5 minutes, stirring occasionally. Transfer to another bowl, leaving behind as much of the juices as possible. Now add the reduced wine and mustard to the pot and stir. Put the ribs in too, meat side down, cover tightly, and let simmer for 1 1/2 hours. (Now is a good time to make the mashed potatoes if you’re going to make some.)

After all that time waiting, gently stir the shallots, carrots, and tomatoes into the pot (I forgot to add our tomatoes, so that’s why you don’t see them in any pictures). Cover again and simmer until meat is very tender, about another hour.

Now, carefully transfer ribs and veggies to a platter. Skim fat off the cooking liquid. To use the liquid for sauce (which you’ll really want to do), it should coat a spoon (and supposedly measure ~1 cup). If you need, you can boil it to reduce it some more.

Plantains with Cinnamon

Plantains
Plantains

Let me tell you about Jonah’s and my living situation. We live in a family’s basement. Sounds awesome right? Let me tell you more. They refurnished half of their basement into this adorable studio apartment, which is actually pretty big for a studio. And instead of paying rent we work for the family: childcare (nannying 3 children is no easy task, I now feel for the nannies I had when I was younger), cooking, and cleaning. Thus far, it has actually been a really wonderful learning experience for us.

The family is gluten-free and Kosher, as well as having a few other dietary restrictions, so cooking for them can be a little complicated, but also has opened new doors for me. Early on in our time with them, one day the father of the family pulled out a tupperware of plantains he had quickly cooked in just oil and told me, “These are going to go bad soon. See if you can get the kids to eat them?” I told him I’d do my best.

Now, I’d never really encountered plantains before, at least not that I remembered, except for one time this past summer when a friend cooked them for us. I know from Jonah’s time in the Dominican Republic that they’re often fried and kind of bland, and I didn’t want that. So I sauteed them in a little butter and cinnamon, got them all caramelized and warm, and the kids ate them up like they were tootsie pops. They tasted so good! They have plantains at the New Seasons by our house, so sometimes I buy them and do the same thing I did for the kids. Delicious.

Plantains with Cinnamon

Ingredients

A plantain
Some butter
Some cinnamon

Instructions

Sounds difficult, right? Slice up the plantain. Melt some butter in a pan. Sprinkle cinnamon over the butter. Put in the plantains. Sprinkle the other side with cinnamon. Cook on both sides until browned and caramelized.

These are so incredibly easy to make, they taste delicious, and are pretty healthy! And I even got picky children to eat them. So you know they’re good.

A Loaf of Bread

bread
bread

bread

Remember a little while back (in the cheddar and sage biscuits post) when I said I had bought some yeast and wanted to use it to make some bread? So I finally did that. I was more than a little bit frightened, and while all did not go perfectly smoothly, it worked! Very cool!

I hunted online for a while for some beginner bread recipes. While I was tempted to jump in and start with crusty french loaves and sourdoughs and breads with all kinds of stuff in it (think garlic cloves, spices, onions, anything else you can dream of), I thought it best to start simply and try to figure this thing out. I found this recipe for just a basic white loaf which didn’t require me to go to the store and buy anything, so already I was a big fan.

I used my kitchenaid mixer because it makes life easier. But a lot of the recipes I read are like “it’s so easy you don’t even need a mixer!” Whatever.

Sandwich Bread

Makes 1 loaf

Ingredients

1 package of active dry yeast
1 1/2 tablespoons butter, melted
1/4 cup milk
5 teaspoons sugar
1 teaspoon salt
2 – 3 1/2 cups flour
cooking spray or other oil

Instructions

First, warm the bowl by filling it with hot water, then dumping it out. Then dissolve your yeast according to the directions on the packet. Stir until yeast is completely dissolved, with no lumps. I think this is where things started to get wonky for me. I think the recipe assumes your yeast packet will call for 1 cup of warm water, but mine only called for 1/4 cup.

Now add the butter, milk, sugar, and salt to the yeast and stir until it well blended (it will look like a slightly yellow-ish tan liquid). Now add 2 CUPS of flour. No more! Not yet! Mix this very well. If the mixture is still wet, add more flour 1/4 cup at a time, mixing well before adding anymore. Now the recipe I used called for at least 2 1/2 cups of flour, so I mixed in the 2 cups of flour, then pretty quickly added another 1/4 cup thinking it wouldn’t be a big deal. But a big deal it was, my friends. My dough immediately became too dry, crumbling into a million little pieces and it WOULD NOT come together. I was so frustrated! A couple other recipes I had read in my research had said “If your dough is too wet, add more flour. If it is too dry, add more milk/water.” So that’s what I did. I ended up adding probably almost another cup of milk/water. I think the important lesson here is that if you follow the instructions and it’s not perfect, it’s not the end of the world (which I thought it was). Just add a little of this, a little of that, it will all be ok.

Once the dough has come together, you can either let your machine knead it for ten minutes or, if you’re feeling adventurous dump the dough out onto a floured surface and knead it yourself. I did the latter because sometimes it feels better to know you’ve actually put in some physical effort. You know what I mean? There are many different kneading techniques. Some say you should punch the dough down, fold it up, then punch again. Some say you can squish it in your fingers and pull and twist it. I use the good old fashioned push away from you with the base of your palm and fold. Push and fold, push and fold.

I then rinsed out my mixing bowl, coated it in a little oil, put my ball of dough in it, covered it with a dishtowel, and let it rise for an hour in a warm place. Don’t clean up your floured surface, because you’ll need it again. The recipe says that after rising for an hour, your dough should double in size, but not to stress if it’s bigger or smaller than double. This was good news, because mine had not doubled. But it did rise, so we were still on the right track here. Now punch the dough down, and spread it out into a rectangular shape: one side the length of your bread pan, the other side 1 1/2 times the length of your bread pan.  Now roll that bad boy up, tucking the ends of the roll underneath (the bottom being where the seam is). Now drop it into the oiled bread pan.

Now you let it rise again, covered with a dishtowel. The recipe says an hour, but mine hadn’t really done much in that amount of time. Here’s where I thought things were going south again. After an hour of rising in the bread pan and not being where it needed to be, Jonah and I had to leave the house to go record his old a cappella group. I know, right? And then we went out to eat. So the dough sat in the pan rising away for a total of 5 1/2 or 6 hours. So I got home and I expected the bread to have exploded and that there’d be yeasty dough all over the apartment (why I suspected that, I have no idea). But no! It had risen the perfect amount!

At this point I’m starting to think that maybe I haven’t completely ruined this loaf of bread. I heated the oven to 400 degrees and baked that sucker for 30 minutes. Once you take it out of the oven, immediately remove the bread from the pan so it doesn’t continue cooking. The recipe says to let it cool all the way before eating. And check it out!

After it cooled and Jonah and I each ate a slice, I was so dang proud of myself. After thinking I had ruined it twice, it worked! And not only that, but our apartment smelled so incredibly delicious. Oh my goodness. This bread makes amazing toast, and tastes wonderful with just a little butter spread on it. And now that I’ve done it once, I feel ready to tackle the world of bread. Keep an eye out for more bread recipes coming soon!